
Don't forget a ramp to get it off the work table, not that I've ever made that mistake - just heard about it... /sWell it's been a while and not too much progress to share. Fiddled with a few odds and ends and realized the o-ring for the oil pump was not included in the gasket set. Checked my clutch springs and they were borderline spec. I put together another list of items that are still required and then ordered from DSS as he seemed to be the only one that had the o-ring.
While I'm waiting for the parts to arrive I decided once the engine is up from the basement it would be nice to not have to work on the ground. I can't justify buying a motorcycle lift and I have no place to store the lift in the winter as cars occupy the unheated garage. With scraps of wood I had laying around I built a platform that is about 7' long, 2' wide and 16" off the ground. When not in use I can stand it up on end and put it in the corner of the garage.
View attachment 35922
To assist with the trek from the basement to the garage I fabricated some "handles" to make it a bit easier. Piece of oak flooring for the front and 2x2" for the rear. Just need to to get the neighbour or my nephew to help lug it up the stairs.
View attachment 35923 View attachment 35924
-
Don't overlook our Welcome Package, it contains many links to important and helpful information about functions at VHT like posting pictures and sending PMs (private messages), as well as finding the parts you need.
AD
You are using an out of date browser. It may not display this or other websites correctly.
You should upgrade or use an alternative browser.
You should upgrade or use an alternative browser.
71ish CB450 build
- Thread starter boddy
- Start date
I remember that from your thread and thought it was a pretty good idea but the only pipe I had was a 4' piece from a bar clamp and I didn't really want to cut it down so I went with the handles front and back.I've slid a steel pipe through, across the head under the bridges in the head. You have to have the plugs out. Then one person on each end of the pipe and it's pretty manageable.
I have an 8 foot 2x10 that should work just fine as a ramp and the platform is not too high so no risk of losing control.Don't forget a ramp to get it off the work table, not that I've ever made that mistake - just heard about it... /s
You should taper and notch the end of it where it connects to the platform, and use a countersunk bolt or pin to hold it in place. Too many times I've had the front end of a ramp slip off a tailgate.I have an 8 foot 2x10 that should work just fine as a ramp and the platform is not too high so no risk of losing control.
I agree, I need to make sure the 2x10 is firmly attached. I might use some angle brackets or as you suggest some pins to anchor it.You should taper and notch the end of it where it connects to the platform, and use a countersunk bolt or pin to hold it in place. Too many times I've had the front end of a ramp slip off a tailgate.
I have an 8 foot 2x10 that should work just fine as a ramp and the platform is not too high so no risk of losing control.
Good deal. I learned mine the hard way.
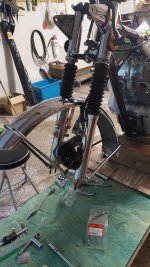
Other priorities have taken over lately, so I haven't had much bike time. I did manage to get my neighbours son to help me bring the engine from the basement to the garage. I took a dremel to the frame engine mounting location and removed the paint from the frame and the engine to ensure a good ground. I did the same on the rear engine mounts so that the battery ground wire would have good contact.
I then blocked the engine so it was level and did the frame over engine approach. I got one bolt in then I decided to then install the starter motor and route the cable before things got too tight. Took a bit of time but the cable is now in the right location. Starter motor is not bolted down yet as I need to locate the proper length bolts. The ones I used were too long and will be replaced.
I went to install the second engine mounting bolt and it only went in partially. I didn't want to hammer on the bolt , so I decided to stand the engine and frame up and see if i could wiggle the motor a bit and get the bolt and hole to align. I played around with it for a bit but it was getting late so I called it a day.


Covered the engine with some rags to prevent dust and dirt from getting in. May be a while before the next update as I have work to do inside and outside before the snow flies!
I then blocked the engine so it was level and did the frame over engine approach. I got one bolt in then I decided to then install the starter motor and route the cable before things got too tight. Took a bit of time but the cable is now in the right location. Starter motor is not bolted down yet as I need to locate the proper length bolts. The ones I used were too long and will be replaced.
I went to install the second engine mounting bolt and it only went in partially. I didn't want to hammer on the bolt , so I decided to stand the engine and frame up and see if i could wiggle the motor a bit and get the bolt and hole to align. I played around with it for a bit but it was getting late so I called it a day.
Covered the engine with some rags to prevent dust and dirt from getting in. May be a while before the next update as I have work to do inside and outside before the snow flies!
wentwest
Veteran Member
Then I played around with it for a bit but it was getting late so I called it a day.
Covered the engine with some rags to prevent dust and dirt from getting in. May be a while before the next update as I have work to do inside and outside before the snow flies!
Seems like you're making some progress. When I was putting the engine back into the frame I found that putting something under the engine so that it was completely off the floor made it easier to wiggle around the frame. That and using a skinny pick to get the holes lined up.
Thanks, that was my next step, to fashion a tapered rod to ease the alignment. I can also try laying the frame/engine back on it's side but raise the engine to give more room for the frame to move around.Seems like you're making some progress. When I was putting the engine back into the frame I found that putting something under the engine so that it was completely off the floor made it easier to wiggle around the frame. That and using a skinny pick to get the holes lined up.
wentwest
Veteran Member
Even a skinny Phillips screwdriver can help line things up.Thanks, that was my next step, to fashion a tapered rod to ease the alignment. I can also try laying the frame/engine back on it's side but raise the engine to give more room for the frame to move around.
That's another thing I like about my old Vessel #3 t-handle, I used it many times for just that.Even a skinny Phillips screwdriver can help line things up.
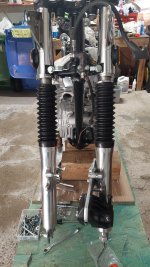
Made some progress today. I supported the engine a little better and that allowed the frame to be wiggled enough that the second engine mount bolt went in smoothly.
The rear engine mounts took a little more time as I had make sure of the sequence for the engine plates, battery box, toolbox etc. The big thing I was worried about was getting the ground cable and starter cables routed correctly. Any and all comments are welcome on the placement of the cables. Nothing is snugged down yet so I can reroute if necessary.

Top engine mounts went in without a hitch.

Front engine mounts went on okay, but there is a little issue with the starter cable. Should I just push the cable out of the way enough that i can put on the lock washer and nut, or is the cable in the wrong place and should be between the front mounting brackets?

The rear engine mounts took a little more time as I had make sure of the sequence for the engine plates, battery box, toolbox etc. The big thing I was worried about was getting the ground cable and starter cables routed correctly. Any and all comments are welcome on the placement of the cables. Nothing is snugged down yet so I can reroute if necessary.
Top engine mounts went in without a hitch.
Front engine mounts went on okay, but there is a little issue with the starter cable. Should I just push the cable out of the way enough that i can put on the lock washer and nut, or is the cable in the wrong place and should be between the front mounting brackets?
From the photos I've seen on the internet of "unmolested cb450's" I believe the cable should be a little more to the right as indicated in red in the pic below. I will make the adjustments next week when I'm back at the bike.

The other day I tried to find decent pics but got distracted by other needs here and didn't revisit. I believe you're right, the look of it near the motor mount bolts just didn't feel right. But, mine is starter delete so I don't have it to compare. You do have the cable running behind the starter motor between it and the crankcase, yes? Can't see it in the pics.From the photos I've seen on the internet of "unmolested cb450's" I believe the cable should be a little more to the right as indicated in red in the pic below. I will make the adjustments next week when I'm back at the bike.
RobMan
Veteran Member
You may have went back and looked at this already but the discussion about the starter cable made me think I had seen a thread about this and after looking I found this one "CB450 K6 K7 Correct Starter Cable routing that @Mr. Bill's Honda 450's" started. https://www.vintagehondatwins.com/f...50-k6-k7-correct-starter-cable-routing.10247/From the photos I've seen on the internet of "unmolested cb450's" I believe the cable should be a little more to the right as indicated in red in the pic below.
Both you and @ancientdad commented in it but I saw that @2wheel had posted pictures of the routing of the cable on his bike and it does show it in the location you marked in the picture. The only thing noted was the cable was not routed behind the starter nut in front. This made me realize I need to make up a new starter cable and get it place on my build so thanks for the reminder.
")
Thanks, it does make more sense being away from anything that can chaff the wire and cause it to ground. The cable is behind the starter motor.The other day I tried to find decent pics but got distracted by other needs here and didn't revisit. I believe you're right, the look of it near the motor mount bolts just didn't feel right. But, mine is starter delete so I don't have it to compare. You do have the cable running behind the starter motor between it and the crankcase, yes? Can't see it in the pics.
I did go back to that thread but wasn't 100% sure so just wanted to confirm before I snugged everything down, and glad my mistakes are enlightening for othersYou may have went back and looked at this already but the discussion about the starter cable made me think I had seen a thread about this and after looking I found this one "CB450 K6 K7 Correct Starter Cable routing that @Mr. Bill's Honda 450's" started. https://www.vintagehondatwins.com/f...50-k6-k7-correct-starter-cable-routing.10247/
Both you and @ancientdad commented in it but I saw that @2wheel had posted pictures of the routing of the cable on his bike and it does show it in the location you marked in the picture. The only thing noted was the cable was not routed behind the starter nut in front. This made me realize I need to make up a new starter cable and get it place on my build so thanks for the reminder.
Got a little time in the garage the last day or so and managed to advance a bit. I ended up loosening all of the engine brackets and removed one of the long engine hanger bolts in order to slip the starter cable over to the right and have it in the correct location.

I then snugged down all of the engine mounting brackets.

I mounted the rotor, starter chain and starter motor gear. The gear did not want to go on the splined shaft and I notice a few splines looked like they got banged a bit and needed dressing with a small file.

Got the alternator cover installed and used some Honda bond on the grommet where the wires come through the case. Got everything buttoned up on that side.

Decided to install the center stand and brake pedal since they go together. I used the penny trick to expand the spring and get it attached. Was only short by about 1/8" but was easily coaxed on with a screwdriver.

Moved on to the clutch side of things. Installed a new o-ring for the oil pump. Installed the clutch basket with a new circlip and then oiled the plates and installed them. New o-rings on the oil spinner and tightened the nut and put the cap on with the old circlip as it looked serviceable to me.


New gasket and then put the clutch cover on. I bought o-rings for the oil filter cap as well as new screws as the ones that were on there were not the oval head screws.

Everything buttoned up on the clutch side.

Next task will be the front forks, fender and wheel, then I'll move to the swing arm and rear wheel.
I then snugged down all of the engine mounting brackets.
I mounted the rotor, starter chain and starter motor gear. The gear did not want to go on the splined shaft and I notice a few splines looked like they got banged a bit and needed dressing with a small file.
Got the alternator cover installed and used some Honda bond on the grommet where the wires come through the case. Got everything buttoned up on that side.
Decided to install the center stand and brake pedal since they go together. I used the penny trick to expand the spring and get it attached. Was only short by about 1/8" but was easily coaxed on with a screwdriver.
Moved on to the clutch side of things. Installed a new o-ring for the oil pump. Installed the clutch basket with a new circlip and then oiled the plates and installed them. New o-rings on the oil spinner and tightened the nut and put the cap on with the old circlip as it looked serviceable to me.
New gasket and then put the clutch cover on. I bought o-rings for the oil filter cap as well as new screws as the ones that were on there were not the oval head screws.
Everything buttoned up on the clutch side.
Next task will be the front forks, fender and wheel, then I'll move to the swing arm and rear wheel.
RobMan
Veteran Member
Very Nice!
Thanks. I plated a few things but then decided to bring everything to a zinc plater near me. I cleaned up the nuts and bolts a bit and did some reshaping of the screw heads before sending stuff out to be plated. Here's a pic of what I got back. This stuff cost about $80 cdn to plate. They didn't lose a thing.Looking good! Did you re-plate all that hardware yourself?

Brad, everything looks great, and the replated hardware really adds to the exceptionally clean look. Very nice.
The bike is going to look fabulous, fresh, clean and shiny like new.
Good move, and I hope you finished that off with a little bit on the gasket where it contacts that old grommet as well. I did the same with mine and it's oil-tight.Got the alternator cover installed and used some Honda bond on the grommet where the wires come through the case. Got everything buttoned up on that side.
The bike is going to look fabulous, fresh, clean and shiny like new.
I did put Honda bond on the grommet as well as the gasket in that area. Hopefully it seals well as that grommet was rock hard.Good move, and I hope you finished that off with a little bit on the gasket where it contacts that old grommet as well. I did the same with mine and it's oil-tight.
The bike is going to look fabulous, fresh, clean and shiny like new.
The bike is not going to be concourse material as the mufflers and fenders are not up to those standards and the tank and side covers I am leaving with their original patina. These items I figured I could easily replace if I decided I wanted to spend the money to go that route.
I'm installing the swing arm and putting on the brake arm but noticed that the shouldered bolt seems a bit long. Maybe I have the wrong bolt?
As you can see from the pic, the shoulder part extends past the swing arm holder. Doesn't seem right that there should be that much play.

As you can see from the pic, the shoulder part extends past the swing arm holder. Doesn't seem right that there should be that much play.

Maybe I'll try to find a flat washer to fit over the shoulder. I did put just a split washer on, but when I tightened it the split washer rode over the shoulder and split apart.
fxray
Veteran Member
I think the idea is to add a 10 mm split ring lock washer, which would drop over the end of the larger diameter part of the bolt to fill the gap, followed by an 8 mm flat washer that abuts the end of the larger diameter part of the bolt, then an 8mm castle nut, and cotter pin on the threaded end of the special bolt. Item #31 in the diagram is Honda # 94111-10000, a 10 mm split ring lock washer.
You are not trying to crush the tabs together, the joint has to operate as a free pivot point. The spring washer is a loose filler piece to prevent the assembly from rattling around.

You are not trying to crush the tabs together, the joint has to operate as a free pivot point. The spring washer is a loose filler piece to prevent the assembly from rattling around.
Agreed, though that joint doesn't actually pivot like the full floating rear brakes on the DT-1 and RT-1 Yamahas back in the day, it does have to adjust the angle of the torque arm when the rear wheel is moved further back during chain adjustment. That shouldered bolt, and the one at the other end of the torque arm, both have to be allowed to change position slightly as the chain adjustment moves the rear wheel further back in the swingarm.
fxray
Veteran Member
^^^Yes, that is a better way to state it.
Thanks, I was working on the other end of the torque arm but fxray you are correct that it needs a 10mm split washer. I looked at the parts fiche and assumed it was an 8mm split washer. I put a 10mm split on the bolts on both ends of the torque arm and all is good there.I think the idea is to add a 10 mm split ring lock washer, which would drop over the end of the larger diameter part of the bolt to fill the gap, followed by an 8 mm flat washer that abuts the end of the larger diameter part of the bolt, then an 8mm castle nut, and cotter pin on the threaded end of the special bolt. Item #31 in the diagram is Honda # 94111-10000, a 10 mm split ring lock washer.
You are not trying to crush the tabs together, the joint has to operate as a free pivot point. The spring washer is a loose filler piece to prevent the assembly from rattling around.
Continuing on, I mounted the shocks which needed some shims as the eye was narrower than the Honda shocks. I made a couple of washers from some 1/8" aluminum stock that I had. Also found some rubber washers to take up any slack.


Went to put on the chain guard and realized that the center bolt is almost impossible to get in. I had to remove the shock lower bolts and drop the swing arm in order to get the bolt in, even then there was not much room.

I got the fender and flashers mounted but was missing one of the big flange bolts that hold the flasher and fender on. Inspecting the fender, I found that the nut welded on the inside was missing which makes me think the previous owner just used an ordinary bolt and a nut on the inside of the fender. I ended up doing the same until I can locate one of those bolts that won't require selling a kidney.

Went to put on the chain guard and realized that the center bolt is almost impossible to get in. I had to remove the shock lower bolts and drop the swing arm in order to get the bolt in, even then there was not much room.
I got the fender and flashers mounted but was missing one of the big flange bolts that hold the flasher and fender on. Inspecting the fender, I found that the nut welded on the inside was missing which makes me think the previous owner just used an ordinary bolt and a nut on the inside of the fender. I ended up doing the same until I can locate one of those bolts that won't require selling a kidney.
Next was the rear wheel. Went in easy enough but a new problem arose with the rear brakes. When the brake lever is aligned with the dot on the cam it seems to be too far forward and takes up all of the threads on the adjusting rod. I can shift the lever backwards but wondering if I have an incorrect lever - it's a little beat up so maybe it got bent at some point in its life. I know for sure the cam is laying flat between the brake shoes as I took the rear wheel off to inspect.
Open to suggestions

Open to suggestions
fxray
Veteran Member
boddy, if I am understanding you correctly, the other end of the torque arm would attach to the rear brake plate. Back there, Honda called out a rubber washer to fill the void. So, item #10 would be a 43434-286-000 rubber washer that would fit onto the large diameter of the special bolt, capped by an 8 mm flat washer, nut, and pin. Click HEREThanks, I was working on the other end of the torque arm but fxray you are correct that it needs a 10mm split washer. I looked at the parts fiche and assumed it was an 8mm split washer. I put a 10mm split on the bolts on both ends of the torque arm and all is good there.

In regard to your brake lever, I don't have a CB500, but I have a CL350K3, an SL350K0, and a CB450K3, and all have brake levers that are as straight as an arrow. I think yours has been customized at some point in its life with that bend added. The additional hammer marks on the side of the lever add credence to that idea.
Where the torque arm connects to the brake drum a split washer is used for the CB450K4 to fill the gap. It's the same for the other end of the torque arm where it connects to the swing arm.boddy, if I am understanding you correctly, the other end of the torque arm would attach to the rear brake plate. Back there, Honda called out a rubber washer to fill the void. So, item #10 would be a 43434-286-000 rubber washer that would fit onto the large diameter of the special bolt, capped by an 8 mm flat washer, nut, and pin. Click HERE
In regard to your brake lever, I don't have a CB500, but I have a CL350K3, an SL350K0, and a CB450K3, and all have brake levers that are as straight as an arrow. I think yours has been customized at some point in its life with that bend added. The additional hammer marks on the side of the lever add credence to that idea.

That was my problem, I was using an 8mm washer until you pointed out it was supposed to be a 10mm that fits over the larger diameter of the bolt.
I will search for some example of the rear brake lever, maybe time to buy a new one!
His brake arm looks like the correct one (the 350 uses a stamped steel version) but you are correct that it looks to have been "modified" by what could have been a rear wheel lock-up due to loose torque arm bolt(s) or worse, way too worn shoes causing a violent lock-up when the cam on the shaft went completely vertical between the shoes. Either way, you can see the top of the arm where it clamps to the splined shaft is also distorted, likely due to having to force the arm off the shaft because of one of those destructive possibilities.In regard to your brake lever, I don't have a CB500, but I have a CL350K3, an SL350K0, and a CB450K3, and all have brake levers that are as straight as an arrow. I think yours has been customized at some point in its life with that bend added. The additional hammer marks on the side of the lever add credence to that idea.
fxray
Veteran Member
I see. The image I posted was for a CB500T, but you are only using the swingarm from the CB500T and you have the CB450 brake plate.Where the torque arm connects to the brake drum a split washer is used for the CB450K4 to fill the gap. It's the same for the other end of the torque arm where it connects to the swing arm.
View attachment 37485
That was my problem, I was using an 8mm washer until you pointed out it was supposed to be a 10mm that fits over the larger diameter of the bolt.
I will search for some example of the rear brake lever, maybe time to buy a new one!
Your bike is really looking great, and you are making progress quickly.
I just went to my garage to check mine, and it is as I remembered - no curve to it at all, it's a completely straight arm (forward to backward, obviously not the side offset which is correct). If you are using it, I believe the CB500T swingarm is close to 2" longer than the 450? Can't recall, but I seem to remember that it is a similar extended length to using the CB360 swingarm. If true, your brake rod should actually seem to be a bit shorter than having excess length, which confirms the forward curve in your brake arm as pictured above.I will search for some example of the rear brake lever, maybe time to buy a new one!
That was me with the 500T swingarm on my 450. @boddy appears to have the proper K3/4 one.I see. The image I posted was for a CB500T, but you are only using the swingarm from the CB500T and you have the CB450 brake plate.
Your bike is really looking great, and you are making progress quickly.
And yeah - it’s quite a bit longer I had to get a 100 link chain to cut down.
Ah, I wasn't sure.That was me with the 500T swingarm on my 450. @boddy appears to have the proper K3/4 one.
AD I think you are right about a catastrophic lock up. Looking closely at the splined shaft it does look like it was twisted near the base. I never noticed when I took it apart. The rear brake was working when I rode it but likely only because the arm was rotated on the spline so it would work. I will look for a good used arm and brake cam.His brake arm looks like the correct one (the 350 uses a stamped steel version) but you are correct that it looks to have been "modified" by what could have been a rear wheel lock-up due to loose torque arm bolt(s) or worse, way too worn shoes causing a violent lock-up when the cam on the shaft went completely vertical between the shoes. Either way, you can see the top of the arm where it clamps to the splined shaft is also distorted, likely due to having to force the arm off the shaft because of one of those destructive possibilities.
Edit: the swingarm is original for the K4 as far as I know but I do see some things on this bike that are not!
Thanks all for your replies.

AD I think you are right about a catastrophic lock up. Looking closely at the splined shaft it does look like it was twisted near the base. I never noticed when I took it apart. The rear brake was working when I rode it but likely only because the arm was rotated on the spline so it would work. I will look for a good used arm and brake cam.
Edit: the swingarm is original for the K4 as far as I know but I do see some things on this bike that are not!
Thanks all for your replies.
View attachment 37494
If you want them. The original pile of parts that turned into my 450 had 3. Need to be cleaned but the splines are sharp.


Thanks EzPete. I will PM you for details. Much appreciated.If you want them. The original pile of parts that turned into my 450 had 3. Need to be cleaned but the splines are sharp.
View attachment 37501View attachment 37502View attachment 37503
Thanks to @EzPete I have a brake arm and splined brake cam on the way. In the meantime I moved to the front end and installed the front forks.

Next was the top bridge and I had to spring for a new cap nut and washer since it's in such a prominent place. I also made sure I had the D washers in place before tightening up the clamps.

Next was the caliper

Then the front fender

Had a bit of a problem fitting the front wheel as the brake pad was sticking out too far on the piston side. Took it apart to discover that the pad moved out which allowed part #16 to fall out of the piston and prevent the brake pad from seating.

Once that was fixed the wheel sort of went on except the speedo drive was not fully engaged in the wheel preventing the axle from seating properly in the forks. Once that was sorted I got the wheel on and the caps positioned such that the gap is at the rear. It's almost a roller, just need brakes front and rear

Next was the top bridge and I had to spring for a new cap nut and washer since it's in such a prominent place. I also made sure I had the D washers in place before tightening up the clamps.
Next was the caliper
Then the front fender
Had a bit of a problem fitting the front wheel as the brake pad was sticking out too far on the piston side. Took it apart to discover that the pad moved out which allowed part #16 to fall out of the piston and prevent the brake pad from seating.
Once that was fixed the wheel sort of went on except the speedo drive was not fully engaged in the wheel preventing the axle from seating properly in the forks. Once that was sorted I got the wheel on and the caps positioned such that the gap is at the rear. It's almost a roller, just need brakes front and rear
Attachments
RobMan
Veteran Member
My friend she already looks beautiful.
Yes, the progress is excellent, everything that you've touched is vastly improved to near original if not brand new. Beautiful job.
I just noticed you have a lead acid battery in it, I'm a little surprised you didn't spring for an AGM.
Thanks. It does still have many flaws but I'm happy with the progress.Yes, the progress is excellent, everything that you've touched is vastly improved to near original if not brand new. Beautiful job.
Haha, this was an old dead battery that I put in just to be able to connect the cables and make sure the routing was correct. I do have an AGM waiting to be installed.I just noticed you have a lead acid battery in it, I'm a little surprised you didn't spring for an AGM.

I neglected to concur with the top bridge nut and washer replacement, it is a very noticeable item and I did the same thing. It's bad enough that the fork caps get a bit rusted and they're ridiculously expensive to replace, mine are also a little boogered up from monkey paws on them previously. and it was before I bought a gallon of Evaporust or I'd have cleaned them up better than a quick wire wheel job.Thanks. It does still have many flaws but I'm happy with the progress.
Got a few more things done today. Installed the front flashers and foot pegs (still have to put on the new rubber). Got the 4into1 coils and condenser and installed them. Also got new rubber and spacers for the ignition switch holder as the old ones were toast.


I trimmed about 1.5 inches from the coil wires and installed new 5 ohm resistance plug caps. Should I shorten the wires even more?

Bought a 100 link chain and a new front sprocket. I removed 4 links and put the chain on as well as the sprocket cover.


Next will be the wire harness. Still need to tackle the head light case and clear coat it. Carbs and stock air filters are on deck.
I trimmed about 1.5 inches from the coil wires and installed new 5 ohm resistance plug caps. Should I shorten the wires even more?
Bought a 100 link chain and a new front sprocket. I removed 4 links and put the chain on as well as the sprocket cover.
Next will be the wire harness. Still need to tackle the head light case and clear coat it. Carbs and stock air filters are on deck.