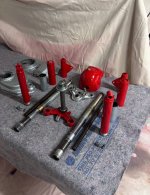
The seals on this bike are definitely original and man what a load of black sludge in there. It didn't stink like it does sometimes, yet it took a lot of brake clean and kerosene to get the one cleaned internally. The fork tube is shot with a bunch of nasty corrosion pitting just below where the seal sits. I am trying to use Tech Steel to fill and smooth the area to an acceptable finish. I have done small spots on other forks in the past and it worked. This is a pretty large area X 2 spots so who knows.I’m expecting a crap ton of Cameron goodness holding them together right now. Probably get everything soaking in some penetrant, given the likelihood these seals have been baking once for 60 years.
I can't see buying another fork tube or maybe 2 tubes, once I get the other one apart.