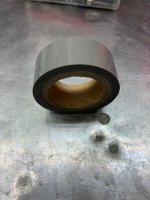
This is the VHT paint that was cured in the oven then clear coated with SprayMax 2K satin. The cylinder and head were bead blasted with no coatings on them.

Brad, your kickstart lever needs that plastic cap to finish off the look!This is the VHT paint that was cured in the oven then clear coated with SprayMax 2K satin. The cylinder and head were bead blasted with no coatings on them.
An anonymous donor provided one...Brad, your kickstart lever needs that plastic cap to finish off the look!

Thank you EzPete. I'm just about ready to waive the white flag.Yeah. Getting a match is likely a futile exercise. I’d probably tackle that as a winter project and just pull the covers, sand them, prime, paint and cure. A blended approach will still show. That caliper paint is pretty thick when it goes on, I don’t know if that could be feathered very well.

I know! His prices are so good and he’ll have the most random hard to find stuff but it’s a true needle in a haystack thing. Crazy thing is even with shipping the gas tank gasket is cheaper than NPN or anyone else.That is looking pretty. I know what you mean about the shipping and trying to order as much as you can from one vendor to get the most bang for the buck. I wish Northeast Vintage Cycle had a search by model feature that would show all the parts that are available instead of searching one part number at a time and then you have to double check the part number that comes up to make sure it was what you typed in.
I’ve never owned a red vehicle of any sort. It stands out!That's a lot of my favorite color, nice.
At least this one will have a license plate bracket so I won’t have to worry about that kind of stop!Progressing well, love the color. You're going to get stopped all the time when you drive that one around town.


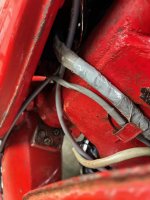
Before to committing to sticky wiring tape, I recommend this British Wiring Tape. It's not tape per se but wrapping that looks really close to original Honda wrap. Two pics. One is the remainder of my roll on my bench, and another as it looks on my wiring harness on my 62. With this tape you only need to sticky tape the ends and with a wisp of heat shrinks a bit. It's removable and can be used again and again. The 62 wiring harness pic shows a separate wiring harness for my turn signals.once I locate some silver electrical tape to wrap the harness back up.

I’ve got some stuff real similar to that on the way. It does have a bit of adhesion, but really only to itself after you heat it. I’ve used it in black a lot and never knew thy had a grey color. Between that and some Grey shrink tubing Bezos is dropping off to skin the rear brake cable and replace the really hard stuff that was in the headlight bucket I should be able to get away with the illusion of stock. I did save the harness tag to rewrqp in there.Before to committing to sticky wiring tape, I recommend this British Wiring Tape. It's not tape per se but wrapping that looks really close to original Honda wrap. Two pics. One is the remainder of my roll on my bench, and another as it looks on my wiring harness on my 62. With this tape you only need to sticky tape the ends and with a wisp of heat shrinks a bit. It's removable and can be used again and again. The 62 wiring harness pic shows a separate wiring harness for my turn signals.
Harness Tape, 3/4'' Wide - Grey
BritshWiring is your complete source for wiring harnesses, components and accessories for your classic car restoration project.www.britishwiring.com
I made my first wiring harness (for a CT90) earlier in the year and also used non-adhesive grey tape, but I just tied a knot in the ends, rather than sticking them down.Before to committing to sticky wiring tape, I recommend this British Wiring Tape. It's not tape per se but wrapping that looks really close to original Honda wrap. Two pics. One is the remainder of my roll on my bench, and another as it looks on my wiring harness on my 62.


It just dawned on me what you were referring to in this post. There’s a knock pin missing on the parts fiche that’s located right next to that oil passageway that locks the bushing end in place.Pete,
Are you planning to strip the engine down completely? I have a question on the upper case crankshaft locator pins and the oil feeds. BB an I have possibly answered the question, as I needed to repair a damaged pin on the roller bearing side of the crankshaft.
If you get the cases down to that point let me know and then I can confirm the oil feed passages.

Primarily Hondapartsnow.com, using the automotive part number (actually the same part number for almost all of them) they ship slow, but most of the fasteners can be found for less than $1 - knock pins in particular are way cheaper on the auto side. For the one M6x38 screw I just shortened a 40mmPete engine looks great!! Hoping mine will come together and look that good over the next month. By the way where did you source the case and side cover scews and fasteners? Honda? Partszilla? Or other?
I figured 60’s bikes kind of have to stick with screws, despite my general dislike for them - the Allen screws just looked weird.Engine looks really good, and the JIS screws really make it look nice IMO.
Engine looks great and I agree, these bikes look better with the JIS screws.I figured 60’s bikes kind of have to stick with screws


Oh man. The bike was partially disassembled and/or had wrong hardware all over so I’ve been piecing it together off the parts fiche and photos… the number of things I’ve done out of order.Looking good and yes it does feel good to get it pieced together if just for a glimpse of where your going. At least with longer bolts you can run a nut on and then cut them off to the correct length but wait until you are 100% sure there is nothing else that has to mount there on another page of the parts manual. I hate a double damn!
I just hate cutting off bolts to length because then the plating is gone and the end of the bolt will eventually rust, even dabbing clear coat on it won't stop it fully.At least with longer bolts you can run a nut on and then cut them off to the correct length but wait until you are 100% sure there is nothing else that has to mount there on another page of the parts manual. I hate a double damn!
Yeah. The bullets were pretty corroded and one was hanging by thoughts and prayers. Since I knew I’d be reworking the harness a bit to tie the white/yellow together out of the stator into the rec/reg I went to a plug.Pete,
Did you change over the stator wiring to a 3 pin plug? Those mounting threaded rods on the tool box need to be longer. If your side covers have a mounting tab that aligns with the lower threaded rod for attachment of the cover lower to the frame
I do have my mini plating rig. Works pretty decent on little hardware like this. Since this one is hidden behind the beside cover I think I’ll probably just mail it in. There’s enough other flaws to distract.I just hate cutting off bolts to length because then the plating is gone and the end of the bolt will eventually rust, even dabbing clear coat on it won't stop it fully.
Never a truer statement was never made on any of these 60's bikes. The amount of research is commensurate with the decades passed since the bike was built. Pete is right with the mistaken size quotes on hardware hex bolts and JIS screws in the CB160 parts manual. It is quite high for a Honda publication.I probably have spent as much time researching parts as I have turning a wrench if not more.
lol. That’s the brown cardboard box behind the bike on the table. It’s like a hardware fishing hole.I work on a lot of bikes and have a box full of parts that didn't fit but aren't worth the cost of shipping to return.
Yeah I realized recently that the parts catalog has the stator cover screws mixed up with the oil filter cover screws on the opposite side...All new case/cover screws (discovered here that the stator cover screws have the wrong sizes listed, should be a 40mm)
Just a reminder that the bottom tabs of the stock air filters mount onto that upper bolt, that's why it's longer.It’s more the upper bolt that annoys me. I get the lower one because of the mounting tabs for both the side cover and air cleaner It may have been a Friday afternoon decision by Honda ages ago. It actually needs a 65.
Yeah. It’ll depend a lot on era/version. Gaskets were another one. In fact, having to cut a custom one for the points cover because both the one from the NOS set and the standalone didn’t fit.I just ordered all new engine side cover screw hardware for my CL160 D along with cap nuts and seal washers for the head from my local Honda shop! I hope I get the correct fasteners !! The guy that always helps me has worked there since he was in high school. He is now 71!! He is a wealth of info and mechanical knowledge. He has just finished a redo on a very early s90 for himself. He told me today that engine gaskets and engine hardware gave him fits!! He confirmed there were lots of changes as models progressed from early s90s to later model s90’s. Certainly can add to confusion.
ill have to get both in there at the same time - I checked with one and it seemed long still. Although I have noticed on this bike that a lot of bolt/nut mount sides aren’t very flush like the newer bikes tended to be.Yeah I realized recently that the parts catalog has the stator cover screws mixed up with the oil filter cover screws on the opposite side...
Just a reminder that the bottom tabs of the stock air filters mount onto that upper bolt, that's why it's longer.