Cycleranger
Veteran Member
Split cotters are hateful things. I like the hitch pins better.
Teeny tiny hitch pins would be cool but for this application I think a stainless cotter pin is ok.
Split cotters are hateful things. I like the hitch pins better.
Tomorrow I might get the tapered steering bearings installed.
I'd appreciate pictures of the tapered steering bearing assembly if you think of it. I should be following you on that task in the next two weeks (I hope).
Sure, no problem. I've got to do some research beforehand and make sure I get the right spacers in the right place on the stem 'cause once that lower bearing goes on you're committed.
I've never replaced a steering bearing before, so this will be a huge help.
Progress has been slow due to the ongoing perpetual heat wave but I have gotten a few things done.
Today I got the front brake plate back together with new seals and such then I got the new tires mounted.
Putting on the new tires was a heck of a lot easier than removing the 40+ year old ones.
If you change your own tires and don't have a Motion Pro Bead Buddy get one, it's worth it.
It really helps by providing a third hand when installing a tire.
I do have a problem with the rear brake plate. One the cotter pins was corroded and broke.
I should have been more careful with it.
I'm going to have to get a 2mm pin punch and see if can get it out. I don't want to try to drill it...yet.
And this is the first time I've gotten new parts from Honda that had Thai on the labels!
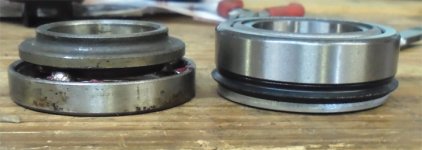
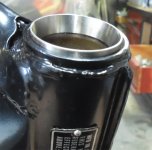
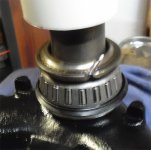
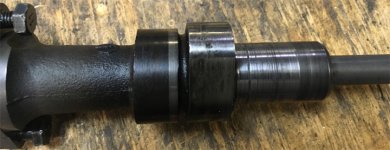
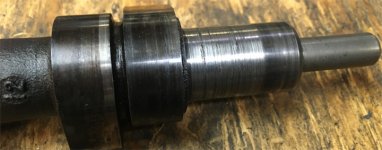
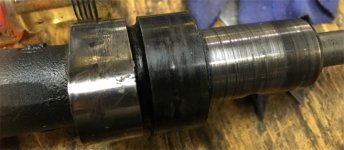
I installed the steering bearings today.
All Balls has improved their kit somewhat since last time I used one several years ago. They include some basic instructions and an additional washer. (Maybe they've been there a while, it's been about six years since I last used one of their kits.)
I wasn't careful enough driving out the lower race so I had to clean that up.
Then I compared the lower bearing stacks to make sure they were close (within ~1mm).
The thinner washer that the instructions recommended was correct. I used the old race and a piece of PVC pipe to drive on the lower bearing. It goes on pretty easy.
The upper race protrudes a bit, this is normal. I like that the kit includes a washer for the top cover.
I'm glad to know you received a 'complete' All Balls tapered steering bearing kit;do you think the quality of All Balls tapered roller bearings and races are good enough to keep them from wearing out?
I have a set in my daily driver Honda now for 8 years; I needed to use Loctite green/bearing mount on the lower race where it goes into the frame because it was a somewhat loose fit in the frame. The Loctite green is SOLID stuff ! and I'm hoping they won't wear out anytime soon. I'm using very good quality grease(Honda Molykote 60),the type you use on GoldWing drive splines and rear wheel splines:real thick paste. Hoping the steel is hard enough to last.
I've used their kits in all my bikes and fortunately never had any fitment issues.
However, I have noticed that not every frame Honda made was perfect.
As far as longevity I think their bearings are perfectly fine and probably over kill for this use.
Unless you're pounding the front end every day like a dirt bike I think these bearings, properly maintained, will last for as long as they need to.
Ok thanks, have you had a set of All Balls bearings on one of your bikes for over 10 years of service yet ?
There used to be other brands of tapered steering bearings which were Made in USA or Made in Japan,back in the day; but lately All Balls Made in China is the only brand I can find..
Yes, I installed the tapered steering bearings in my CB750K5 in 2009 and I've put a lot of miles on that bike since then.
I installed the steering bearings today.
All Balls has improved their kit somewhat since last time I used one several years ago. They include some basic instructions and an additional washer.
FWIW: With a drill press that is an easy drill out repair along with some small cobalt bits and oil lube. Slow speed on the drill press and it is out immediately. A small cobalt bit will bite without a punch mark and go right through.
Yeah, I finally broke it trying to punch out the pin. Oh well. Fortunately replacement plates are plentiful and relatively inexpensive on ebay so that's taken care of.
And speaking of broken things, boy the battery box on this bike sure is flimsy. Mine was cracked in a couple of places with a piece missing.
i got a replacement that looked good in the photos but it too has a brazed repair and some rust, but I can work with it.
It's a pita to strip the paint since someone repainted it after the repair. sigh.
I've kept a gallon of used brake fluid for a soaker paint removal bath, might depend on what paint was on it.
If the box is too far gone I can look here for an extra, probably have one.
Yeah, very little sludge that I can see so far. At least the oil got changed.I almost expect the screws and RTV on these old motors but the relatively clean filter is a bonus. I hope mine will look that good.
Yeah, very little sludge that I can see so far. At least the oil got changed.
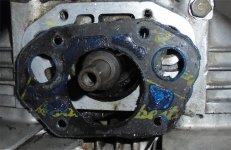
I looks to me like someone had it apart and just reused the gaskets..

Yeah, this one cost considerably more when I bought it seven or eight years ago.HF just had those on sale last weekend for $19.99
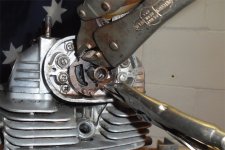
The goal today was to remove the stuck advance.
Which, after an hour or so, some heat, some vise grips, and lots of wiggling, I accomplished.
It fought the whole way off. Weirdly though there was no rust.
It was just glued on with old grease, even after liberal application of heat.
I was looking at the chain guard and I think it's going to have to soak for a week in solvent to remove the petrified coating of muddy chain lube. (Or maybe I can heat it up and scrape it off, like tar.)
Then, disaster struck! My big shop fan died. It was running fine then just quit.
I looked it over and I can smell something burned. It still spins freely so maybe there's hope.
Its function is essential to continued progress and I don't want to have to buy another.
So I'll look at that tomorrow.
Looks like the rtv is oozing out from under the rocker box, too. Fun. At least there is good news about your fan. My project will soon be graduating from the basement to the garage and I'll have to worry more about the heat from that point forward.
Glad to hear you can get your fan running again;going up to 105 here today..
It's been 100°+ every day here for the last month, really since June. I'm pretty sick of it.
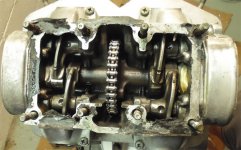
How about the cam and rockers? Did I miss those?
. . . The little shims ("rubbers") were missing from the cam chain roller and the roller is completely shot so the chain had a lot of side to side flop.
Maybe the RTV mechanic left out the shims when it was reassembled.
I guess I will never know 'cause I'm not going there.They likely got jostled out of place during assembly. You will probably find them stuck in the goo under the windage tray after you split the cases.
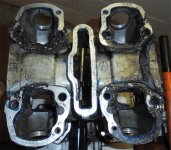
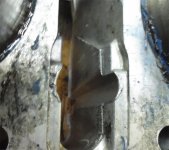
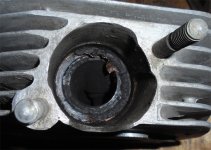
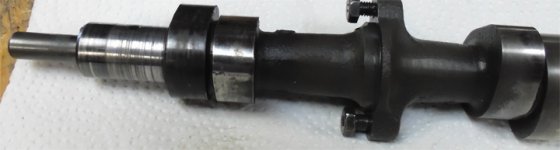
Cam looks normal, for one that lost oil pressure. The galling is pretty bad and may mean scrapping it as well as the cam bearing. The blackened cam lobes are another sign of low oil pressure/starvation.
Need to measure the bearing cap and that end to see how bad it really is. Cam can be reground by Oregon Camshaft and the rockers can be repaired at Rockers Unlimited.
Yes I think the photos make it look worse.But any amount of galling isn't good..It may not be as bad as I think. I've learned to add more damage to pictures of parts than what's seen over the years. The real truth will be measurements.
While not ideal some grooving on that surface will be ok since it oil pressure fed.
They likely got jostled out of place during assembly. You will probably find them stuck in the goo under the windage tray after you split the cases.
I guess I will never know 'cause I'm not going there.
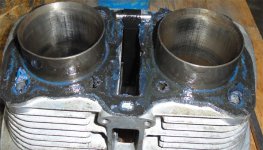
Do you mean that you are not planning to split the cases? Does that imply that you are going to reuse that old cam chain that was slung side to side enough to cut big grooves in the tunnel? Maybe I am misunderstanding what you meant, but I sure would replace the chain if I were you.
No I wasn't planning on splitting the cases. Replacing/repairing the cam wasn't part of the plan either..
But here we are.
So I measured the buggered end of the cam and the bearing block. Both are out of spec.
The other end is fine.
Fixing the cam will pretty much blow the budget for this bike.
I will have to think about what's next.


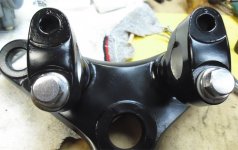
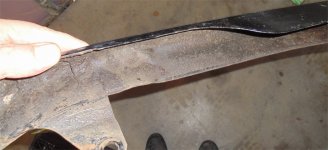
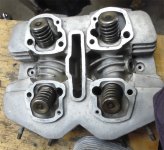
All the rockers need repair, 3 are not good and the 4th is about to be bad.Tried to get some decent pix of the rockers.
Tell me the bad news.
I'm thinking maybe only one of the three is any good.
The right exhaust has a nice groove in the face.
It's good news I guess that the pins and rockers still measure in spec so I guess the rockers could be refaced.
Hmmm, "attach file" doesn't seem to be working right to post a picture. "Insert Image" seems to work.
View attachment 24213View attachment 24214View attachment 24216View attachment 24217View attachment 24215