1979 CB400TI - Western Colorado

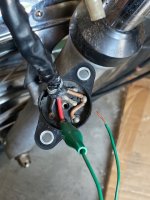
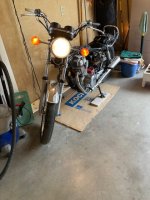
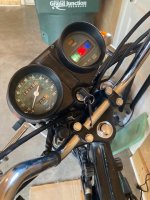
Back to the project over the past couple of days. Installed the tail light assembly, surprised to figure out that the light is a compression fitting; seems a bit shaky to me, but for now it's good. Also put the headlight in place, all with the idea of installing the battery and hopefully seeing the lights come on when I turned the key. No such luck. Went back into the headlight bucket and checked the ignition switch connection. Since everything plugs in, it all looked good. Went to the electrical posts on the forum which caused me to take a look at the fuse box. It looks okay, and the fuses are the ones that have been living in this bike since forever; however they all look good. I pulled the battery and checked the light bulbs and headlight. They all work. I did not remove the ignition switch; it could be the problem, but I wonder if there are other things I am overlooking. Thanks for checking out my post.
 
If your bike doesn't have an on-off section of the headlight switch (just high/low beam) then it's possible the starter section of the right switch is at fault, not reconnecting the power to the headlight after releasing the starter button as it should. Pushing the starter button on the later models disconnects the headlight during cranking.
 
Thanks Dad, but this model does not have an electric starter. It was the cheapy model; spoke wheels, front drum brakes, no center stand, no E starter. I did mess with the headlight switch. Also, none of the lights came on in the instruments and I would think some if not all the bulbs are good.

BTW, the battery shows 12.04 volts.
 
BTW, the battery shows 12.04 volts.

I was going to say check grounds, or start tracing wires with a voltmeter (test light), but you’re battery is definitely weak. Do you have a 12v battery charger, or a load tester? How old is the battery?


Tom - 1982 CM450E
 
The battery is new. Picked it up last week. I did remove the nut that holds the ground in place, not easy, but was able to clean up the connection to the frame. I figure if I can't get the lights on, it will be hard to restart the engine. Will check out the ignition switch tomorrow to be sure it's working. Also will get a battery tender to maintain the battery. Thanks Tom.
 
In that case it sounds like the ignition switch not energizing the brown wire in the harness. And, if the battery is only showing 12.04 it is either discharged or bad, it should read 12.6 at rest in normal circumstances.
 
Did you check that voltage is actually passing thru the fuses? Test at the brass fuse holder not the fuse. If that's good the go to the ignition switch connector and check for battery voltage on the Red wire. Turn the ignition on and check for voltage at the Black, Brown and Brown w/White.
 
Will focus on both those things tomorrow. Thanks Dad.

Of course, but Jim's answer is actually more comprehensive - I knew the brown wire would be involved but he's given you all the colors involved as well as the potential plug issue, not to mention being certain of the fuse integrity. (y)
 
Bought a quality battery tender and pumped the voltage up to 12.7. Also removed the ignition switch. Did not find any breaks in the wiring. Checked connectivity between the blades and the soldered connections, and all were good. Reinstalled the battery and the switch; although at this point the switch is hanging out of the headlight bucket; so I have easy access to all the wiring up front. Found that there is power at the fuse bank. Found that with the key off there is power between the brown wire and the red wire. With the key on there is also power between brown and red. With the key in the park position, there is power between red and black/white; but no tail light or instrument lights. Found another ground to the frame near the coil and cleaned that up. Again no bueno. The ignition switch still may be the problem. I saw a video where you could jumper the contacts with a piece of wire. Also, I did not replace the fuses, they look good, no breaks, but age may be a problem and I can personally attest to that.

:)
 
Key off there should be power (Red wire) to the ignition switch. Nothing coming out.
The Black w/White is a CDI ground circuit. Key OFF there should be continuity between that wire and the Green. Zero voltage.
So your ignition switch is internally messed up. Here's new aftermarket https://www.davidsilverspares.com/CB400T-DREAM/part_28607/
In the meantime you can use jumpers to test the lights. Red to the Black, Brown and Brown w/White. Do Not apply voltage to the Black w/White!
 
Bought a quality battery tender and pumped the voltage up to 12.7. Also removed the ignition switch. Did not find any breaks in the wiring. Checked connectivity between the blades and the soldered connections, and all were good. Reinstalled the battery and the switch; although at this point the switch is hanging out of the headlight bucket; so I have easy access to all the wiring up front. Found that there is power at the fuse bank. Found that with the key off there is power between the brown wire and the red wire. With the key on there is also power between brown and red. With the key in the park position, there is power between red and black/white; but no tail light or instrument lights. Found another ground to the frame near the coil and cleaned that up. Again no bueno. The ignition switch still may be the problem. I saw a video where you could jumper the contacts with a piece of wire. Also, I did not replace the fuses, they look good, no breaks, but age may be a problem and I can personally attest to that.

:)

Denny,
To check for power in ANY wire, you read (red probe on THAT
wire) to (Black /common probe) on a GROUND.......
You are getting a reading between RED wire (always powered) and Black/white wire (kill) because in off or park, the kill wire IS grounded.....
You also may be transposing off and park positions.....
Text me Denny K
from your phone number to straighten this out....I'll phone you.....
Steve

 
Thanks everyone for the advice and ideas. After closely inspecting the ignition switch, I came to the conclusion that it needs to be replaced. When I bought the bike there were no keys with it and the PO was the local Honda shop. They agreed to get keys made. I took the switch to a local shop and they made keys. I can see that they had to break into the assembly to get the job done; so who knows what happened then. Also, the switch is over 50 years old and I'm just not willing to keep sinking time and brain cells into this switch. I decided to get the switch from 4into1 and also pick up the hex bolt kit that others recommended. Steve, let me see how this all works once I get the new switch.

There are plenty of other things I can be doing to advance the effort; too darn hot to fish around here. Fifth straight day of 100 degree weather with more on the way.
 
Denny,
To check for power in ANY wire, you read (red probe on THAT[/COLOR] wire) to (Black /common probe) on a GROUND.......


^^^THIS!
A fried CDI box, or any number of other electrical pieces, can be a bad thing.
Good luck with the new switch. [emoji1303]


Tom - 1982 CM450E
 
Feeling better about solving my electrical problem. Used a jumper in the ignition female plug and while I did light the tail light, I sparked when it hit the ground. So I decided to reinstall the old ignition switch and test the connection there. When I touch the middle brown wire the tail light comes on and I suspect that if the headlight was installed it too would light. Touched the black wire and the instrument lights come one. Also tested the high beam switch and light and it worked. So I feel pretty confident that the old ignition switch is bad. I'm not going to throw it out, but may dive into it sometime down the road to understand how it works. It still might be salvageable.

The battery is showing 13.5 volts and is still connected to the tender. I have noticed that the voltage drops when I disconnect the tender and start testing the voltage. Not sure if that is just something that happens or maybe there is a connection sapping away the power.

Thanks everyone for the comments. It takes a bit of time to let this electrical stuff drip into my brain and to take time to consult the wiring diagram.
 

Attachments

  • Honda CB400T_64.jpg
    Honda CB400T_64.jpg
    93.9 KB · Views: 7
Take the battery off the tender and let it rest for at least a half hour, then check the voltage. If it's less than 12.6v then you have a problem, either a bad battery or a draw.
 
After 30 minutes the meter read 12.9. Will leave it unplugged overnight and take a reading. Thanks Dad

Just caught Jim's comment. Will continue to monitor and then look to the voltage regulator. Thanks
 
Just caught Jim's comment. Will continue to monitor and then look to the voltage regulator. Thanks

And he's more familiar with the later version components, I'm still in the separate rectifier and regulator days of the older twins.
 
The postman delivered my new ignition switch and the hex bolts today. I was in the middle of adjusting brakes, installing new spark plugs and trimming the spark plug wires. Tested the new switch and it worked. So I put the the instrument cluster back together, installed the front winkers and headlight. I can't avoid it anymore, I have to put the carbs back on nd see if this bike will actually start. Will confirm that my bench synchronization is right and try my luck. I don't plan to connect the air box rubbers for the restart unless that would cause some issue. If all goes well, then of course I will do that. I am planning to use an auxiliary tank for the restart.

Have been monitoring the battery and I think it's okay. Holding at 12.6/7 off the tender. I also checked it with the regulator unplugged and did not see any differences.
 

Attachments

  • Honda CB400T_65.jpg
    Honda CB400T_65.jpg
    109.2 KB · Views: 7
  • Honda CB400T_66.jpg
    Honda CB400T_66.jpg
    110.8 KB · Views: 9
WooHoo! Don’t ya love it when a plan comes together! Patiently waiting for restart news…


Tom - 1982 CM450E
 
It will run without the airbox but it probably won't rev out very well, CV carbs like their correct air flow and intake resistance. No harm will come though
 
Thanks guys, good to know. I am just thinking that it will be easier to remove the carbs if there is an issue and also access will be easier. The tank and seat will be close by and if things go well, then I will button her up; finish the punch list and take a test ride. No plates on her yet and will need to call my insurance agent!
 
Got the carbs back on the bike and as you can see the air box rubbers are not in place. This is a temporary installation for the upcoming restart. Hopefully I have followed Jim's instructions and have the throttle plates and mixture screws in the right positions. After installing the carbs I learned a few things. First of all, with the carbs sitting on the engine, I would start by connecting the lower rear throttle cable, then do the front. Next I would put the carbs into the front insulators and remove the rear bracket bar and then connect the choke cable. Once the choke cable is in place, reinstall the bracket.

Now, I did not do it the way I just described. I started with the front throttle cable, did the rear and then fought with the choke cable all with the carbs being unattached to the insulators. I had the choke cable going over the bracket bar which I could see had to be wrong. I'm a process oriented guy, so doing things in the right order is important. Is what I previously described the right order?

I know that I will need to put the air box rubbers on at some point. I'm not sure that I should even ride the bike without the air box rubbers in place and the air box completed. I am thinking that will mean wrestling with the carbs and working the air box rubbers into place. Jim says set the rubbers in the sun so they are flexible. No problem with that here!

I think the carbs need to be pushed forward a bit more and the clamps need to be tightened as do the cable nuts. The aftermarket choke cable works, but does not have any stops or adjustments. Have to run back to the Honda shop, I ended up with the wrong ID sized fuel line, even though I had the old with with me. Luckily the store is just a few miles away.
 

Attachments

  • Honda CB400T_67.jpg
    Honda CB400T_67.jpg
    113.1 KB · Views: 10
Just to be clear, I did what Jim suggested. I started with the carbs lying on the engine and below the insulators. There is enough slack to allow the cables to reach. I think starting with the lower rear facing throttle cable and then connecting the front facing cable might be the way to go. You can connect the choke cable as well, but I found that it was easy to do once the carbs were into the insulators.
 
I kept thinking about what Jim and Dad said about how the engine will not run well without the carbs connected to the air box. I had a similar experience with my CB750 build. So I decided to "man up" and put those air box rubbers on, clean the dirt out of the air box and install the new air filter. Warmed the air box rubbers up in the sun and massaged them with some silicone lubricant; not an easy task, but with a little patience and a lot of squeezing, they went in. What the heck, I was going to have to do it sooner or later.

The other picture shows a spring and washer that I had in the bag with the shifter lever. I studied the fiche drawings but could not find this spring and washer, but I think this is where it should go. Right or wrong?

Have a couple more things to do, but am planning to restart the engine on Monday. Now that all this other stuff is in place, we might just also take a test ride on Monday. :)
 

Attachments

  • Honda CB400T_69.jpg
    Honda CB400T_69.jpg
    122.8 KB · Views: 13
  • Honda CB400T_68.jpg
    Honda CB400T_68.jpg
    123.4 KB · Views: 14
Jim, do you think I should find a second washer? The fiche is not very clear on the exact location of the spring, I assume I have it in the right place. Thanks
 
I'd certainly suggest having a washer on top of the shift shaft seal so the spring doesn't ride directly on it
 
Yep, it goes on the shift shaft and as Tom points out, since there's a single washer it should be on the seal side.
Or you can just leave it out since Honda did away with it.
 
I got my flashlight out and checked the engine side and discovered a washer. All is good. Will put it back so I don't lose it. Thanks again.

Denny
 
She Runs!

Happy to report that the engine runs. Followed Jim's suggestions and kicked the bike over a number of times to get the oil moving through the engine. We used an auxiliary tank for the initial start up and as Jim suggested, we let the fuel run into the carbs and sit for about 10 minutes; no leaks. My friend John who is another Honda CB750 guy straddled the bike sans the seat, turned the key and the kill switch and kicked her over. On the third kick the engine started. The idle was too fast so I turned it down until it sounded right; no tach on this bike. Let her run for a bit and shut her down. Got the tank out of the basement, mounted it, connected the fuel lines, and put in a some gas. Mounted the seat and side covers and put a mirror on. Time for test rides. John did the first one; he's younger and a much more experienced rider. Then I took her for a short ride; it's been awhile since I was on bike. Then we both took longer rides and were able to take the bike through all the gears. When we finished, I checked the battery voltage and it was 13.4; so I think she is charging. The engine sounds good, the bike has a lot of torque and is very peppy. The speedo does not seem to be working. We confirmed that it was properly connected; I may have got it messed up when I was working on the front brake shoes; or maybe the gauge is broken. I do have a backup speedo. The idiot lights cover seems to rattle around. So on to the next phase; keep her or let someone else have the opportunity to save a vintage bike? I'll be 74 in September; but what the heck it's just a 400 twin!:)

Picture is of my friend John headed out on a long test ride. BTW, there is the distinctive odor of hot motorcycle in my garage; love it!

Trust me when I say, if it weren't for the shared wisdom of the folks on this Forum, I would not be this far along on my project. Jim's Sticky's on re-building the carbs and how to set them up were invaluable; as were the encouraging and helpful notes from so many of you who weighed in on my posts.

Denny
 

Attachments

  • Honda CB400T_70.jpg
    Honda CB400T_70.jpg
    144.9 KB · Views: 17
The speedo does not seem to be working. We confirmed that it was properly connected; I may have got it messed up when I was working on the front brake shoes; or maybe the gauge is broken.

Denny, good to hear things went well and the bike is running good. As Jim said, ride it a bit before deciding to let it go, my uncle started riding in his late 70s at the urging of his brother (my father) on a CB400A so you're not too old by any stretch.

As for the speedo problem, since you did just have the wheel apart it could be the drive gear tangs are not aligned in the notches in the hub when you put the brake backing plate back on the wheel. If that turns out to be the case, you might have bent the tangs a little and may need to bend them back before putting it back together with them aligned to fit into the notches in the hub. Check this section of another thread to see what I mean

https://www.vintagehondatwins.com/f...ing-on-something&p=38197&viewfull=1#post38197
 
So on to the next phase; keep her or let someone else have the opportunity to save a vintage bike? I'll be 74 in September; but what the heck it's just a 400 twin!:)

First of all, fantastic news and ditto the Congratulations! I’d have to keep her and at least enjoy the rest of summer and autumn, especially after bringing her back to life. And meanwhile maybe you run into someone who should have it? Be safe and enjoy… great work!
(Anyone notice how happy John looks?)


Tom - 1982 CM450E
 
Thanks guys! Yes, my friend John has a great smile; we were both grinning from ear to ear.

I did dive into the speedo issue. I removed the cable and it would not turn; finally the wheel end just fell out of the cable; also it looked twisted to the breaking point. I removed the speedo itself and tried to turn the mechanism and found it to be very stiff. I was using a square end bit that snuggly fit into the port. I applied a bit of silicone lube and kept turning the bit; finally the the mechanism loosened up and turned freely. But the question remains will it work? BTW, which direction does the mechanism turn to record mileage? (Recall Ferris Buller's directions to Cameron) Luckily I do have a back up set of instruments albeit they need a bit a attention.

I am going to take your advise and ride her around, but not before I get a new front tire. Also, while the tire work it being done, I will replace the front brake shoes and service the fork tubes. I can see evidence of oil on the forks, so the seals need to be replaced; and the rear winkers need to be installed. I am planning to drain the tank and the carbs since it will take a bit of time to get the new tire mounted and complete the work on the brakes and forks. One great thing I see is that there are no oil leaks under the bike and no fuel leaks.
 
The cable turns left or in reverse using a drill motor. Keep oiling the bushing where the cable goes in and periodically use the drill. That area collect dust and dirt so it binds up and the oiling will clean it.
 
Ordered new front EBC 314 brakes today, seems as though rear EBC 313 brakes are mostly on back order, but no problem. Got lucky at the Honda shop and found a Dunlop D404 110/90/19 that they had on the shelf for a very nice price; about $20 less than Amazon; put it on Lay Away! Drained the carbs and also drained the tank knowing it would be a while before I got back "on the road". My challenge now is getting the front end of the bike lifted up and stable so I can remove the front wheel and rebuild the forks. I don't have a center stand, but am thinking that I can brace the frame where the center stand would go and then put a jack under the front of the frame. I do have a Craftsman motorcycle jack, but can't seem to find the right place to put it under the bike. I was watching a YouTube video by the those guys in Houston Collective where they showed how to disassemble the fork while on the bike and in that video the guy had the frame lifted at the front of frame. No doubt I will want to replace the fork seals and O rings. The dust seals look good, just some crud on them that is probably dried ATF. Any suggestions on essential parts for fork rebuilds?

As soon as I get the front wheel off I am going to take it to the Honda shop and have them mount the new tire. Will install the new brake shoes when they come. But still need to order new seals, etc. for the forks.


Thanks
 
Place a piece of plywood across both arms of the jack, add wood to get a somewhat better fit of the engine, power chamber and exhaust with the bike upright. Now hold the bike and lift it until the safety bar can be dropped in. Then use straps to tie the bike to the jack so it won't fall and go to work.
 
I hung mine from a big ‘ol piece of wood set through a stepladder before I got a center stand, but if you have a jack I like LDR’s idea better. [emoji1303]

Just had the same problem looking for EBC313 brakes. I found a set in stock at Chaparral Motorsports.

https://www.chapmoto.com/


Tom - 1982 CM450E
 
Front End Lift

This is what we did to get the front end lifted. The hydraulic jack pressure is mostly off and the bike is being supported by the stack of lumber under the front portion of the engine. I had previously shaped a piece of 2 x 4 to fit in this position. We stacked the lumber and then let the jack down until the bike firmly settled. I have a concrete block behind the rear tire and we did stack lumber under the kick stand. Currently I have the front wheel off and plan take it in to my Honda dealer on Monday to get the new tire mounted. With some good luck I hope to get the front brake shoes early next week.

After reviewing the shop manual, it looks like the fork tubes simply drop down and come off the bike for servicing and new seals. I have previously loosened the large nuts on the triple tree.

Tom, thanks for the lead on the 313 shoes, plan to add these guys to my favorites.
 

Attachments

  • Honda CB400T_71.jpg
    Honda CB400T_71.jpg
    120.7 KB · Views: 4
Tom, thanks for the lead on the 313 shoes, plan to add these guys to my favorites.

Since most of your weight is the engine, looks like you should be ok, the only thing I’d add is be sure it can’t tilt (fall over) to either side.
You’re welcome, hope they still have a set.


Tom - 1982 CM450E
 
Fork Seal Question

Got the forks off the bike and all apart. Did need to find a 14mm Allen wrench. Like the guy at the hardware store said, that's a big 'un. No special problems until I got the the fork seals. I'm pretty sure these are the original seals and the "oil" was putrid. Anyway, started trying to pry out the seals per the shop manual and what I saw on a video. Eventually the rubber started coming out; including a spring like ring. I got most all the old rubber part of the seal cleaned out, but I think the thin metal body of the seal is still in the lower tube. I don't have the new seals, but as I look into the lower tube, I think I see a seam where the old seal body seats. I decided to stop and ask before going further. Trust me when I say those seals seem to be stuck. If that's the case, then I think I may just cut them out with a moto tool.

Here are the parts I am planning to replace; the fork seals, the brass washer on the hex bolt and the o ring on the large cap nut.

Thanks
 
Eventually the rubber started coming out; including a spring like ring. I got most all the old rubber part of the seal cleaned out, but I think the thin metal body of the seal is still in the lower tube. I don't have the new seals, but as I look into the lower tube, I think I see a seam where the old seal body seats. I decided to stop and ask before going further. Trust me when I say those seals seem to be stuck. If that's the case, then I think I may just cut them out with a moto tool.

It’s been awhile since I had mine apart…
First, the seals have a spring ring in them, but you also may have a snap ring which sits above the seal.
The thin metal body I’m not aware of, I’ve never torn a seal apart that far.
As far as a seat in the fork leg, my seal is driven in to just clear the snap ring groove.
Be very careful cutting, if you nick the seal area it may never seal properly.


Tom - 1982 CM450E
 
Got the forks off the bike and all apart. Did need to find a 14mm Allen wrench. Like the guy at the hardware store said, that's a big 'un. No special problems until I got the the fork seals. I'm pretty sure these are the original seals and the "oil" was putrid. Anyway, started trying to pry out the seals per the shop manual and what I saw on a video. Eventually the rubber started coming out; including a spring like ring. I got most all the old rubber part of the seal cleaned out, but I think the thin metal body of the seal is still in the lower tube. I don't have the new seals, but as I look into the lower tube, I think I see a seam where the old seal body seats. I decided to stop and ask before going further. Trust me when I say those seals seem to be stuck. If that's the case, then I think I may just cut them out with a moto tool.

Here are the parts I am planning to replace; the fork seals, the brass washer on the hex bolt and the o ring on the large cap nut.

Thanks

Old fork oil is always putrid, some of the worst smelling stuff you'll ever get out of your bike. The seals do have a plastic-covered metal perimeter but typically they don't come apart when prying them out of the lower leg. Take something really thin and see if you can tap it in between the fork aluminum and what you believe is the metal ring, it should bend inward pretty easily if you can get behind it. Do be cautious about gouging the aluminum as Tom suggested, but if you do scratch it up a little it should cause a leak as the seals fit pretty tight when new and driven into the lower leg. And the washer on the hex bolt is probably copper, they're usually reusable. I've never had to replace one. Good to replace the o-ring on the caps though.
 
Back
Top Bottom