stl360+450
Veteran Member
Sounds like Dan only needs one turn signal body. Focusing on the body itself, am I correct in thinking that the front and rear assemblies are identical, aside from the wire color coding for left/right?
If it doesn't have running lights on the front, then yes. And the CL450K4 did not.Sounds like Dan only needs one turn signal body. Focusing on the body itself, am I correct in thinking that the front and rear assemblies are identical, aside from the wire color coding for left/right?
I think you won't hear the plunger normally because it's already against the cam chain.Should there be an audible “click” or sound from the spring/plunger when I adjust the cam chain?
Do spark plugs need to be out when turning the crankshaft?
Cam chain adjustment is done. Now for valves. I’m reading over your previous notes towards bottom of the 1st pageSometimes you'll hear something from it, usually when the adjuster moves more than usual meaning it hasn't been adjusted in a while. Most of the time when maintenance is fairly regular, you won't hear it. I'm guessing yours hasn't had regular maintenance. But, there's also the possibility that the adjuster is stuck from sitting a long time too. You've probably noticed that the tensioner body has a hole in the back of the shaft area, so you can stick a rod or 90° tipped tool of some sort into the end of it and give it a light push if you suspect it doesn't move. Do NOT push it to enhance the tensioning though, it's a good way to cause early death of the tensioner roller that is probably hard rubber now.
Pretty sure you mean "narrowest" .003" feeler, since it's .003" thin...The left cylinder valves were so tight, that my thinnest .003” feeler gauge would not go in them

I will take the VHT terminology class after the stress is gone from adjusting these right valves correctly lolPretty sure you mean "narrowest" .003" feeler, since it's .003" thin...
After you turn to LT with TDC of the compression stroke for the left cylinder, you rotate 180 degrees to the T mark to get TDC of the compression stroke on the right cylinder. Both right intake and exhaust valves should be closed at this point.When spinning the crankshaft to set the right valves, do I visually wait until the right exhaust valve is closed, or the right intake valve?
I saw the .003" reference earlier, but because your engine hasn't run in a long time you would do just fine to leave it there for now, and I'd set the right side valves at .003" too. Run it for a few miles and do another valve adjustment later.So big mistake on my part. FSM says
0.03 mm (0.0012" in.)
I was using this feeler gauge:
0.3 mm (0.012” in.)
The lowest my set goes is:
0.04mm (0.0015” in.)
Will that be good to use?
Do as Brody suggested but to confirm, you always look for the intake valve to close because after that comes TDC on compression stroke (both valves closed).When spinning the crankshaft to set the right valves, do I visually wait until the right exhaust valve is closed, or the right intake valve?
So big mistake on my part. FSM says
0.03 mm (0.0012" in.)
I was using this feeler gauge:
0.3 mm (0.012” in.)
I totally missed that, read it as .0012.Yes, 0.012" is way too big! But, thankfully, you noticed before going too far.
I try to get mine pretty close using flat stock that I ordered online, but 0.003" will do fine and is probably easier to achieve.
I definitely missed it too when looking over the feeler gauges.I totally missed that, read it as .0012.
The factory calls for .0012". Back when I worked at Honda dealerships we used to set them at .0015" since feeler stock of that thickness was available. Since even that is pretty snug, I've since set them at .002". the shortness of the followers in the 450 engine keeps them from making as much loud "clacking" noise as other twins like the 350 when they're loose. Since your engine hasn't been run for a (possibly long) while, that's why I suggested .003" above. If there is any buildup of deposits on the seats, or even rust on one that was open while sitting, it might change a bit once you run it a bit so .003" will be fine for now. As I mentioned earlier, you can always reset them in 500 miles or so, at which point I'd change the oil again as well considering you'll be learning a lot about the engine's overall health during that time.I definitely missed it too when looking over the feeler gauges.
After triple checking, the lowest gauge I have is .0015 - Next size up is .003
Sounds good AD. I am actually about to be doing another oil change. The original oil was 40 year old gunk that had metal glitter in it. Maybe the little bit of idling I did, let the fresh oil circulate enough to “clean” it out.The factory calls for .0012". Back when I worked at Honda dealerships we used to set them at .0015" since feeler stock of that thickness was available. Since even that is pretty snug, I've since set them at .002". the shortness of the followers in the 450 engine keeps them from making as much loud "clacking" noise as other twins like the 350 when they're loose. Since your engine hasn't been run for a (possibly long) while, that's why I suggested .003" above. If there is any buildup of deposits on the seats, or even rust on one that was open while sitting, it might change a bit once you run it a bit so .003" will be fine for now. As I mentioned earlier, you can always reset them in 500 miles or so, at which point I'd change the oil again as well considering you'll be learning a lot about the engine's overall health during that time.
If it got up to full running temp, maybe. If it was mine I'd probably dump it again too, best to do more than less.Sounds good AD. I am actually about to be doing another oil change. The original oil was 40 year old gunk that had metal glitter in it. Maybe the little bit of idling I did, let the fresh oil circulate enough to “clean” it out.

Yeah there is no way these two are screwing back together. Didn’t know you could trim themThe caps essentially screw in to the plug wire to establish the connection. When it gets sloppy after many years, you can clip off about 2 cm and redo it. Yours is missing the rubber seal that covers the joint, protects it from moisture, and helps secure the twist-on connection.

Take a pick or thin nail and spread the wires so the screw goes up the center.Yeah there is no way these two are screwing back together. Didn’t know you could trim them
Where did you get the gaskets? Did you buy a top end set, or just the valve cover gaskets? There was a change in the crankcase baffle plate along the way and the vent holes were moved as you can see by the differences. I believe your original is the later version. Do you have the baffle plate on the intake cover? I neglected to mention the intake cover needs 2 gaskets, I'm so used to having multiples on hand that it didn't occur to me for your situation.This new gasket does not match my intake valve cover “plate”. Still ok to use?
View attachment 25116
I know in some cases, those guys in Houston can be the most logical option to purchase something. I bought a complete gasket set from them. When I looked at the 4into1 set, someone complained about missing gaskets. I actually don’t have a baffle plate for the exhaust valve cover.Where did you get the gaskets? Did you buy a top end set, or just the valve cover gaskets? There was a change in the crankcase baffle plate along the way and the vent holes were moved as you can see by the differences. I believe your original is the later version. Do you have the baffle plate on the intake cover? I neglected to mention the intake cover needs 2 gaskets, I'm so used to having multiples on hand that it didn't occur to me for your situation.
Since most gasket sets are sourced from a handful of suppliers, the sets from most aftermarket sellers come from one of 3 of the usual brands (whether the label says so or not), Vesrah, NE and Athena, and I can vouch for the quality of Vesrah and NE as I've used both. But the manufacturers all make the same mistakes when gathering and packaging these sets, they include valve stem seals that are often incorrect or aren't even used on some engines, o-rings that are incorrect/not used or even for a different engine entirely, and omissions of gaskets where more than one is required like the valve cover gaskets for the 450. I asked about the baffle plate because at one time the proper gaskets were full-sized and looked like your plate (black in color from crankcase gasses), not just the perimeter of the plate but completely solid so I assumed you were showing me 2 different gaskets. You can mark and cut those holes in the proper locations since the plate will cover the holes in the wrong locations. There is no baffle plate on the exhaust valve cover, it's located on the intake because that's where the crankcase breather tube is located.I know in some cases, those guys in Houston can be the most logical option to purchase something. I bought a complete gasket set from them. When I looked at the 4into1 set, someone complained about missing gaskets. I actually don’t have a baffle plate for the exhaust valve cover.
Edit: The plate you see pictured on the left, came off the inside of the intake valve cover.
You would be correct. The left baffle plate still has the original gasket on it. I haven taken it off yet, because I didn’t know if I would need to salvage it. That’s a good idea to cut out holes in the new gasket. Is the breather tube supposed to have a rubber tube connected to it? It looks like I’m seeing one on the parts diagramSince most gasket sets are sourced from a handful of suppliers, the sets from most aftermarket sellers come from one of 3 of the usual brands (whether the label says so or not), Vesrah, NE and Athena, and I can vouch for the quality of Vesrah and NE as I've used both. But the manufacturers all make the same mistakes when gathering and packaging these sets, they include valve stem seals that are often incorrect or aren't even used on some engines, o-rings that are incorrect/not used or even for a different engine entirely, and omissions of gaskets where more than one is required like the valve cover gaskets for the 450. I asked about the baffle plate because at one time the proper gaskets were full-sized and looked like your plate (black in color from crankcase gasses), not just the perimeter of the plate but completely solid so I assumed you were showing me 2 different gaskets. You can mark and cut those holes in the proper locations since the plate will cover the holes in the wrong locations. There is no baffle plate on the exhaust valve cover, it's located on the intake because that's where the crankcase breather tube is located.
Yes, it's a long road draft tube that goes down behind the engine in front of the swingarm and ends just below the bottom of the frame. If it's missing from the bike, it will be a difficult find because the stock breather hose is thin-walled and of course, metric diameter. If you buy locally supplied hose from a parts store it will not fit properly and will have huge wall thickness. I found that the Yamaha XS650 breather tube is essentially the same but now they're hard to find as well.You would be correct. The left baffle plate still has the original gasket on it. I haven taken it off yet, because I didn’t know if I would need to salvage it. That’s a good idea to cut out holes in the new gasket. Is the breather tube supposed to have a rubber tube connected to it? It looks like I’m seeing one on the parts diagram

I’ll have to check that out. What are the downsides of not having one for the time being?David Silver Spares sells an aftermarket version, hard to tell by the single picture of the wall thickness is the same.


Downside of not having one is oil mist from blow-by gasses all over the battery box, air filters and under the tank, so you want one on there before you ride it at all. That one you found is the later version that is only 1 foot long and connects at a catch-box to separate the mist and recycle the 'air' back into the air filter, not long enough to do the job right. I finally found the one I bought, they changed their listings since I bought mine.I’ll have to check that out. What are the downsides of not having one for the time being?

Wow. Thanks again. Will be ordering this tonightDownside of not having one is oil mist from blow-by gasses all over the battery box, air filters and under the tank, so you want one on there before you ride it at all. That one you found is the later version that is only 1 foot long and connects at a catch-box to separate the mist and recycle the 'air' back into the air filter, not long enough to do the job right. I finally found the one I bought, they changed their listings since I bought mine.
I knew they should have them, about 4 years ago I went to Dime City's local store in Tampa and bought a few things for my drag bike project including one of these long breather hoses and it's a good fit, plus longer than stock so you can cut it to fit the length you want. Just took some part number cross-referencing to find it in the conglomerate that is DCC/Mike'sXS/Z-1 Enterprises/Randakk's group. (never done it with Yamaha parts until today, LOL, never owned one)Wow. Thanks again. Will be ordering this tonight
I also remember reading that the xs650 advancer springs are a possible fit on a vintage Honda CB/CL. I wonder what else is compatible lolI knew they should have them, about 4 years ago I went to Dime City's local store in Tampa and bought a few things for my drag bike project including one of these long breather hoses and it's a good fit, plus longer than stock so you can cut it to fit the length you want. Just took some part number cross-referencing to find it in the conglomerate that is DCC/Mike'sXS/Z-1 Enterprises/Randakk's group. (never done it with Yamaha parts until today, LOL, never owned one)
Really, I'd imagine a lot of general parts might be interchangeable, but anything like switches, controls and manufacturer-specific engine and ignition parts would be less likely. There are some here who have used other brand pistons in some of our twins but that's something requiring some adaptation.I also remember reading that the xs650 advancer springs are a possible fit on a vintage Honda CB/CL. I wonder what else is compatible lol


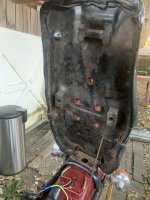
Could the evaporust be brushed onto the seat pan, or does it have to be submerged?If you decide to do the seat yourself, there's always Evaporust or the stuff Jim found, Bilt Hamber Deox-C to remove the rust on the pan and hopefully it won't be weakened by the level of rust it has.
Evaporust is a thin liquid so you'd have to find a rectangular container to submerge it in, closer to the size of the pan the better since a gallon jug of it would probably do the job in a container of the right size, shape and depth.Could the evaporust be brushed onto the seat pan, or does it have to be submerged?
Ok, I’ll give that a try.Evaporust is a thin liquid so you'd have to find a rectangular container to submerge it in, closer to the size of the pan the better since a gallon jug of it would probably do the job in a container of the right size, shape and depth.

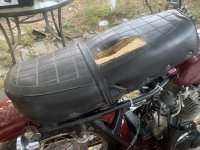
Here are site-specific search results for "replacement seat foam"I would be curious how to tackle the foam. Has that topic been covered here before?


The first guy is helping to make these vintage bikes even more rare. Don't be that guy.I've discovered this morning that the search feature with Xenforo is not much better than our old software. I spent over an hour using the forum search, the advanced forum search and site-specific Google search trying to find a thread in which I gave specific, detailed instructions on how to safely do what you want to do and I cannot find it. It happened in a thread where a member started to do that gasket replacement and did NOT follow the instructions specifically, and rotated the engine once he had one of the cam bearings removed. He was never heard from again, but I suspect it was not a good result.
While this thread below is not about replacing the gaskets specifically, it amounts to the exact same procedure. Note that the OP had NEVER done this work on a DOHC 450 prior and because he listened and followed the procedure correctly, he did it without any issues. To avoid any accidental change in cam timing while replacing the cam bearing gaskets one by one, only one at a time and NOT rotating the engine at any point during the operation until each cam bearing is re-installed in order to position the engine to do the next cam bearing, follow this procedure as outlined. And, I'd strongly suggest reading the entire thread through, then asking any questions you might have, then re-reading the thread again to be sure you fully understand both the importance of following it verbatim but the consequences of not doing so as well, before attempting to do this yourself.
Nervous about changing followers
This is a little embarrassing, but I'm really nervous about taking this engine off the frame and changing out all four followers. I have no idea how complex this is and the prospect of dropping a motor and/or buggering things up has me holding back on this job. This is the set of NOS followers...www.vintagehondatwins.com