CA95 project(s)

As for the tank threads, good to know what they are. Will have to see if I have that tap. I have the original screws from the original style petcock, but the aftermarket one would require me to find other screws or space them since they are not full threaded. Worst case, I suspect that I could redrill/tap for something more standard - but need to see how much thicker material they left outside the holes.
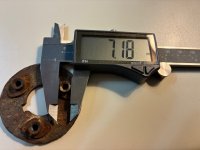
You can tap the petcock tank holes. I have successfully many times. I dissected a hopeless cause CA95 tank ages ago just to keep a sample of the petcock mount for reference.
 

Attachments

  • IMG_6640 Disected Tank Bung.jpg
    IMG_6640 Disected Tank Bung.jpg
    1.3 MB · Views: 3
  • IMG_6641 Disected CA95 Tank Bung.jpg
    IMG_6641 Disected CA95 Tank Bung.jpg
    760.7 KB · Views: 3
Last edited:
This is what I have for a throttle setup.
We are not held hostage to the old controls. New controls for 7/8 handlebars can be found usually on eBay. One just needs to rewire or mark which wire goes where to match original harness. Sorry I don't have the throttle side pic, but here is a shot of the left side control complete with turn signal switch. I would have done so with my 62, had I needed controls. Just a thought,
 

Attachments

  • Army Bike 007.JPG
    Army Bike 007.JPG
    450.5 KB · Views: 4
No throttle slots. Does have wiring holes. Bars have the collar that fits the clamp slot. They are nos aftermarket 30+ years old.
1000003153.jpg
 
Slotted handlebar & throttle type slides are the worst. At least how I feel about it. Twist throttle like yours is my preference all day. I might add that I dislike the original starter button wire setup, even on my 62. If the yellow wire is not installed perfectly, and it grounds out, when you turn the key to on, the starter engages and stays engaged. If I ever do another CA95/160 (likely not) I will opt for new controls. Should I ever have any problems with my 62 controls during my ownership, I will replace them as I should have to start with. Just my rant. One more thing, If I ever tear into my 62's handlebar setup, I will replace the brake & clutch controls with modern types with the mirror perch mount type. I do like bar end mirrors, but nice chrome mirrors on top of the bars is my preference.
 
I have new levers on order from Thailand with the mirror perch. The slotted throttle is a cool design thing, and for the usage of this bike would be fine but I didn't get any of those parts.
I'm pretty much just waiting for parts now - maybe a month. Need to empty the shop soon anyway so I can slide my wife's convertible in against the front wall for the winter.
 
I'm thinking that this cb style setup may solve issues affordably.
View attachment 50770
I agree with Spokes, these wind up types are better than the sliding hinge type, less slop in the action.

This one has the starter button. If you don't pinch the inside wires they work fine. I got mixed up and said horn but you did say starter. They are actually the same button.

If you run signals you do need a different left switch, Left switch is only horn and hi/lo. OEM signal switch is on the right and crazy money.
 
Last edited:
I agree with Spokes, these wind up types are better than the sliding hinge type, less slop in the action.

This one has the starter button. If you don't pinch the inside wires they work fine. I got mixed up and said horn but you did say starter. They are actually the same button.

If you run signals you do need a different left switch, Left switch is only horn and hi/lo. OEM signal switch is on the right and crazy money.
FWIW - I did order this setup off ebay. Looks close enough to the stock style and takes care of my starter button issue. Project is mostly on hold until early Nov when the Thailand parts show up (Or maybe they are overly pessimistic on ship times). I have a few more parts to cleanup and install, but not a ton. Need to make some decisions on side covers as well. Even if I clean up the crappy plastic reproductions, still need to get some badges for them. There is a set of side covers with badges on ebay, just not willing to pay what they want quite yet.
1760027917634.png
 
Benly side covers didn't have badges, only on the toaster tank panels. I have seen folks add some that say 150 but not sure what they were originally meant for.
 
Benly side covers didn't have badges, only on the toaster tank panels. I have seen folks add some that say 150 but not sure what they were originally meant for.
That would explain why I have seen so few of them. Can cross that off the list then. Now I need to wait for some screws to hold the tank emblems on. All the little stuff just takes forever. On the plus side, one of my Thailand shipments looks like it might clear customs early next week. Funny how pictures show all the scratches that I can't see just looking at it ;) Will need to put some metal polish on it I guess.
1760100092105.png
1760106946518.png
 
Last edited:
The little 3x8mm long oval head screws, I've found at hardware or scavenged from old printers etc. I see you found some early chrome fork side caps instead of the later black or white plastic ones. Have you ordered the rubber plug for the left side cover clutch access from Clauss Studio?
 
The little 3x8mm long oval head screws, I've found at hardware or scavenged from old printers etc. I see you found some early chrome fork side caps instead of the later black or white plastic ones. Have you ordered the rubber plug for the left side cover clutch access from Clauss Studio?
It is in my cart, and I should have ordered it when I ordered the footpegs from them. Will get that on the way eventually. One of the bikes had the chrome caps, one was good and I found another at the junkyard. Got a chrome inspection cover for the chainguard too. I just ordered some screws - $4 for a bag and they'll be here next week. I don't really have much small metric stuff around here to scrounge from. About the only this that I need (that I know of) is exhaust, got it picked out but will order that in a few weeks when I feel like paying for it.
 
Must have ordered the 'Merican style seat cover. It is expecting the seat to be 1-2" wider than it is stock. Not a huge deal, just some more foam work to add and Might make it an inch taller while I am at it.
1760532535955.png
 
The top of the seat drapes over the frame a bit. Just my thought. Attached is a sample pic of my red seat that I recovered using a "standard" cover. Actually, I like the look of cross-stitched upholstery. 

IMG_5223 read finished seat.jpg
 
For their cover it is supposed to look like this when installed. 1760546761931.png

I'll just say that it was a pretty imprecisely built cover and the worst part is that they didn't manage to line up the honda logo. But I'll live with it. Still need to steam it, but not in love with how it came together.

1760546837078.png
1760546849595.png
 
One aspect of restoration is rework. I don't recall if you installed the original seat springs or just stuffed the frame. Ages ago I had an upholstery shop do a CA95 seat. I was in the same boat as you about the look. That's one reason I built solo seats. I think reworking the seat until happy might be key, then again not. Winter is bearing down anyway (I lived in Eden Prairie Late 2010-Late 2011) so there is lots of time to fuss.
 
It needs the 1" foam for a full and pillow top feel.

Also my Dream seat re-do.


Very comfortable indeed. Even have a few custom stencils from Cycleranger in the old script (non-stock, never used)

ojk6Mxz.jpg
 
There is a full extra 1 inch added today top and sides, before adding cover. Even with that it is kinda floppy and offset.
1000003199.jpg
 
Do you have an inch of thicker density on the bottom? Like a couple layers of yoga mat.
1/4" of HDPE
1.5" of ultra high density upholstery foam
1.5" of high density foam
1/4" of stretch foam.

Main issue is just that the cover is huge and not even. I've done a few dozen seats in the past and this one is just a crappy cover
 
Too bad but does have a unique look to it. Since a return is probably not planned I'd double the 1.5 ultra high dense inside, get it good and warm and stretch it on.
 
Too bad but does have a unique look to it. Since a return is probably not planned I'd double the 1.5 ultra high dense inside, get it good and warm and stretch it on.
Yeah. I'll let it sit for now and then decide what to do about it later. Getting to be winter time, so plenty of time as I am still waiting on some other parts to finish this one up.
Currently on the hunt for another winter project since this one isn't going to last long once parts are here. Found a Bridgestone 90 that needs some love but have not decided on it yet.
 
Got the controls all installed this morning and then realized that I have continuity between the power and ground cables at the battery. UGG. Now to go back and look at every wiring connection.
1000003213.jpg
 
Now to go back and look at every wiring connection.
Rework is one aspect of restoring these old bikes that makes me bonkers. We assemble each piece with care only to go back over what we did. I wouldn't want to restore old firearms. My feet would end up full of holes.
Although the Bridgestone 90 is a cool find!
 
That was an easy one. The problem was - there is no problem. I'm used to there being diodes in systems so that you don't get a continuity signal because of light bulbs. It was the neutral light causing the reading. Hooked up the battery now, all lights working and starter cranks. Need to check for spark and then see about hooking up the gas.1000003215.jpg
 
No spark, so need to dig out the coil wiring - points seem to be working.
 
No spark, so need to dig out the coil wiring - points seem to be working.
Check your caps, I've bought new ones that were no continuity at all. If not then likely a bad coil, points working then coil has power.
Not sure if Spokes tried the 4into1 repop 6volt coil.
 
Not sure if Spokes tried the 4into1 repop 6volt coil.
I sure did. Works well. I reinstalled the original coil just the same because I was traveling down the same no spark path.

Here is what little I know about no spark:
Check continuity at the points wire (green one) Got power?
Pinched points lead (green wire)
The coil mount where the frame of the coil mounts against the coil can be less than good.
I resoldered the coil wires. Just to be anal.
Oily points.
Bad condenser
I too doubted the spark plug caps. Replacement caps aided spark. So, caps can be bad.
There are two really close looking wires in the harness. Black and black with faded red stripe. Yep! I got that wrong.

The 4 into 1 coil sits in my parts drawer in case you want to try it out.
 
The coil is a brand new empi, but always a chance it is bad. The caps are some pretty crappy after market, but I also tried one off a stock coil - will check continuity and everything else on that list.
 
Got distracted by the new project, because I wanted to decide if it was a project or not. Pretty sure it will be one, except that I need to find a kick start shaft for it since it is snapped off (PO had been push starting the bike when last used). All in all, not too bad - won't be a beauty queen because it wouldn't be worth anything when done. But good enough to replace a few parts, tires and fix up some farm repairs.
IMG_20251020_180805830_HDR.jpg
 
The bs90 frame is pretty nice. Funny how similar it is to the ca95 frame. Fork is pretty lightweight, but the weld quality is a lot better everywhere, no voids or splatter. It is 6 years newer than the ca95, so may just be that.
 
While I am waiting on the exhaust for the CA95 to clear customs, figured I would split the case on the BS90 - new kick start lever will be here friday. Pretty clean inside, outside needs some degreasing.
1761772278616.png
Trying to keep myself from just using this spare 200cc ;)1761772319374.png
 
Well, it wouldn't be a 2 smoker then.... :giggle:
Yeah. The oil injection line had already been plugged so they must have been premixing in the tank. No idea what the condition of this motor is, other than it does have some compression. Figure after I replace the snapped off kickstarter that I'll decide if the motor is any good
 
Pipes showed up and looks good. Only complaint is that the exhaust gaskets that came with my engine gasket kit are a little too big - can't even seat them with a socket. So I guess I'll give them a little sanding around the perimeter later and make them fit.

Edit: Guess you can't sand them since they are basically a spiral wrap of tin. Ordered some normal copper exhaust gaskets that'll be here wednessday.
1762192693911.png
 
Last edited:
I finally found good fitting copper exhaust gaskets at Wicks Aircraft and Motosports, AN900-19.

Nice looking headers, true circular, not later eliptical curve. Got a link?
 
Last edited:
Mechanically it is all together, now just to make it run. These fit perfect for exhaust gaskets PATIKIL M30 Copper Washer Sealing Ring, 4 Pieces 30mm ID 38mm OD 1.5mm Thickness Metric Flat Sealing Gasket Crush Washer for Screws Bolt Sump Plugs Oil Drain https://a.co/d/2AmdWyu
1000003300.jpg1000003297.jpg
 
It turned out really nice. Good work all along the way, everything clean and shiny. (y) Brown seat's not my style but that's just me.
 
Got back to the CA95 this morning to find out why no spark. Apparently when I put the air filter in, I pulled one of the wires off the coil. Duhhhhhhh. Fired right up after that, but wants to run at a few thousand RPM. So next thing to figure out is why. The manual isn't great, but I did set the air screw and 1.5 turns out (it was at 2) and that dropped the idle a little. Turning it down further did nothing. I also disconnected the throttle at the grip to make sure that it was not pulling - seems to not be.

So- I'll start searching, but any advice on what the issue may be?
 
Just for the sake of argument - if you have Not attached the breather line on the cylinder head to anything or the line that comes off the carb spacer - would that do anything bad?
 
Next task finding a new e-clip for the needle since I launched it somewhere in the shop. I skipped my normal step of tiring a piece of floss to it and my finger
1000003333.jpg
 
Last edited:
Back
Top Bottom