-
Don't overlook our Welcome Package, it contains many links to important and helpful information about functions at VHT like posting pictures and sending PMs (private messages), as well as finding the parts you need.
AD
You are using an out of date browser. It may not display this or other websites correctly.
You should upgrade or use an alternative browser.
You should upgrade or use an alternative browser.
CA95 project(s)
- Thread starter oldjeep
- Start date


ballbearian
Veteran Member
Tailight wiring in rear fender channels?
Not yet. Tail light not here. But I had already fed some test wire through it after painting, shouldn't be an issue.Tailight wiring in rear fender channels?
Any chance you have an extra 5 position ignition switch in that pile?Picked up this whole pile of parts yesterday. Plan to make 1, maybe 2 bikes out of it and give away or sell the rest. 3 CA95 frames, 1 CA160 frame. 2 engines, 7? wheels including a couple new rims, one already laced up and the other the hub has been polished and the spoke kit came with. Need to finish up my FZ600 project before getting too carried away, but will get all the parts sorted and cataloged this week so that I know where I am at.
View attachment 41247
View attachment 41248
I do have an extra one that has no key - but waiting to make sure that the one I plan on using actually works. Guess I could check it with a meter - just getting to that pointAny chance you have an extra 5 position ignition switch in that pile?

ballbearian
Veteran Member
Nice to have better choices. My project bike actually had some plastic repops from Asia that I'm not too keen on. I'd check fit your options if any were from the CA160, might be slightly different, not all Dream ones fit all.Last paint for a while. I still need to do the tank (after I line it) and the side covers - once I find a pair I like.
Mine came with some brand new plastic ones, the fit is terrible and no provision for the rubber bumpers. I've got one left side metal one that seems like it will clean up decently but have not checked the fit. Figure that they are the last parts I need. Might take a trip out to Sport Wheel and see if any of the 20 or so dreams/babies have good covers. Don't recall, but looking at the pics I took in may - plenty seem to have key switches.


Picked up a few small parts today at the junkyard. Were not any really good handlebars or side covers, but got a few of the small stuff I was looking for. FWIW - there are about 30 Dreams/Baby dreams out there. About a dozen with ignition switches (no keys). Couple well priced rebuilds - basically they run and look pretty decent from 10 feet away.


Last edited:
stl360+450
Veteran Member
I love looking around places like that. Do they do business remotely? And is it a narrow focus or a little bit of everything type of place?Picked up a few small parts today at the junkyard.
It is a whole pile of everything. 10 acres. You could call and see if they pull parts. They sell some stuff on eBay. Sport Wheels in Jordan MnI love looking around places like that. Do they do business remotely? And is it a narrow focus or a little bit of everything type of place?
ballbearian
Veteran Member
Candyland!
Only the early ones had the chrome round fork side plugs (needs a spring to hold them in) the later ones had either black or white plastic.
If I was changing bars, I'd try to find an early throttle with normal wind up action, instead of the sliding hinge type, ala, late Benly or Dream. They always have slop in the take up that can't be overcome. I've tried.
Also - depending on what you are looking for - pm me. Always looking for a reason to go out there. But does need to be a bike/part that I could identify.I love looking around places like that. Do they do business remotely? And is it a narrow focus or a little bit of everything type of place?
Yeah, don't want the slider. Was just trying to take the easy way out of drilling and grinding the oval holes for the internal cable/wiring. I have a set of new aftermarket bars that came in the parts pile. Just hoped to find the style with the collar that fits the bar holder and holes already there - I have new grommets. The whole tariff thing has really screwed up the supply line from Thailand. Should have ordered a bunch of stuff earlier but assumed that the de minimus elimination would be short lived.Candyland!
Only the early ones had the chrome round fork side plugs (needs a spring to hold them in) the later ones had either black or white plastic.
If I was changing bars, I'd try to find an early throttle with normal wind up action, instead of the sliding hinge type, ala, late Benly or Dream. They always have slop in the take up that can't be overcome. I've tried.
The chrome caps, I had one good one and the one I grabbed was the only good one out there. Grabbed the spring because it was better than the one I had.
stl360+450
Veteran Member
That's a very generous offer.Also - depending on what you are looking for - pm me. Always looking for a reason to go out there. But does need to be a bike/part that I could identify.
") I'm not hunting anything at the moment, but I could see myself making a trip to a place like that to pick up a parts motor or two sometime. Who knows what else would end up hitching a ride home if I do...
I'm not hunting anything at the moment, but I could see myself making a trip to a place like that to pick up a parts motor or two sometime. Who knows what else would end up hitching a ride home if I do...I live about 15 miles away. I took the fjr with the trailer just in case I found more toysThat's a very generous offer.
. 
ballbearian
Veteran Member
Good titles on your book shelf.

Spokes
Veteran Member
Speaking of planes, I highly recommend Skunk Works.

Sounds good, I can get around the key issue. where in Minnesota are you located? I'm in Spring Lake Park.I do have an extra one that has no key - but waiting to make sure that the one I plan on using actually works. Guess I could check it with a meter - just getting to that point
Got most of the wiring connected (hopefully correctly). Waiting on more parts and just installing what I can. Got the convertible tack strips riveted to the seat frame and gave it a covering of stretch foam. Not much else to do with that seat until I get ahold of the cover that I want.


.jpg")
ballbearian
Veteran Member
Pretty cover, hope it puts a smile on your, or her, cheeks.
Its the little things that always slow down a project. Was going to install a chain today over lunch and realized that there was a lot of slop side to side in the rear wheel. Never put it on more than finger tight since I knew that I needed to add the chain later. Apparently I never installed spacer 5. Even weirder is that I have 5 different full rear axles and associated hardware and not a single #5 in the hardware piles. Not sure how that happens, but I have a used one coming Thursday at a reasonable price.

ballbearian
Veteran Member
I've seen that left out on a Dream and result was not pretty. Seems they are easily forgotten and lost.
The thing that bugs me is that most of the stuff I got was in boxes, but there was one complete (rusty POS) that I actually took apart. So that means that either I lost it or it was never there. FWIW that bike didn't rollI've seen that left out on a Dream and result was not pretty. Seems they are easily forgotten and lost.
Anyways, need to take it off the lift and turn it around so I can actually drop the rear wheel in the lift drop hole. I managed to install it since the front wheel wasn't on initially. Should roll well enough for a quick turn around
ballbearian
Veteran Member
The Benlys, Dreams and C200s with full chain guards are pretty cool that the rear wheels can be removed leaving the drive sprocket with chain in place. The manuals show this.

ballbearian
Veteran Member
Yeah, remember Benly means convenient in Japanese.It is really the only way to install the upper chain guard unless you want to scratch the crap out of it.
After doing some test fitting of the chain guard, I understand why they are rare. No competent owner/mechanic would have r&r this silly thing more than once. The order of operations to replace a chain is just crazy. Pretty sure that I will transform the top into a more standard guard and never install the bottom again.
ballbearian
Veteran Member
My chains are overly modest and would be ashamed to be seen naked.After doing some test fitting of the chain guard, I understand why they are rare. No competent owner/mechanic would have r&r this silly thing more than once. The order of operations to replace a chain is just crazy. Pretty sure that I will transform the top into a more standard guard and never install the bottom again.

So - a question for the folks who have done this before. Once the entire mess of wiring is connected in the air filter area - is there more than just the one clamp to hold it all in place? The clamp that is forward of the air filter hole. I'm just looking at it all and wondering if I should bundle it all with zip ties or if I am missing some sort of organization aid for the wiring. Air filter, seat cover and some grips are on a slow (boat?) from Thailand at the moment so I have a while to ponder.
Also, I am regretting the plastidip on the peg bar and kickstands. Pretty sure I will be peeling it off and just painting them.
Also, I am regretting the plastidip on the peg bar and kickstands. Pretty sure I will be peeling it off and just painting them.
Spacer showed up, so buttoned up the taillight wiring and got the back wheel back on. New handlebars showed up and starting to figure out how much of the controls I will be able to clean up and use. For the number of partial bikes that I started with, there are a lot of things that I only got one of in the entire pile. Been putting off lining the tank, guessing that will be tonights task so that I can paint the tank this weekend.

ballbearian
Veteran Member
There was a rubber sleeve that slid over the connections then into the clamp. I just wrapped an old bicycle inner tube around them. I think just the one clamp, can't remember.So - a question for the folks who have done this before. Once the entire mess of wiring is connected in the air filter area - is there more than just the one clamp to hold it all in place? The clamp that is forward of the air filter hole. I'm just looking at it all and wondering if I should bundle it all with zip ties or if I am missing some sort of organization aid for the wiring. Air filter, seat cover and some grips are on a slow (boat?) from Thailand at the moment so I have a while to ponder.
Also, I am regretting the plastidip on the peg bar and kickstands. Pretty sure I will be peeling it off and just painting them.
Reminds me to try to find some tighter fitting footpeg rubbers, mine are loose and I look funny running down the road trying to kick mine back on as they work loose.
Spokes
Veteran Member
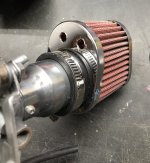
As far as the air filter goes, I'm a little rogue. See pic. I've learned a couple of practical ideas following your thread with the help of ballbearian.
1st is getting the chain guard on. I've struggled to get the chain guard together with the rear wheel on. Next time I install the chain guard the wheel will be off.
2nd The innertube wrap at the wiring clamp is a "shudda" figured that out myself. I went through the trouble of wrapping the bundle with wire wrap normally used on British automotive wiring harnesses.
Foot pegs. Friction tape footpeg posts till snug. Kind of a crappy fix but it's ok for government work, as my late father would say.
Attachments
I will definitely wrap the wiring with something - there was no rubber in my clamp. I should have just gone cone filter instead of paying what I paid to get a stock type air filter on the way. Have some new foot pegs on the way since I didn't even have old ones. I figure that I will just drill and pin them if it becomes an issue.
ballbearian
Veteran Member
Sounds better than my restless leg syndrome behavior.I figure that I will just drill and pin them if it becomes an issue.
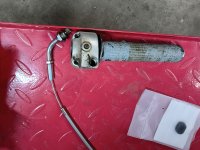
In a holding pattern now waiting on parts to come, so I lined both of the tanks that I had. Need to drill the petcock opening back open, but shows me how thick this stuff stayed. Doing a little body work on them now and then will paint them this weekend. If anyone has a start button they want to sell, let me know. Seems to be the only piece that I can't find in the parts pile.

ballbearian
Veteran Member
Looks good, watch those female threads, extinct 5x.9mm thread.In a holding pattern now waiting on parts to come, so I lined both of the tanks that I had. Need to drill the petcock opening back open, but shows me how thick this stuff stayed. Doing a little body work on them now and then will paint them this weekend. If anyone has a start button they want to sell, let me know. Seems to be the only piece that I can't find in the parts pile.
View attachment 50754
I bet I have that button, do you have the little spring and stop plate? Let me go dig.
Spring and stop plate? I don't even have the housing for the start switch - the ones I have found on ebay are starting out at $100 for something that looks like junk.Looks good, watch those female threads, extinct 5x.9mm thread.
I bet I have that button, do you have the little spring and stop plate? Let me go dig.
As for the tank threads, good to know what they are. Will have to see if I have that tap. I have the original screws from the original style petcock, but the aftermarket one would require me to find other screws or space them since they are not full threaded. Worst case, I suspect that I could redrill/tap for something more standard - but need to see how much thicker material they left outside the holes.

ballbearian
Veteran Member
Ok, looked like you had one in pic from #235 post. Can't tell much from that pic.
Are your bars slotted for the later slide hinge throttle? Late is same as Dreams (cable inside bar), early is like CB160 where cable exits curved chrome pipe.
First match bars and throttle, then we'll figure out horn button.
Not sure on that ebay one, can't see back if chrome pipe threads and boss are there. Different throttle pipes for each type too.

Actually they are available from the UKLooks good, watch those female threads, extinct 5x.9mm thread.
I bet I have that button, do you have the little spring and stop plate? Let me go dig.

M5-(0.9) x 10 Phil Pan Head Screw Former JIS 0.9 Pitch Trivalent Black
M5-(0.9) x 10 Phil Pan Head Screw Former JIS Thread pitch 0.90mm Pre ISO These are the old Japanese Industrial Standard Screws with the 0.90 pitch thread Used on older Pre 67 Motorcycles, Toys, European Cars, Drums and other musical instruments, Models, Telescopes, Radios.
 jis-fasteners.com
And here. Winds up being about $5 a piece shipped at a 6 quantity.

 belmetric.com
M5X0.9 Ex Coarse Pan Head Stainless Retired JIS B-1111 Screw
Bel-Metric sells metric hardware & specialty automotive supplies worldwide. Visit our website to purchase metric fasteners, nuts, bolts, screws, washers & more.
belmetric.com