1979 CB400TI - Western Colorado

Brian, thanks for the suggestion. Your advice coincides with a local upholstery person I met with. He suggested rehabbing the foam and patching it as needed. He also said it's easier for him to craft a cover. He said he could do the work for $150. I am going to clean up and paint the pan and pick up a couple of rubber parts and turn the job over to him.
 
Have made a bit of progress. The bike is now back up on its wheels and I have drained the crankcase. It is back in the garage and is still dripping. Plan to get it all buttoned up tomorrow and then get some oil back in the engine. Have looked at various threads regarding what oil to us, but am thinking of buying the oil at the Honda dealer and also picking up a battery. Have started to put things back together and hope by the end of this coming week to have most of the parts back on. Need to review the bench synchronization for the carbs I rebuilt a couple of months ago. The tank went through a Metal Rescue bath, but for the restart I will use a temporary tank. The seat is being redone at a local shop.
 

Attachments

  • Honda CB400T_53.jpg
    Honda CB400T_53.jpg
    125.5 KB · Views: 17
I buy oil at O'Reilly's or Autozone where it's cheaper than Honda. All you're concerned with is that it's 10-40w and JASO MA rated. I use Castrol 4T in mine.
 
Took off the coil this morning and compared it to the coil I bought from 4 into 1. I can see that the wires to the plugs are oriented differently. When I rebuilt my CB750 I had a similar issue with the aftermarket coils, but that did not seem to matter. Just need to be sure that the wires don't interfere or live too close to the bottom of the tank. Also I want to replace the screws holding the muffler covers. I believe the packing washers are readily available and wondered about just using a stainless steel 5x8 pan screw to replace the old, rusty screws.

Thanks,
 

Attachments

  • Honda CB400T_57.jpg
    Honda CB400T_57.jpg
    135.6 KB · Views: 15
Jim, Thanks, maybe just stick with zinc, but still use the anti-seize. I am tempted to use the old coil. The crack may be superficial. On the other hand, I could mount up the new one and see how the tank fits around the wires.
 
Jim, I could see how that could be interesting. :biggrin: I am going to mount the new coil and put the tank in place. If it looks good and I don't see any potential interference then I'll trim to the plug wires and go with the new coil. Heck that original coil is old enough to be my kid!

When I get ready to remount the carbs what should I do with the air box rubbers? I have pulled them out and cleaned them up but have not put them firmly back in place. Is it easier to mount the carbs and then refit the air box rubbers?

Thanks
 
Most of us just fight the air box rubbers back in after the carbs because we're too lazy to remove the reap wheel and shocks to pull the air box back for clearance like Honda says to do. Helps if they are warm and more flexible, lay them in the sun for awhile.
 
Jim. I just noticed that the choke cable is broken where the metal and the plastic tube meet. I suspect that I could "fix" it for the restart, but I am thinking that if I want to replace it, it should be done before re-installing the carbs because that connection is at the bottom of the carb controls. It looks like there are some options out there to get a new one. Headed over to the Honda shop tomorrow to pick up a parts order and will see what they can do. If it is an easy replacement, then I may just forge ahead and replace it later. Thanks
 
...but I am thinking that if I want to replace it, it should be done before re-installing the carbs because that connection is at the bottom of the carb controls.

It is MUCH easier to connect the choke (and throttle) cables to the carbs before you fully install them onto the bike. It’s not the simplest procedure while holding the carbs sideways, and close enough to reach the cables!

https://www.partzilla.com/product/honda/17950-413-690?ref=b754d10076813f02b663b2be93e5dc09e0b4b9e9

https://www.motionpro.com/product/02-0158


Tom - 1982 CM450E
“Noob”, but learning fast.
 
Yeah, that's where they normally break. My last new one I coated that area with JB Weld and it's lived for years now. Replacing that cable with the carbs in isn't a problem as long as you connect the ferrule to the linkage before setting the adjuster clamp in place. Throttle cables are nearly impossible with carbs in place.
 
Ive actually gotten quite good at doing this. I’ve never attached the cables before mounting the carbs. Ha ha.


Sent from my iPhone using Tapatalk

[emoji15][emoji15][emoji15]
You’ve either more patience, or triple or quadruple jointed, and smaller fingers than I have! Or both. Or better tools. Better something.


Tom - 1982 CM450E
“Noob”, but learning fast.
 
[emoji15][emoji15][emoji15]
You’ve either more patience, or triple or quadruple jointed, and smaller fingers than I have! Or both. Or better tools. Better something.


Tom - 1982 CM450E
“Noob”, but learning fast.

Ha ha. I have huge hands! I wear a 3XL riding glove. [emoji2375]


Sent from my iPhone using Tapatalk
 
Thanks everybody for your thoughts. Ordered the Motion Pro choke cable today. I hope the length is right, but from what I could find the MP cable is the only one that is readily available. MP lists CB400T1 as compatible. Might cause a slight delay in my restart plan which will allow me to hit the Gunnion River for some fly fishing.
 
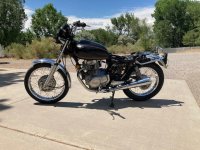
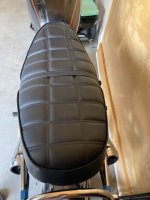
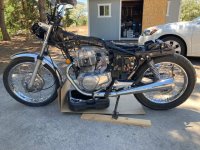
Here's a picture of the bike with the tank, grab bars, and instruments in place. Having that grab bar in place sure makes it easier to move the bike around. Checked on the seat and it might be done next week. I did get the Motion Pro choke cable and have installed it. The cable is the same length as the stock cable, but the housing is shorter. Holding up the old cable to the new MP cable and measuring from the metal clasp, the length appears to be the same. Might get the battery tomorrow.

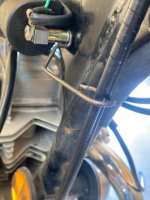
The other picture is of the clutch cable bracket and this looks wrong to me. I was thinking that the bracket needed to be against the frame because if not that might ground the coil, but maybe I'm wrong.

Also, have been relegated to doing home projects, too darn windy to fly fish
 

Attachments

  • Honda CB400T_58.jpg
    Honda CB400T_58.jpg
    121.6 KB · Views: 14
  • Honda CB400T_60.jpg
    Honda CB400T_60.jpg
    90.7 KB · Views: 18
Well I am back with a bit of an unexpected issue. Decided to put the chain back on and thought that I needed to see what was under the left side cover. To my chagrin, I found a bunch of rust and one of the 6x35 hex head bolts snapped. Likely it is cross threaded. I removed these bolts by hand but I could tell this one was tight. Tried to soak it as best I could and used my small vice grip, but no good. Will need to cut if off and drill it out. Will accept any advice on doing this.

Also, I tried to loosen the two 6x45 screws that are part of the generator and did not have any luck. Have been careful not to strip any screw heads. Probably won't know if the generator/stator is good until one pulls the cover off. By the way, does the large center bolt have reverse threads? Going to Honda shop soon to pick up battery. I am thinking this discovery might slow me down a bit. :rolleyes:
 

Attachments

  • Honda CB400T_61.jpg
    Honda CB400T_61.jpg
    93.6 KB · Views: 12
The large center bolt (that holds the rotor on the crankshaft) is standard right-hand thread. You need a specific size and thread bolt to remove the rotor if you plan to, but I do know it isn't that unusual for there to be a little rust under that cover as it is a dry cover (no oil) unlike most of the other twins where the alternator runs in oil. As you already know, LDR is the best for answers on these bikes but the rotor puller bolt information should be in the FSM.
 
No need to remove the rotor, run these tests to see if the stator is good https://www.vintagehondatwins.com/f...gnosis-for-1978-86-CB-CM-400-450-Manual-Trans
If you find the need to remove the rotor then you need either this tool https://www.motionpro.com/product/08-0086 or a bolt that matches it.
Some rust in that area is perfectly normal, it's a dry area that easily collect moisture causing the rust.
Before cutting the broken bolt off try penetrating oil and vise grips to see if you'll get lucky. Otherwise it's cent punch the bolt and drill, may need to heli coil when done.
 
Right on Jim. I took a green pad and small brass brush to the rotor and it cleaned up pretty well. Saw the rust and had a slight panic attack. Will try the big vice grips in the morning, maybe some magic will happen overnight. If not go to plan B as you described. Will check out the stator tests. Just picked up my battery from Honda. I probably messed up a little in that I bought a stock replacement. Oh well, I'm sure it will work. Many Thanks!
 
The standard lead acid battery will be fine, just be sure that the vent/drain hose is attached and run down to open below the swingarm. If above then the liquid will rot the paint off. Be sure to check the fluid level every 3-400 miles since it does boil away slowly.
Positive thoughts that the vise grips work out for you
 
Jim,
Appreciate the battery advice; will do. There is a long clear tube that is on the battery and runs from the top. No luck with the vice grip. Cut off the nub of the bolt that was left and punched the center as best I could. Drilled a small hole to the right depth, but I discovered that this hold daylights out the back. Not sure if I did it, don't think so, or what. Anyway eventually I tried a 6mm bolt extractor, but no luck. Eventually I got enough metal out the way and was able to pry out a portion of the old bolt threads. Had a sacrificial bolt of the same size and carefully turned it into the hole. It does bite a bit, and I plan to try to tap it, but a Heli-coil would be the thing to do.
 
I think I may have got lucky and solved the problem. First of all, this location is probable the most forgiving; there is easy access and you can feel the back side of the assembly. I was able to dress the bolt hole with a 6mm 1.0 tap and probably go a bit deeper than the stock bolt. Also, I determined that I could use a 6 x 40 in lieu of the 6 x 35. Went to the local True Value and picked up both a 6 x 35 and 6 x 40 cap head bolt. The case provides a nice support for the bolt and I carefully ran the 6 x 40 into the hole. It snugged up nicely and for now this issue is solved. The cap head is a bit different and in the future I may get a nice bolt kit to upgrade the look. BTW, I do have access to Heli-coil tools.
 
The case provides a nice support for the bolt and I carefully ran the 6 x 40 into the hole. It snugged up nicely and for now this issue is solved.

Great news, glad you got it fixed. Here’s what the S/S Allen heads look like if your curious - on an unpolished side case cover. Much, much easier to work with, I won’t go back to the hex heads. Cheers.
b4c397ae463e84676a6f04fa7e88a591.jpg
 
Those look great Tom. I am going to put those bolts on my wish list. Have a couple of upcoming events that will slow down my progress, but hopefully will be able to restart the engine in early July; and take a test ride to determine how the bike performs and then plan my next steps. Just over 14K on the odometer so I'm hopeful. I put the chain back on the other day and have located a solid chain guard that is on the way. Love your avatar pic, which one are you? :)
 
Love your avatar pic, which one are you? :)

[emoji1787][emoji1787][emoji1787]

Here you go. A set for a whopping $7.95. Get this off your wishlist and on the bike!

https://4into1.com/stainless-steel-allen-bolt-set-honda-cb400t-cm400t-1978-1979/

I picked up a set for my SL350, but have not decided whether I want to abandon the stock look. Once I discovered JIS screwdrivers, stock screws are no longer the bane of your maintenance time.

Yep, that’s where I got mine. I think Dime City Cycles has them, too. And definitely, DEFINITELY get yourself a decent set of JIS screwdrivers if you don’t already have them. OEM screws are one thing, but the hex heads gotta go. I wish I could have fit Allen heads on my carb-to-head insulators - PITA to turn that little bolt a zillion times, but no room for a hex bit or key.
 
Wow, Clutch Cargo, one of my favorites as a kid. Great nickname and Avatar. Guys, I am signed up with both Dime and 4into1. Will include that bolt kit the next time I buy parts. However, I want to let you know, I have had great success buying parts directly from our local Honda Powersport dealer. I have found the prices to be very good and no shipping charges as long as you let it arrive normally. It's also nice talking directly with the parts guys and looking at their screens. Of course it helps if you know the part number; which is just something guys like us do! Also JIS screwdrivers and bits changed my life when I was rebuilding the CB750. Bought the Vessel assortment deal; I think I paid $75 for it, see it now cost over $100. The bits have come in handy as well, especially when used with my impact wrench. The one tool upgrade I want is to get is a set of 6 point metric sockets. I hate those 12 point sockets that tend to round off nuts and bolts.
 
^^^And if you're still using JIS screws (so many change to allens), a good t-handle like Motion Pro with 3 interchangeable JIS bits is great as well, gives lots of leverage on stuck screws.
 
I looked that up on the MP site and that is a neat set up. I purchased a set of 5 bits from Vessel when I got the screw drivers. So now I am thinking what can figure out to replicate that tool. Thanks Dad!
 
Thanks! It has always seemed applicable to use on motorcycle forums.

It's interesting to me that I'd never heard about the character before, but after looking up the show I learned it only ran for one year during which I turned 5 years old. My mother was a stay-at-home Mom back then and we spent a lot of hours together with her teaching me things, and rarely watched the TV during the day which is why I never saw it.
 
It's interesting to me that I'd never heard about the character before
Always a part of my Saturday morning cartoon lineup. Clutch Cargo, Space Ghost, Fireball XL5, SuperCar, Jonny Quest, Thunderbirds, etc. Given that while on our bikes, we are cargo for the clutch, the avatar always seemed fitting for bike forums.
 
Back in town for a day or two and my local upholster called to say that my seat was ready. He rehabbed the stock foam and used it. Fortunately I carefully took it apart and then he recovered it. The shop is a locally owned family business and it was great doing business with him. Also he did the job for $150, which I think was very fair. I have not put the under seat hardware on yet, it is just sitting on the bike. It does not have the famous HONDA logo on it. He is not a fan of the decals or transfers; rather he suggested letting a sign shop paint the logo on the seat. Do I or don't I?

With a little good luck late next week I will try to restart the bike.
 

Attachments

  • Honda CB400T_62.jpg
    Honda CB400T_62.jpg
    104.3 KB · Views: 17
  • Honda CB400T_63.jpg
    Honda CB400T_63.jpg
    92.5 KB · Views: 14
Seat looks good, score another one for the good local guys. Wish we had more of them everywhere. You could look for a stencil for the back of your seat, that's what I did on the aftermarket seat I put on my 450
 
Nice seat! My replacement doesn’t have the Honda logo either, but I’m ok with it. You wouldn’t see it that well behind the tail light, and it is embossed(?) on the original seat so it didn’t show up that well either. Personal preference, whichever you like.
 
Good thoughts guys; thanks. I didn't have it on the restored seat for my 1974 CB750 and still got top dollar when I sold it. Sold it! What a stupid thing to do that was! :rolleyes:
 

Attachments

  • Finished 3.jpg
    Finished 3.jpg
    205.5 KB · Views: 9
What a stupid thing to do that was! :rolleyes:

We've all done it, so it really depends on what the circumstances were. I have a few that were just plain old stupid, like selling my paid-for '79 CBX because it was sitting in the garage while I had a new '82 Z-28... now THAT was stupid.
 
If you mean the CBX, I was fortunate to never have to do it with either the '79 or the '80 I owned almost 10 years later. They were close enough, though it idled a little bit rough but nothing to be aggravated about and it certainly wasn't worth messing with in the event that I made it worse instead of better. The primary chain growled a bit because of it but that went away if you pulled the clutch, so I didn't care. Nobody paid attention to that anyway, they were too busy listening to the exhaust note of the Denco 6 into 6 pipes :dizzy:
 
Back
Top Bottom