1979 CB400TI - Western Colorado

Denny K

Veteran Member
Joined
Feb 2, 2021
Total Posts
203
Total likes
45
Location
Grand Junction. CO
Folks,
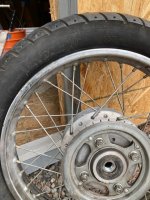
Recently picked up a 1979 CB400TI. This model as you can see has the spoke wheels, front drum brake and is kick start only. I have downloaded The Basic Checklist and Shop Manual for this bike. In addition, the owner’s manual was on board in the compartment under the seat and it is in good condition. I have removed the seat and tank and am figuring out what I need to do to get the engine started. A few years ago, I restored a 1974 Honda CB750K with a little help from my friends. Took it down to bare frame, put in new rings and did a top end so I do have some experience and am looking forward to seeing how this bike turns out.
I would like to ask a few questions to be sure I get started in the right direction. I have spent several hours perusing the VHT Forum and looking at threads of interest; hopefully I won’t be asking too many questions that have already been answered.
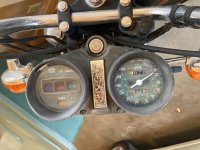
Keys – I have no keys and the guys at the Honda shop told me to locate the key code; they will get me fixed up. I bought the bike from them and they told me they would take care it. I have poked around but have not found it. I have not taken the instrument cluster apart. Bottom line, if I need to, I will pull the ignition switch and take it to a locksmith. However, if someone knows where the key code is on this bike that would be very helpful.
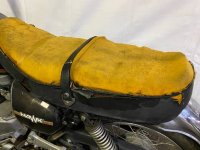
Seat – I am inclined to buy a new seat rather than get this old one rebuilt. I like the stock look and wonder what sources folks might suggest. I saw Texavina seats that looked nice and of course there are plenty of other vendors.
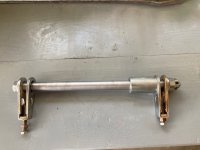
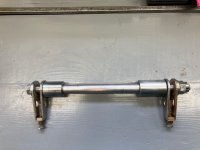
Rear Passenger bar and turn signals – This item did not make it. I have seen some for sale on eBay. Will go that way, but would rather buy things from Forum members if available.
Rear Tail Light – The large hard plastic socket holder is broken. Am looking for that, hacks to fix the one I have, or cool substitutes.
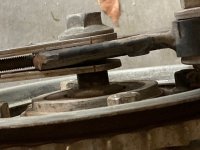
Case Pilot Upper – Areas around the instruments are broken out and am looking for that part or other suggestions.
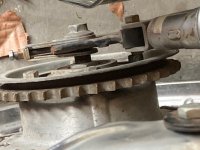
The coil case is cracked and the plug caps are in bad shape, I plan to replace all that and get new plugs. Need to get a battery. The tank needs to be cleaned, but I do have a temp fuel tank I used for balancing carbs. Will do a cold compression test on the engine before trying to start it.
I have standard motorcycle jack but wondered about using that jack on this bike because of the pre-chamber unit. Don’t want to damage that. Any suggestions on using the jack?
Thanks, and all comments are appreciated. Not sure how the pic will turn out, need to review how to post pics. Sorry
 

Attachments

  • Honda CB400T_9.jpg
    Honda CB400T_9.jpg
    130.6 KB · Views: 49
Wanted to add a couple more pics. One showing the cracked coil the other damage to the case upper.
 

Attachments

  • Honda CB400T_11.jpg
    Honda CB400T_11.jpg
    110.3 KB · Views: 48
  • Honda CB400T_12.jpg
    Honda CB400T_12.jpg
    111.8 KB · Views: 50
At one time in a more honest era, Honda put the key code in a visible spot on the ignition switch but it was too easy for a thief to get a copy of the key, so they later put the code on the switch in a place where it must be removed from the bike to read it. VHT member 12ozPBR has a really large selection of keys he purchased recently and will probably have one for you once you know the code. I'm not well versed in the SOHC 400/450 series so many of your questions will have to be answered by others here who have more knowledge and experience. As for your pictures, they're uploading fine but the orientation when they were taken is the reason they appear upside down. Here's a link to help explain that, it was one of the many in the "Welcome Package" link I give everyone in my reply to their introductions.

https://www.vintagehondatwins.com/forums/showthread.php?507-Pics-post-upside-down
 
The key code is on the base of the ignition switch as mentioned and you'll have to remove it to see.
Not sure about replacement seats, my seat pan and foam were in good enough shaper to recover.
I'll look at the extra rear grab handle I have and see if it's in decent shape, I think it is. Might have the TS on it.
I'll look at spare taillights also.
The instrument housing is typically brittle with age and sun exposure. I'd look for a replacement there. It can be refinished using Rustoleum flat or satin black and fogging on several coats so the grain pattern remains.
Plug caps are NGK XD05F. There are several different coil suppliers, the key thing is that the primary resistance has to be 1 ohm or less. DSS was selling replacements that were too high, may have corrected that issue by now. If they don't list that spec then ask before buying.
No problem using the jack and the power chamber to lift the bike, it's real heavy duty metal and won't collapse.
Your model cam w/o a center stand. You can add one easily by getting the stand, spring and C connector from any of the CB400's or CM400's.
You can also add the T2 tach by replacing the right side cover which contains the tach drive.
 
Jim,
Thanks for this info. Spent the morning diving into the instrument cluster to figure out the ignition switch. Glad you confirmed that is where the code is. One thing led to another and I was into the headlight bucket; off came the turn signals and with a little patience I disconnected the ignition switch plug and found the code. Have called the Honda shop and the guy I bought the bike through said they will take care of it. Also, the Honda shop is giving me a discount on parts, so I will check on prices for the plugs, caps, and coil.

Will put the bike on the jack sometime soon. I want to turn the wheel by hand and put some lube on the chain. If you do have an extra grab bar, please PM me. You live in a beautiful part of the world up there. Sailed in and out of Vancouver up to Alaska a few years ago. We drove from Colorado and parked the car at the port. Sailing under that big bridge was fantastic.
 
The taillight is specific to the 1978/79 CB400's and I don't have one of them
The grab bar has good chrome, turn signal mounts will need to be straightened. Turn signals will need some work as well.
PM sent
 
Jim,
Got you PM and tried to respond. Can't tell if it went through.

Denny

If you go to your Sent messages box and you see it there, you know it went out. This forum software is damn near bulletproof in most ways, one of the reason we like it despite its age
 
Folks,
Decided to pull the carbs off the bike yesterday. I have to admit it was quite the effort and took me nearly 4 hours. Eventually removed the bolt holding the air box to get just a bit more play, used some silicone gel and applied some heat. Finally one carb popped off the head insulator and then the other, but the darn things seemed to be tangled and stuck in the air box rubbers. Don't worry that throttle cable was loose, just not fully disconnected. Finally with a more shaking and twisting the carbs came free. I pulled carbs from a couple of CB750K bikes and that was a chore, but this was a lot harder than I expected. Just wondering if I did things right. But now off to cleaning and rebuilding the carbs. I hope reinstalling will be a snap.
 

Attachments

  • Honda CB400T_23.jpg
    Honda CB400T_23.jpg
    111.6 KB · Views: 29
  • Honda CB400T_24.jpg
    Honda CB400T_24.jpg
    79.5 KB · Views: 24
Honda's way to doing it is to remove the rear wheel and release the airbox so it can be moved backwards.
Most of us just pull the air box boots out and then there's more room for the carbs. Cables get removed after the carbs are out and free, installed before putting the carbs in.
Now is an excellent time to replace the carb insulators.
 
I should have the tail light, cluster, and a grab bar with signals. I'll get some pictures and list them in the Parts for Sale section. I'll pm you when the ad is up.

Welcome!
 
Jim,
Thanks for the feedback. I looked at trying to get the airbox boots out of the way, but did not want to damage them. By what method did you pull the boots out? Did you yank them forward or pry them out? I am on the hunt for the carb insulators and O rings; I see some big price differences on the insulators, but want to get a good quality product. Was able to get the bowls off my set; I'm sure this was the first time that has been done on this bike. Did an initial cleaning and thinking of taking them for an Ultrasonic treatment. Have read your thread on rebuilding the carbs several time and plan to print it off; nice piece of work.
 
Alan,
Thanks for taking a look at my effort. Another member did donate a grab bar to me, but it will need some work. Will be happy to take a look at your offerings. Do you still have your 750s?
 
Folks,
Making headway with the project. Have the carbs apart and doing the cleaning as suggested by Jim, also have new insulators coming. Need to ask about the bracket that secures the carbs on the air box side. My bike seems to have come without that bracket. I can see on the parts diagram that one is shown, but no part number. My post above on 2-12 shows the carbs during removal without said bracket and an earlier picture I have of the engine in general shows the carbs without the bracket. Is this bracket essential or maybe this model did not have it? Thanks
 
Just so you know you're not being ignored at times, Jim (LDR) is the resident expert on this model series and these carbs and he'll be along to let you know. Personally, I've never worked on one or even ridden one so I am of no help.
 
Folks,
Wanted to give an update on my project. The big job was removing the carbs and getting them cleaned and back together again. No picture, just imagine a shinny set of VB21 carbs. There were of course some issues I encountered that I wanted to share and might be helpful to others. First of all I wrecked the head on one of the emulsion tubes and my subsequent adventures in getting it out and getting new tubes. I earned a sticky for this, no need to go over all that. The other two things popped us during reassembly. When it came time to put the bowl on, it would not fit down onto the carb body. Seems like something was blocking it. Pulled out the jets and tried, but still it would not go down. Figured maybe I bent the overflow tube, but even trying the other bowl it would not fit. Finally I determined that the new float pin that came with the kit was a bit too long and it was hanging up the bowl. Replaced it with the stock pin and the bowl fit like a glove. Then came the choke relief spring. I spent a long time figuring out just exactly where the larger curved hook connected, then how to get it around the bend and into place? Finally I took a piece of 22 gauge phone wire made a little hook on the end and pulled the relief spring round the bend and hooked it up. No doubt there are many ways to pull this off, but that's how I did it.

I have cleaned up the instrument case and made it serviceable. Also had to get keys made; so now I can get the headlight and cluster back together. Have secured new insulators and O rings for when I mount the carbs; along with a new coil, plugs, caps and wires. Am crafting a wood frame to marry up my jack with the engine and frame so I can get the wheels off the bike and start working on them. New brake shoes, tubes, tires and inspect the spokes; also a battery, new cables and fresh oil. Have gallon of Metal Rescue to clean the tank and a new petcock. BTW, I would love to find a cap bolt that fits the tank to use as a plug when I am cleaning it; anyone done anything like that?

Will be busy with family for the next little bit so progress will be delayed. A big tip of the hat to LongDistanceRider for all his help and advice.
 
Finally getting back to working on the bike. Thanks A.D. for the suggestions on the brakes. Am in the process of getting the wheels off the bike; without a center stand, I am struggling a bit to get the bike jacked up on my motorcycle jack without getting in trouble. Will be calling a friend to help with this. Took the chain off and in looking at the rear axel set up, I think this bike is missing a wheel collar; just checking if I am right?

Hopefully the bracket to adjust the wheel is not sprung.

Thanks,
Denny
 

Attachments

  • Honda CB400T_38.jpg
    Honda CB400T_38.jpg
    94.6 KB · Views: 22
Thanks Jim. Will soon be getting all this apart and will see. I did find a "rear wheel collar" part number 42311-413-000 that looked like it might fill that gap; but for now I will wait to see what I find.
 
Got the bike up on my jack and spun the rear wheel only to hear a clicking sound that ended up being one of the sprocket bolts bumping up against the frame. The wheel had slid to the left. Unfortunately I am finding a number of missing pieces on this bike; just hope all the parts are in the engine! Will be sourcing a rear wheel collar.
 
With a little help from my friend, we got the bike under a block on a furniture mover and strapped down. Pulled the front and rear wheels off and removed the brake drums. Getting the rear wheel off was difficult and required the big hammer to finally drive the axel out. So here is a picture of the rear axel with the one collar/spacer that was located on the wheel side of the bike when I took it apart. There was no collar on the sprocket side which seems strange to me, but frankly I can't figure out from the parts diagram for the rear wheel. I have looked at pictures of CB400 Hawk rear axels on eBay and there are some for sale that have two collars. When I took the chain off, the wheel slid to the left side of the bike. Just can't believe that the chain is designed to hold the wheel in place.
 

Attachments

  • Honda CB400T_37.jpg
    Honda CB400T_37.jpg
    92.4 KB · Views: 16
  • Honda CB400T_39.jpg
    Honda CB400T_39.jpg
    106.4 KB · Views: 22
  • Honda CB400T_40.jpg
    Honda CB400T_40.jpg
    84.2 KB · Views: 18
In case you haven't yet looked at these, places like cmsnl.com and Partzilla.com have the factory parts fiches to view the exploded diagram of parts involved in any section of the bike.

honda-cb400ti-hawki-1979-z-usa-rear-brake-panel_bighu0110f3012_d1a6.jpg honda-cb400ti-hawki-1979-z-usa-rear-wheel-cb400ti_bighu0110f3013_663e.jpg
 
Thanks A.D. and Jim. I did not check out the diagram that showed the rear brake; guess I had a case of tunnel vision. Now it makes sense. Looking for part number 42311-413-000. I don't think this part is generally available from what I have seen. There is a vendor in the UK and the other option looks like used stuff through eBay.
 
Wow, thanks. I went for the cheaper one and save a penny. My order is in and thanks for taking the time to source that for me. :)
 
^^^We're good like that. We hate to see anyone pay too much for parts for our favorites Hondas, they're expensive and hard enough to find as it is.
 
Got the short collar yesterday and cleaned it up. The axel looks like it should. Will be cleaning up the brakes and reinstalling what's there. My plan is to get the bike back together for a restart and a test ride. Am off to get a tube for the rear tire; discovered that the tube around the stem was badly torn.

Thanks Jim and Dad for helping find this missing part and at a great price!
 

Attachments

  • Honda CB400T_41.jpg
    Honda CB400T_41.jpg
    66.5 KB · Views: 8
Glad you got it sorted now. Jim did all the "heavy lifting", he can find stuff almost anywhere. :)
 
I have another question about the rear hub. I am trying to identify the threaded piece that is in the center or the hub. I can turn it with my fingers either way and I can see how the shorter collar fits up against it, but in my mind, that is not a very sanitary connection and would allow dirt and moisture into the hub. I have studied the parts diagrams and checked the shop manual but have found nothing that jumps out to me. Just want to be sure I get this back together correcly.

Also, I did clean up the brakes and drums on both wheels.

Thanks guys!
 

Attachments

  • Honda CB400T_42.jpg
    Honda CB400T_42.jpg
    132 KB · Views: 21
Jim, thanks for this. I did check the rear axel and it is 17mm as is the inside diameter of the collars. I tired to get the big snap ring off, but my snap ring pliers were not up to the challenge. However in messing around with the hub, that chrome nut came out. I cleanup the grease and I think #8 is there. I was able to read on the flange of the piece the word Japan and four other letters that I could not figure out. The new left side collar fits nicely into the space. The rubber washer is a bit worn and will get replaced. Plan to get a properly sized snap ring plier for the job; beg, borrow or buy. When I went looking for that part, it was hard to find and likely would have to come from cmsnl. The hub is sitting on top of a white 5 gal bucket thus the stark white back ground. Hopefully, I have dodged a bullet.

Denny
 

Attachments

  • Honda CB400T_43.jpg
    Honda CB400T_43.jpg
    137.4 KB · Views: 14
  • Honda CB400T_44.jpg
    Honda CB400T_44.jpg
    132.9 KB · Views: 10
Jim, I agree with you. Just a quick and dirty fix for a lost or possibly cannibalized part. Appreciate the link for the seal.

Cheers and Happy Friday.

D
 
Wow, that Motion Industries has everything under the sun. Ordered the seal today and also some hard to find Honda flange bolts from Honda Part Now. Mostly for auto parts, but I could not find the long flange bolts locally. Bolts are not pricey but shipping is...
 
With a little help my friend, we got the big circ clip off and removed the old seal and replaced it with the one Jim recommended. Also took a some time to clean up the rear sprocket that appears to have seen some pretty good action in its day. Will need to replace that pending a favorable restart and test rides. We turned our attention to installing the new tube for the rear tire, but after a few minutes decided to take it to the Honda shop and go to lunch. The folks at Perri's Powersports did the work and it was ready when John and I got back from lunch. No sore hands, no pinched tube and a rear wheel that holds air.

Decided to pour the Metal Rescue in the tank and get that process going. Noticed that the fuel cap gasket had some cracks in it. Applied a bit of silicone to the gasket in hopes that would refresh it, but when I turn the tank to the side I can see slight leak. I only put one gallon of MR in and planned to turn the tank each day. So I am looking for a "fuel packing cap" new part number 17631-329-003. Does Motion Industries carry a like item, or maybe Honda uses that part for some of its other bikes and ATVs.

One step at time!

Found out Perri's can get the part for less than $3 but have to wait for 5-7 business days. Grand Junction is a geographical oddity, 5-7 business day from everywhere. Apologies to the Coen Brothers.
 
Last edited:
Wanted to show off the wheels on this 1979 bike. The chrome and spokes are in great shape. Both tires are holding air and I hope to have the bike back up on its wheels soon. Then I'll get the headlight bucket back together along with the instruments and ignition switch. BTW, I took the ignition switch to a local locksmith and they made a set of keys for me there. Other parts on hand are a new coil, plugs, and caps. Carbs are rebuilt and have new insulators and O rings. The air box rubbers are out and cleaned up. Hopefully this will allow me to reinstall the carbs more easily. Need to get a new battery and a few bolts. Hoping for restart by the end of the month.

Decided to take the seat apart since what I had was pretty well shot. Got the old foam off mostly intact; found a good bit of rust on the seat pan. I don't think I want to personally try and rebuild the seat. Am fine with cleaning up and repainting the pan; but maybe just look for a new complete seat? There are folks around here that can rebuild the seat and I plan to check out those options.

I included a picture of my plastic chain guard and I wonder if anyone has tried to "fix" the rear attachment point. You can see that it broke off and there's no place to put the bolt through to the frame. Was thinking of using epoxy to build up or attach a strip of metal with a hole for the bolt. Besides taking a chance on something on eBay, does anyone know of an aftermarket replacement?

Thanks for any ideas and for checking out my project. :)
 

Attachments

  • Honda CB400T_46.jpg
    Honda CB400T_46.jpg
    135.3 KB · Views: 10
  • Honda CB400T_47.jpg
    Honda CB400T_47.jpg
    164.7 KB · Views: 10
  • Honda CB400T_49.jpg
    Honda CB400T_49.jpg
    125.2 KB · Views: 12
  • Honda CB400T_50.jpg
    Honda CB400T_50.jpg
    148.7 KB · Views: 11
Jim, thanks for pointing this out. Here's the seat intact as it was when I bought the bike. Were the CM and CB seats interchangeable? If in fact, I have the wrong seat and the pan is not correct, then the probably best to find a complete new seat. BTW, any thoughts on chain guards?

Denny
 

Attachments

  • Honda CB400T_2.jpg
    Honda CB400T_2.jpg
    35.8 KB · Views: 9
Yes the seats are interchangeable, the pictures I posted were related to a thread elsewhere about the seat fit to an CM tank on a CB400, There's a gap with the CM tank and CB seat at the front.
For the chain guard the options I see are replacement or use a piece of sheet metal glued to the original plastic. You'll want to drill holes thru both so the glue can squeeze thru and get better grip. I'd use JB Weld steel type for that.
Just went and looked at both seats and the latest photo. The CM seat does not have a strap like yours and the new photo shows less dish/rise at both seating positions. I'll call your seat as a CB
 
Jim, thanks for the tip on the guard. I was imaging something similar and will use the JB product you suggested. Also, thanks for taking a second look at the seat. I see the Bike Seat Factory has a cover and foam kit for what looks like the stock seat. S.C.I. has a good deal on the cover and straps, but no foam; would need to turn to a local pro to shape the foam.
 
It's hard to tell from photos of course but your seat foam doesn't seem to be in *that* bad of shape...

If you have, or can find, a handheld steamer of some sort (for clothes or drapery or whatever), it can kind of do miracles to re-fluff the foam, removing/reducing any divots or dents that might seem to be hopeless. Stretching on a new seat cover is pretty straightforward and would probably save you a ton of money sourcing a new seat or having a shop re-do yours.

And, if the upper surface wants to stay a bit lumpy, you could cover it in some thin carpet foam or something similar. Thin enough to not alter the shape of the seat but enough to smooth it out...
 
Back
Top Bottom