1963 CA95 Restoration

my D-cell powered strobe like arrived yesterday but unfortunately does not work so I will not be able to check the timing until I can arrange a replacement.


In the meantime I have had a go at resolving the rich idle. The stock slow jet is a #35 and although Honda did once upon a time offer a number #32 it seems to be unavailable now.

I was able to find an alternative set of keihin jets which are available as #31 and #33, but the need to be modified to fit

The jets are the right length and the screw thread in the same place as the stock jets, but the head, thread and emulsion tube are all wider than stock + the thread pitch is 0.75mm rather than 0.6. I was able to find the required 3.5mm/0.6 pitch die on ebay for a few quid.

the only tricky bit is the tube which needs to be filed down from 2.5mm diameter to 2mm as there is only just enough material to do this. I managed this by (engineers look away now) putting the jet in the jaws of my battery powered drill driver and gradually filing the outside of the tube.

It is then just a matter of reducing the diameter of the head, removing the old threads and recutting the new ones . I broke the first jet while doing the adjustments but luckily I had a spare (they are only £3 each), and the next two attempts were ok.

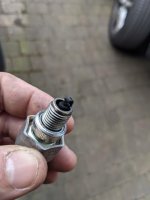
I could not get an idle with the #31 but the idle is good with #33 albeit still a bit rich I think. Here is a new spark plug after idling for a few minutes - no longer covered in soot, but still black
PXL_20210417_163619595.jpg


irritatingly I can't find a #32 which I think would be better. It is still rough at low revs but I am begining to think the may be the best I can get it. Anything else I can try?
 

Attachments

  • PXL_20210417_163619595.jpg
    PXL_20210417_163619595.jpg
    69 KB · Views: 8
I believe once your rings are fully seated your plugs will look more as you expect/want them to....(and the low range "blubbering" may disappear as well).....
To me that looks more like oil residue than fuel residue.......
These engines SOUND and PULL initially more like "high-powered vacuum cleaners" and the acceleration is quite gentle as compared to larger engines with more low end torque, so as long as it runs/pulls fairly well at mid-range and above, I believe you are close......
I actually expect you will go back to a #35 pilot once you are fully "broken-in"....
 
thanks Steve, in that case I will stop fiddling with the carb and focus on getting it registered and ready for an MOT.
 
What a great job you did on the bike and this thread. I know I'll come back to it, just for reference, as I go back to correct some issues on my 63 Benly (a mere 355 units later- #3103998). The one thing I did not see addressed was the 'round bowl' carburetor that was used on the early bikes. I hope yours is running good and hope to see it in the new gallery of 'before and after' project builds.
 
ah I see, I had not really looked at the sides carefully enough, now I can see clearly the groves at the base of the forks (worse on the inside faces). I had another good look at the dogs on the movable gears and the holes they fit into and - to my untrained eye - there is no sign of rounded over corners or other damage.


I hope the damage on the forks can just be blamed on normal wear and tear - I suppose I will find out if I ever get it running :)


ACtC-3e_0Fg87GbZoG2lekVLQO8rg4mOKoHwy6y0HJ7d4npbaz_xB8c0qmKF1afax9Diu0wgpGtGl8Zq5fnKCqloCQAXhAShIPJFpq0UZRL-gfIktVRFNt9AxGugLtUN9Yaf2z15G0VmE82NE8NR-sIP21LblQ=w1276-h1000-no


ACtC-3fdW2QLqvAbYVPpWWwB8qtZEqkThTWfixZfHGSmCEiCuFYKTjvkDlS78jjAp_FDO9wuqQBO7XRKDWFnbidEtZ9qdZHd6Rt14LkVuhknqJQhc9fW-t6KxOX1oUXMGD3XjrE5aw8-Aauq8ycrIPgYOfIyzw=w1493-h1276-no


ta, on the look out for replacements, no point spoiling the ship for a ha'porth of tar :)

I found these for my C(A)72 in Germany. Perfect fit. I don't know if the would fit yours (if you're up to disassembly once again :)), but they've got more in store.

Really nice thread by the way. Even in cheerful writings!
 
Nabs!! This is just an incredible document! Thank you so much for preserving that baby dream and taking the additional time to document and post!
I have been searching for an answer to this question! Can the rear suspension be adjusted on a 64 baby dream? For a heavier rider? Thank you very much for your time and consideration!
 
glad you found it useful mrmojo! I suppose you could experiment with stiffer springs to see if it helped.

Unfortunately the dampers are not serviceable and you may find that the oil has escaped over the decades. I did read somewhere about people drilling and tapping a hole in the base of the dampers to refill them with oil, which I suppose might be an opportunity to try thicker oil if you were feeling adventurous. You might want to wait to see if anyone who as actually tried this comes along to comment before giving this a go though :)
Thank you very much for getting back to me!! I really appreciate your expertise and kindness!! Thanks again!
 
Hope you are all doing well!

Several years ago I did some repairs on a CA95 that had been imported into the UK a few years earlier (I recorded my hapless escapades in this thread). The bike had seen better days and, although I did get it to run, it never ran well: erratic idling, hard to start and would not rev cleanly through the mid range, all of which made it essentially unusable.

At the time I was convinced the problem was with the carb (it appeared to be running very rich, and new spark plugs were quickly covered in black soot) - getting correct brass parts for this old bike is particularly tricky in the UK as this model was never sold here and, after months of futile trying various parts from other bikes, I gave up. As sometimes happens, life and other projects got in the way and the bike has remained parked under a groundsheet ever since.

Hard to believe this was all over 4 years ago. Anyhow, I finally decided I either needed to fix it or move it on to someone who could. I thought I’d record the progress here in the hope you might find it interesting and possibly help me in my investigations

I started by looking into a small but persistent leak that appeared to emanate from below the alternator cover. The contact breaker points on this bike are mounted on the crankshaft and after taking off the cover - and much to my surprise - I found the whole device was covered in a light coating of oil.

Perhaps I had been having ignition problems all along? This would be excellent news as I have all but abandoned all hope on the carburetion front!.

I have made some progress working out how the oil got there and will report back shortly.

the scene of (the first) crime:
IMG_20200622_155222.jpg
 
Last edited:
FWIW - the Keyster brass parts for my bike were junk. I put the original stuff back in and the carb was perfect. As for oil in the points - that is really weird. I don't even have a guess as to how you would get oil on them.
 
Unless maybe your oil level is crazy high?
 
there are actually three crankshaft seals - I shall post some pics and more info later on today...
 
I suppose - just seems odd that you would get enough oil past that and have it wind up on the points. Oil level should be well below the crank centerline, so it would be all splash and you would only get a lot of splash if the weights are actually hitting the oil. that would not be the norm for most engines (weights hitting oil when oil is at proper level)
 
I suppose - just seems odd that you would get enough oil past that and have it wind up on the points. Oil level should be well below the crank centerline, so it would be all splash and you would only get a lot of splash if the weights are actually hitting the oil. that would not be the norm for most engines (weights hitting oil when oil is at proper level)
Aside from an old engine with more blowby=higher crankcase pressure and/or (potentially) a blocked or restricted breather tube.
 
Aside from an old engine with more blowby=higher crankcase pressure and/or (potentially) a blocked or restricted breather tube.
on digging out the tube that I had attached to breather I found this at the dangling end:

breather.jpg

... a bit more digging was still needed to find out the whole story though.

I removed the contact breaker and left hand crankcase cover where I found the alternator and spark advancer were also covered in oil. On removing the rotor and stator, I discovered that the starter motor sprocket oil seal was dislodged - bingo! (I reinstalled it in the shot below).

sprocket seal.jpg

This must surely be the source of the leak, but it was still a bit mysterious - as you can see from this parts diagram there are a further two seals on the crankshaft inside the stator base


parts diagram.jpg

- these seals were both in place and intact, apparently providing two additional barriers between the dry alternator side and the engine side, so how was the oil getting in?

The answer is the two holes in the back of the stator base (see picture below):

According to my notes from when I first went through the engine I’d concluded (incorrectly) that these were oil ways intended to allow oil through for the starter chain. If I’d thought a bit harder at the time I would have realized that this made no sense, as any oil in this compartment could get through to the points.

On closer inspection the two seals - when inserted flush in either side of the base - leave a gap of a few millimetres. Oil drips through the holes and fills this void where it can then seep through three tiny gaps between the starter motor socket bushing and the housing. On reaching the oil seal on the other side, It returns through the spiral groove in the bushing so that oil is circulated around the crankshaft/sprocket bearing. The picture below is with the rear seal removed:

oilways.jpg

[ note for other CA95 owners - care should be taken not to push the rear seal in further than flush with the back of the stator base - too far and you risk covering the passages that supply the sprocket bushing with oil ]

The final thing I noticed was the sprocket seal was a very loose fit - it would spin in the housing as the crank rotated - It was the correct size and (I thought) I got it from Honda. Anyhow, I replaced it with a new SKF one and that required a good firm shove to put in place.

So problem number one solved!
 
to add: on further inspection, the oil feed is a bit more deliberate than i described - the hole at the bottom of the picture is orientated to 12 o'clock when installed, and the two cast splines funnel the oil into the space between the seals. The other hole is where it exits having travelled round the crankshaft.

I would like to think the Japanese engineer that originally thought all this up would be pleased to know the penny has finally dropped with one of their European customers 70 years later!
 
a quick question: for the two seals in the stator base, the diagram above indicates they both face towards the starter sprocket, but when I fitted them originally I had the one at the back the other way round (facing towards the cam chain). Can anyone think of any reason for doing it one way or t'other?

Here is the back of the stator base with the rear oil seal installed in the way I originally had it.

PXL_20251209_171112564.MP.jpg
 
Looks backwards if the idea is to keep the oil behind the seal
 
... in this application there is oil on both sides of the seal shown above - I think it's purpose is to seal of the chamber between it and the seal on the other side (and the chamber then acts as a reservoir of oil to supply the starter sprocket bushing. That's my theory anyway!
 
Yeah, the spring-loaded lip should always face the oil it's supposed to contain.

Looking at the photos of the rear stator base seal as I originally found it, and half a dozen used CA95/C92 stator bases on eBay, they all have the rear seal facing as above.

I suppose in this case it makes sense since it is really containing oil on the alternator side.

Next step on to the ignition, where I have found other (self induced!) problems...
 
The next step in my attempts to fix my poor running CA95 was to have another look at the ignition coil.

With much help from 66Sprint I managed to demonstrate the ignition coil I originally installed was able to create a spark, albeit with lacklustre results. On re-checking the resistance on the secondary coil I noticed that pushing on one of the HT leads caused an open circuit. Ater talking the leads out again, I found one of the pins that the cables push on to was bent and had got into the lead at an angle - a problem almost certainly caused by my ham-fisted repairs.

At the time of the original repairs I had kept an eye out for another coil, just in case, and a cheap but battered looking one did eventually turn up, only to sit on the shelf for 4 years.

It was in a sorry state - snapped mounting bolt, no HT leads, and the wires for the primary coil had been cut about an inch from the body of the coil - but all reparable. In this case, rather than splicing new wire on to the remaining stubs of the primary wires, I removed them entirely and soldered a couple of salvaged wires onto the metal posts on the coil body directly, which I think is a better fix.

coil3.jpg
So I now have 3 coils with the following resistances:
  • The original coil that came with the bike (never used - faulty?) 0.8 Ω primary/ secondary 8.9k Ω
  • Coil #2 (previously fitted): 1.3 Ω / 8.9k Ω
  • Coil #3 (newly repaired): 1.3 Ω / 9.3k Ω

ignition coil graveyard:
all2.jpg

I am going to fit coil number 3 - this also produces a weak spark on the bench test, which I think is most likely a reflection on my testing set-up/technique rather than a problem with the coil. Only one way to find out I suppose.

The other thing I noticed was that where I had used a newer male 3.9mm bullet connector on the black wire on the coil, the connection to the older style female connector on the bike was not really a satisfactory connection - having failed to find a version of the period correct 4.7mm male fitting, I switched the female side so, even though I am still using the cheap and not very well made bullet connectors on both ends, they are at least compatible.

That’s it - I am now out of ideas, beyond the normal tune-up adjustments. Time to put it back together to see if it works!
 
in case it is useful for other CA95 owners, I've updated the color wiring diagram to show the male/female connectors.

CA95 1963 wiring diagram v3 - CA95 v3.1.jpeg

One oddity is there is no harness ground connection for the headlight and switches - I think the route for ground must go through the clutch cable?
 
in case it is useful for other CA95 owners, I've updated the color wiring diagram to show the male/female connectors.
Nice job, great addition and I'll put it in the library with your permission.
One oddity is there is no harness ground connection for the headlight and switches - I think the route for ground must go through the clutch cable?
Yes, early on Honda used the cables as ground but started having internal issues with gauges because of the current flow through the drive cables because of their rubber mounts. I suspect that little ground jumper from handlebar mount to gauge bracket happened sometime afterward.
 
having knocked about two dustpans full of soot out of the original exhausts - which can't have been helping on the smooth running front - I have finally got back to putting it all together.

As perhaps can be expected in a bike designed in the 1950s, there are a few annoying ergonomic issues: you can't get the top chain guard off without removing the rear left suspension; you have to remove the carb to get the top on; there is a mysterious inner chain guard that does not attach to the frame and is not mentioned in the manual or parts diagrams which - when you inevitably forget to put it on - requires you to remove the chain guard, suspension and chain in order to get it in position; the elaborate earth wire is a bit short and - if you do not align it properly - can't be moved since the accessing the nut requires removing the engine; and so on...

Naturally I had forgotten all these quirks and had to refit nearly everything twice. Anyhow, it is all back together and I was most excited to see my fixes had worked, only to drop the the battery while trying to fit it to the too short earth cable. It fell right on the positive terminal and broke it, so 40 quid down the drain and naturally there are none in stock anywhere.

I have found a replacement that I think will work and will shall report back with the results as soon as it gets here!

Perfectly good battery ruined by a nincompoop*

PXL_20260117_154859175.jpg
* me.
 
It's a shame you got almost to the end just to have a little accident like that. Maybe the silver lining is that you have a spare battery that you could keep on the bench for testing your electrics (if it's not too damaged!)
 
As perhaps can be expected in a bike designed in the 1950s, there are a few annoying ergonomic issues
Agreed. I chased my tail for months trying to figure out why my CA95 engine ran so poorly, only to realize I installed the wrong crankshaft bearing on a bent crankshaft. I'm likely to suffer a few extra Millenium in afterlife heat treat due to "a few annoying ergonomic issue" related foul language.

On another note, I sourced flexible cable meant for automotive use. (see pic) to replace that nasty short battery ground cable. I clamped a larger connector to fit the engine bolt for ground.

I would gladly send it off to you, but who knows how long it would take to get the UK.IMG_7408 Ground Cable .jpg
 
On another note, I sourced flexible cable meant for automotive use. (see pic) to replace that nasty short battery ground cable. I clamped a larger connector to fit the engine bolt for ground.

I would gladly send it off to you, but who knows how long it would take to get the UK.
thank you for the very kind offer Spokes, and a great suggestion - turns out they are available in the UK too, so I have one on order! https://www.ebay.co.uk/itm/267056953417
the shop selling them let's you pick the size of the crimped terminal connectors, which is rather handy.
 
Aided by my new lavishly long earth strap (thanks again for the top tip Spokes) I managed to fit my new battery without breaking it. There is a nice blue spark at the spark plug which is encouraging.

Since it has been sat so long I turned the engine over with the starter motor until oil started to appear at the cylinder head - one of the 5 settings on the ignition key is reserved for this purpose (to aid cold starting?) and turns on power to the starter motor but not the lights or ignition.


The battery is back on charge and will see if it works tomorrow!

PXL_20260124_124504923.jpg
 
Last edited:
something of an anticlimax - having left the battery on charge (still installed on the bike) overnight I found it completely discharged and reading 2.5v this moring.

So I have presumably introduced a fault somewhere - I also now realise the previous battery, which I assumed was reading very low volts because of physical damage to one of the terminals probably suffered the same fate.

I don't think it is the charger as it successfully charged both batteries on the bench. Both batteries were new - one was pe-filled and the most recent one was received dry with separate battery acid. I don't think it was faulty - it was holding a charge of 6.3 sufficient to power the starter, lights etc - only dropping to 6.2v after a fair amount of cranking

Other than fixing a few loose bullet connections, the only thing I changed was the block connector on the end of my spark moto reg/rectifier, which had worked previously. Checking a photo I took at the time I have the wires in the right location, although I don't remember if it had a tag to prevent it being inserted the wrong way round.... Anyhow, I suppose this must be the prime suspect. Could a wrongly wired reg/rectifier drain the battery like this over night? I also should say that - out of laziness - I rarely unplug my batteries from the harness when topping them up, perhaps this is bad practice?

Does anyone have any other thoughts or suggestions please? cheers
 
Last edited:
My first thought would be to stick your meter on amps and put it between battery and cable. Then start unplugging until you get to 0
 
something of an anticlimax - having left the battery on charge (still installed on the bike) overnight I found it completely discharged and reading 2.5v this moring.
My concern would immediately be the amperage of the charger you're using, and how long you left it charging. These small batteries can only be safely charged with about 1 amp or less, and even with a 1 amp charger they shouldn't be left on overnight or the old school flooded lead acid batteries can be damaged. This is from a chart of batteries from Honda models and the information about them including safe charging levels.

1769354650817.png

1769354600410.png
 
My concern would immediately be the amperage of the charger you're using, and how long you left it charging. These small batteries can only be safely charged with about 1 amp or less, and even with a 1 amp charger they shouldn't be left on overnight or the old school flooded lead acid batteries can be damaged. This is from a chart of batteries from Honda models and the information about them including safe charging levels.
I used a Noco Genius 1am charger, although I did leave it overnight.

There was no sign that any electrolyte had boiled off though, and the charger is supposed to go into some kind of 'maintenance mode' once the battery is charged (well that's what the sales bumf says anyway!).

Having said that, If it was faulty, it would explain the two discharged batteries . I suppose they are most likely permanently damaged now? I will try and recharge one on a 0.5am motorblat charger I have somewhere and see what happens...
 
I used a Noco Genius 1am charger, although I did leave it overnight.

There was no sign that any electrolyte had boiled off though, and the charger is supposed to go into some kind of 'maintenance mode' once the battery is charged (well that's what the sales bumf says anyway!).
I well remember seeing others overcharge these batteries when I was younger and working in the industry, and they often stayed full but had been "boiled" enough that they were shot the next morning. And I have little faith in most of these chargers that are also "maintainers" because I hear so many stories of long term use ending up with bad batteries after a winter hibernation.
Having said that, If it was faulty, it would explain the two discharged batteries . I suppose they are most likely permanently damaged now? I will try and recharge one on a 0.5am motorblat charger I have somewhere and see what happens...
Hopefully it will be okay. VHT member CrazyPJ uses an analog timer to turn his chargers on for a short time each day to avoid the demise of a good battery caused by a maintainer.
 
Hopefully it will be okay. VHT member CrazyPJ uses an analog timer to turn his chargers on for a short time each day to avoid the demise of a good battery caused by a maintainer.
thanks - that is a good idea, I have a manual timer that gets used one a year for the Christmas lights - I will dig it out!
 
I've been smitten only once, and recently, on my 62 project, regarding improper aftermarket replacement rectifier wiring or bad original unit causing battery drain. I must say that I have never heard of a battery being totally drained while attached to a battery charger until reading your post and subsequent responses. I found success with this little rectifier, by the way available from eBay in Redditch, UK. I also use a 6/12 V charger 1.5 amp with auto detect and shutoff purchased back in 2007.
Some members disagree with me about this little unit, but it works well on my 1962 CA95 project.

 
Back
Top Bottom