CL350 oil rotor circlip engine damage

Same gasket for R or L. Don't flip it backwards like me. I know you're asking about the right side, but...
 
Hey all again!

did some more inspecting and found the bores that the rocker shafts sit in, in the end-caps are pretty not-smooth. Though they're usually clamped down stationary except when adjusting, so I'm not sure if that matters too much? Also, is lubrication to the tach-driveshaft the only spot that matters if the cam-cap gaskets are one way or the other? It looks like like the oil passages kinda flow around the gasket in the other spots that would be direction-dependent.
I'm not as detailed on the 350 as others here but I'd consider buying some replacement cam bearing covers, there are plenty of used 350 parts around. Not sure if the diagram in the FSM showing the oil circulation might help clear up the oil flow paths, but I do know that one side will leak if the gasket is reversed (just can never remember which side).
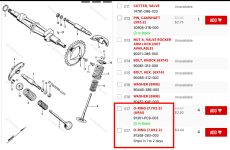
That last one I think is for the shift lever shaft - does the scoring in there matter too much? The shaft seemed smooth otherwise.
If the shaft itself is smooth in the area where the lip of the seal sits on the shaft, it should be fine. Scoring in the aluminum inside the crankcase half would only be important if the shaft was a sloppy fit due to the wear and material missing. And the opening where the seal sits in the outside of the lower case shouldn't be damaged or misshapen in any way or it could leak around the perimeter of the seal body.
is there similar merit in disassembling the transmission shafts, and thoroughly cleaning out their bearings, and any crud that may be between the gears/shaft?
I would spend a little time checking the bearings, roll them long enough to be sure that none of the balls or needle bearings have any tight spots. If the gears all spin freely on the shafts, they generally only need a rinse.
now I'm worried that I won't be meshing the gears back up between the two shafts exactly as they were since i didn't mark corresponding teeth.
As long as all the gears, thrust washers and circlips are in place in the correct order and the gears are correctly oriented on the shafts for the engagement dogs to work correctly, it's fine. There is no specific timing or order of teeth engagement, they're just transmission gears :)
Should I get new circlips for those shafts instead of reusing the old ones?
I've never had to replace any, but if they're difficult to remove from the shaft and any of them get bent because of it then yes. As long as you're careful it should be fine.
And is backlash and other things measured after oiling/greasing/assembly-lubing the parts, or while they're all still dry?
Good question and one that I've never worried about. These transmissions are pretty durable, usually it's clearly evident when something is worn or damaged and needs to be replaced. When I've ridden a bike that rides and shifts fine, if it needs disassembly I give things a good visual inspection but unless I see something that is a problem I generally use my eye to check general clearances, looking for excess. If something seems off enough to investigate, then I'll be concerned about getting out the feeler gauges. I have bigger concerns for using straight shift forks and checking the shift drum for wear in the pathways for each fork's movement as well as the pins for the shift forks, and the detent mechanism on the shift drum end before clutch re-installation.
Also for what it's worth, how do the transmission gears stay sufficiently oiled? I see the oil feed to the mainshaft needle bearing, but can't seem to figure out how the rest of it stays lubed other than just splashes.
Check the oil flow diagram for that too.
Sorry, I might be over-thinking these things but wanted to see y'alls thoughts. Thank you!
Nah, better to overthink a little bit than rush to get it back together and pay for it later.
 
This leads me to wonder, is there similar merit in disassembling the transmission shafts, and thoroughly cleaning out their bearings, and any crud that may be between the gears/shaft? I already took apart the mainshaft and it seemed pretty clean, and scrubbed/rinsed the bearings with solvent,
You definitely want to clean the caged needle bearings good and pay attention to the bronze or steel end caps and the knock pins that are hollow to allow the oil to feed those bearings. Incorrect knock pin installation can cause damage. Check lengths on knock pins as well.
 
You definitely want to clean the caged needle bearings good and pay attention to the bronze or steel end caps and the knock pins that are hollow to allow the oil to feed those bearings. Incorrect knock pin installation can cause damage. Check lengths on knock pins as well.
Yep, or end up with one of these.

popped cap.jpg
 
Or oil starved from crud. Ruined. Cups with slits are to catch and hold oil.
8gD4N2B.jpg
 
Ah, Ballbearian, it looks like on the left side where you indicated the oil comes up next to the gasket - that rear part - if the gasket is oriented correctly, there is more gasket surrounding that spot, vs backwards it's right on the edge and leaks, right? I was wondering because on the Right side, the hole is necessary for lubricating the tach but on the left I couldn't figure out where the hole needed to be since the cutout in the casting still allows the oil to flow to the cam, regardless of if there's a hole there in the gasket or not. But now I see the shape of it provides more sealing surface when oriented correctly. Thanks for pointing that out!

Also holy cow those needle bearings are toast! I'll take pictures next time I'm at it, but mine look virtually pristine by comparison. I've cleaned out the small passage that connects the mainshaft needle bearing to the main-bearing oil passage so that's verified free of debris.

Thanks AncientDad for your thorough answers to my questions! I'm feeling a lot less anxious about the small details now. Looking at the parts fiche, on this bike it looks like the knock pins for the transmission needle bearings are the same part # as the pins that keep the shift forks aligned on the drum. I've put those all in one pile, separate from the crankshaft dowel pins, which are larger. It appears the transmission knock pins sit in a separate recess from the oil passage, so they don't need to be/aren't hollow.

Have y'all had good success with the EK cam chain from 4into1? I think I've decided to just replace the worn roller with a new (not NOS) one, and continue to use the original cam tensioning system. Also, it's Hondabond 4 for the case halves, right? I'm thinking of coating the new clutch rod seal with it too (though mine hasn't yet, I've read they can blow out) and the alternator wire grommet.


Still trying to think where all the metal shavings were coming from, since I'm not seeing a lot of obvious wear. Possibly residual metal from the oil filter clip jumping out and getting ground up, along with maybe some old stuff that was caught under the windage plate that I didn't clean sufficiently the first time. I'm not sure. Also not sure still what to make of the side-play in the crankshaft when the engine was warm, that went away when it cooled down. I'm guessing it's from just guessing on the torque when I reinstalled the oil slinger, but it was damn tight and idk how much an effect that has on it anyway since the bearings are held in place with dowel pins. Maybe the bearing dowel pins are wearing? Now that the crank is clean, I'l try to measure clearances on the bearings.
 
Thanks AncientDad for your thorough answers to my questions!
Happy to help.
Have y'all had good success with the EK cam chain from 4into1?
I just researched that chain and came to the conclusion it works fine with the 350, and overall EK chains are good. I've not used one but others have.
Also, it's Hondabond 4 for the case halves, right?
I think most of us use the HT version, though at 300° F max for Hondabond 4 it should be okay.
I'm thinking of coating the new clutch rod seal with it too
Good idea, it will save you making a retaining plate to cover it to be sure. I just did that one the 450 engine I'm building right now, Hondabond all around the seal outer before the case halves go together. And only put sealant on one half of the crankcases, I like to do the lower case myself.
 
Been out for a minute helping my partner with medical stuff, haven't had much time for bike stuff.

I'm getting ready to put the cases back together and just wanted to confirm something:

Bearings: grease / oil the inside, (I got some assembly lube) and the outside is DRY when it goes into the case, right?
Oil seals: small bit of oil on the inside lip for the shaft, and the outside is also DRY going into the case, right?

Or should I be using hondabond on any of it? already planning on that for the outside of the clutch rod seal.

I feel like these are kinda dumb questions but thought I'd just check in before I just assumed I was doing it right. Thank you!
 
The others not so much, but the clutch rod seal should have a smear of Hondabond around the perimeter (between case halves) to help prevent it from blowing out of the engine later, yes.
 
So you never found the reason your crankshaft had axial movement? I thought you'd be able to grab your roller bearings on the crankshaft and see if they felt tight or had play?
 
The hole in the gasket goes to the forward side when it is the left side cam bearing. The hole is deceptive because it is not really needed on the left but Honda made just one gasket to be used either side.
 
Doing a bit of work on this again today - yeah I'm curious about the crankshaft axial play too! I didn't see a spec for it in the manual (of course! why would there be :rolleyes:) but after having washed out the crank with wd-40 and now the bearings have no lube, there is a tiny amount of axial play in the two end bearings. The two middle ones slide left and right by design it seems, but how should I confirm if the end bearings are good? They seem pretty butter smooth otherwise. I guess my current working theory is that heat expansion opened up the clearances a bit or something. It's hard to believe it'd be that large though.
 
Last edited:
Lube the bearings with engine oil, bolt it in place with the cases together, check the play, don't worry, put the engine together and run it like ya stole it.

Out of multiple cranks I have worked on I have discarded one that I wouldn't reuse as it was but that whole engine suffered massive abuse.
 
Finally getting back to this. Haha, so much for winter project.

I figured I'd replace the o-rings all around, and right now the rebuild is at a standstill until I get the cylinder base o-rings, so I'm doing some shopping. I made a whole list of all the o-rings I could find in the parts fiches for the engine, and I'm confused about a couple that have different size options. Which do I choose? And for the ones that are the same, is there any reason to choose one over the other?
 

Attachments

  • Screen Shot 2026-04-26 at 6.30.30 PM.png
    Screen Shot 2026-04-26 at 6.30.30 PM.png
    246.2 KB · Views: 4
  • Screen Shot 2026-04-26 at 6.32.45 PM.png
    Screen Shot 2026-04-26 at 6.32.45 PM.png
    256.4 KB · Views: 4
  • Screen Shot 2026-04-26 at 6.40.39 PM.png
    Screen Shot 2026-04-26 at 6.40.39 PM.png
    31.4 KB · Views: 4
  • Screen Shot 2026-04-26 at 6.38.17 PM.png
    Screen Shot 2026-04-26 at 6.38.17 PM.png
    23.6 KB · Views: 4
  • Screen Shot 2026-04-26 at 6.36.28 PM.png
    Screen Shot 2026-04-26 at 6.36.28 PM.png
    24.2 KB · Views: 4
  • Screen Shot 2026-04-26 at 6.31.57 PM.png
    Screen Shot 2026-04-26 at 6.31.57 PM.png
    23.6 KB · Views: 4
In the first example the difference in size of the o-rings is negligible. The part with the 283 middle number is for the CB450K0 which is where this o-ring was first used. When you see letters as part of the middle number of a part number it is usually a later part likely because Honda changed suppliers and this part also fits newer models or even some Honda cars. Most of the parts that are exclusive to the 350 will have a 286 or 287 middle number.

1777256256870.png
 
OK, got all my o-rings and I'm gonna see if I can button it all up today, but I just have a small specific concern I'm trying to get peace of mind on first.

I'm still stoked to try cutting my own gaskets with my cricut machine and am working on tracing them all to SVG files for print/cutting. I'm using a new Vesrah kit as a template. (It feels silly not to just use them, but I feel good about keeping them as an original to reference for copies). From what I can tell, the kit has two thicknesses of gaskets: about .031in for lower side covers, generator cover and points cover, and about .019in for everything else other than head gasket at .047in. The gasket materials I can get locally are 1/32in and 1/64in, which I measured at about .032 and .0165ish respectively. the 1/32 is pretty spot on for the thicker size but I'm curious if I use the thinner one for cylinder base gasket and cam bearing side covers, how that'll affect clearances. My cam already has a couple shims in it I'll have to measure/remove and check when I get back in the garage/to that point, but I'm curious if I should be concerned about losing about .003in between the piston/valves? JamesPal in THIS thread suggests that 1/64 for base gasket has had no issues, and Outobie in THIS thread mentions running with 2mm (.078in) less clearance on a CB350 with stock pistons with no issues, so I'm inclined to think it should be fine, but reading THIS thread has me worried about valve timing, compression, and what it would take to clay the head.

Any insight would be appreciated, thanks!

Also regarding the cylinder base gasket and getting my cut-outs precise: should the gasket overlap with the cylinder base o-rings, or do those sandwich between metal on top/bottom, with just the gasket to the sides? With a gasket there, the o-rings' purpose kinda eludes me.
 
I see no problem with the base gasket being thinner, there's plenty of clearance for piston to head/valve.
The only potential issue with thinner for the cam bearing covers is the shim clearance which is fairly easy to compensate for.
 
Back
Top Bottom