Yes, unfortunately they're in the US as you might expect.Any recommendations on someone who does this?
Rocker Arms Unlimited - rockerarms.com
Oregon Camshaft - oregoncamshaft.com
Yes, unfortunately they're in the US as you might expect.Any recommendations on someone who does this?
Quite a distance from you butAny recommendations on someone who does this?
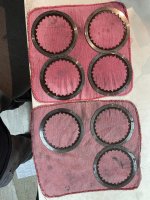
It's not as much about proper functioning with that level of "wear and tear", it's more about longevity. They'd work fine for now as is, but the pitting on some areas will only continue to get worse and the wear on the rocker arms would create difficulty in getting the valves correctly adjusted too.Yeah I figured I’d need to send them to the states. But I rather do it right.
Can you guys explain how the current state affects the engine’s proper functioning? Just for learning purposes
Long term the pitting will create a grinding effect on the rocker pads and cam lobes wearing both down. If left alone it won't create a catastrophic failure but will cause degradation of the power.Yeah I figured I’d need to send them to the states. But I rather do it right.
Can you guys explain how the current state affects the engine’s proper functioning? Just for learning purposes
If you replaced all the gaskets and seals previously but the engine has never been through any heat cycles, they should all be like new. However, any gasket you disturb now should be replaced when you reassemble it (unless it came off the surfaces completely clean and without damage).Should I replace all the gaskets and seals? The motor never ran since the rebuild I did 8 years ago?
The wristpin is what governs the size of the clips, not the piston size, so stock wristpin clips are fine for your pistons. Yes, I'd replace them each use to be safe.Should I get a new circlip that holds the piston pins if I removed them, in other words are they a one-time part? I saw that they mentioned that in a those guys in Houston video.
If so, is there a specific size? I'm asking cause I have 65.5 mm pistons from Bore-Tech (They closed shop years ago)
The clips are a one time usage, one and done.Should I get a new circlip that holds the piston pins if I removed them, in other words are they a one-time part? I saw that they mentioned that in a those guys in Houston video.
If so, is there a specific size? I'm asking cause I have 65.5 mm pistons from Bore-Tech (They closed shop years ago)

Hi j see that you have pamco e avancer.can you please send me sommes foto of conectionHey guys!
I've got to the point where I can start it!
I have spark (I checked both spark plugs on both sides)
I put fuel in the tank, and I think I'm getting fuel in the cylinders (The spark plugs are dry but smell a little like fuel)
I'm trying to kickstart it and it won't start. I also hear this hiss of air blowing from the left side of the engine...
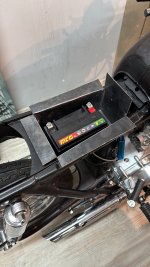
I also think I drained my battery a little, it's showing 8.7 V, but if I'm not mistaken, that's fine if I'm trying to kickstart it. Right?
Attemped start video -> https://vimeo.com/1065600835?share=copy#t=0
View attachment 43362
Check your PMs (private messages).Hi j see that you have pamco e avancer.can you please send me sommes foto of conection
Tank you very match
Stéphane
Good catch TomThat allen head and washer may stick up too high and cause a cross thread spark plug. I remember finding that issue on 350.
I've had multiple issues like that. I got all the new bolts from Alloy Boltz. The top motor mount bolts were too thick, so I had to use the old ones. Two different washers from the engine case set interfered with mounting the engine. Also, one of the long M6 bolts was missing from the kit.That allen head and washer may stick up too high and cause a cross thread spark plug. I remember finding that issue on 350.
Since LT is TDC (top dead center) for the left piston, the camshaft decides if it's on compression stroke or exhaust stroke. If you have the cam timing mark set correctly and it won't start, you might have the points cam on the advancer 180° out. Does it "backfire" and pop but not run? or nothing at all?I got the bike back together to start it but it won’t start. I checked the timing snd I believe I set the camshaft marks to LT like the manual said but it doesn’t note if it matters if it’s the compression stroke or exhaust stroke. Does this matter?
I have a pamco electronic ignition so no points. It did get some smoke coming from the intake.. but a really small amountSince LT is TDC (top dead center) for the left piston, the camshaft decides if it's on compression stroke or exhaust stroke. If you have the cam timing mark set correctly and it won't start, you might have the points cam on the advancer 180° out. Does it "backfire" and pop but not run? or nothing at all?
It’s the pickup for the Pamco - and really any EI. It’s possible (almost easy) to install those 180 out from where they should be. I’ve pulled that one off a few times.There’s something I’m missing here. If before inserting the camshaft I place the crankshaft on LT and then insert the sprocket with the line and L mark parallel to the cam housing then the cam has only one way of going in and that should complete the timing right? What I’m not understanding is how could you decide on tdc for compression stroke or exhaust stroke before inserting the camshaft? So in other words if I place the crankshaft on LT and insert the cam with the sprocket’s line and L mark parallel then how could I be 180 degrees out of phase?
While the picture would be helpful to someone who has installed one, there aren't many of those people around here at VHT since Pete's Pamco ignition has been out of production for close to 10 years now. I assumed the instructions pictures would have been adequate for addressing that. Looking at the pics in the Word doc instructions, the only thing I see that is different would be the rotor replacement for the advancer but I'm not sure it would be helpful because it is slightly different than yours (added holes). However, if you go by the two holes that appear to be "staked" in appearance (assumedly over the magnets) then yours might be 180° off.I have it like this:

I wondered if it had two notches 180° apart, kinda like the points cam can be installed either way on the stock advancer. Guess that isn't it then.The rotor has a little notch on it for the pin at the end of the camshaft so it can go only one way
On the pano it has the red? leads that go to the box - make sure those haven’t gotten flipped.The rotor has a little notch on it for the pin at the end of the camshaft so it can go only one way
This the one notch I have:While the picture would be helpful to someone who has installed one, there aren't many of those people around here at VHT since Pete's Pamco ignition has been out of production for close to 10 years now. I assumed the instructions pictures would have been adequate for addressing that. Looking at the pics in the Word doc instructions, the only thing I see that is different would be the rotor replacement for the advancer but I'm not sure it would be helpful because it is slightly different than yours (added holes). However, if you go by the two holes that appear to be "staked" in appearance (assumedly over the magnets) then yours might be 180° off.
View attachment 46407

OMG you're a life savor. I didn't understand what you meant regarding the red wire but you got me looking over all the pamco wiring and I did it all correctly except for the final green and white wires. I switched them! I put the white on the left and the green on the right. Put them back correctly and It fired in one kick!On the pano it has the red? leads that go to the box - make sure those haven’t gotten flipped.
I’ve done this every single time with a new EI - everything perfect and firing the wrong side.
If you're sure they've been left out, unfortunately yes. Though things are well-clamped together at this point, the knock pins are there for a reason and parts could potentially shift under load over time, which could cause problems. You might wait for others to reply to get more opinions, and maybe someone has done it previously and did not have any complications from it, but IMO they need to be in place. And, you'll need a new head gasket at the very least.I noticed I forgot to insert 2 knock pins (dowels) somewhere or between the cylinders and head or between the head and cam box. Should I take the engine out again and put them in? I’d really rather not but if it’s a must then that’s what I’ll do.
Thanks for your input! Why would I need a new gasket though? It’s brand newIf you're sure they've been left out, unfortunately yes. Though things are well-clamped together at this point, the knock pins are there for a reason and parts could potentially shift under load over time, which could cause problems. You might wait for others to reply to get more opinions, and maybe someone has done it previously and did not have any complications from it, but IMO they need to be in place. And, you'll need a new head gasket at the very least.