Buco Twinmaster Saddlebags Restoration

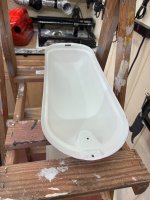
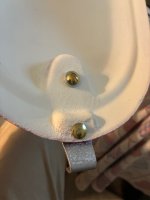
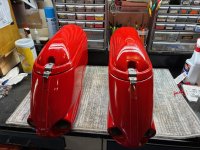
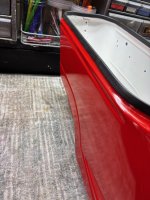
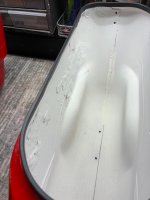
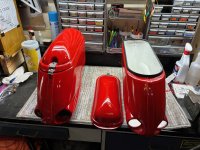
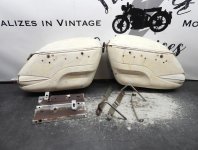
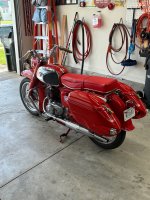
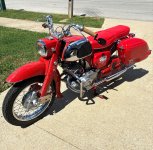
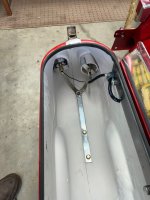
Worked on hangers while bags cure final coat of red color. Thursday next week the bags get clear coated and perhaps next Saturday the interior of the bags gets painted. I decided to go with chalk white for the inside of the bags. Inside lid pic shows the promise of how nice chalk white will look. I was considering automotive trunk paint then thought chalk white would be really nice.

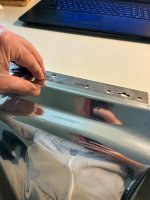
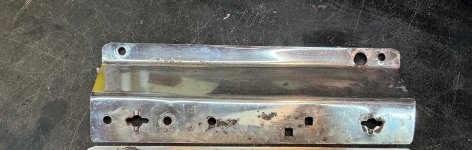
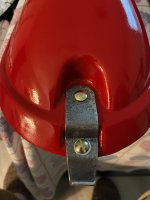
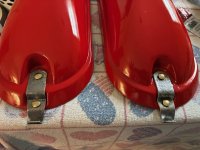
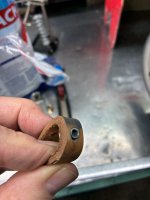
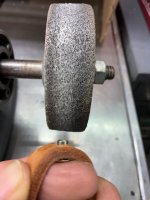
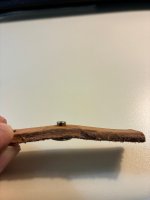
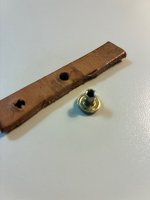
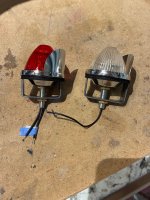
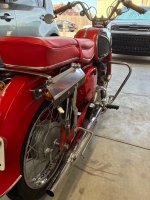
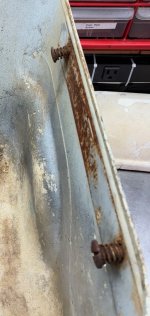
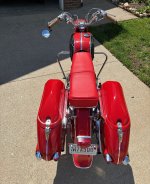
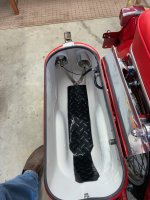
Hangers. Pricing for re-chrome to high. So, I tried painting the hanger's silver. I wasn't happy about the look. I then painted the hangers red to match the bags. The red paint lifted the silver paint (Note to self: Never use Rustolium brand anything again). Now I have a mess and need to strip the hangers and start again. This time I opted for chrome adhesive wrap. Two tone, chrome where one can see the hanger and black vinyl where the hangers meet the bags. One favorite country song kept popping up in my mind while I wrapped the hangers and how nice they turned out. "Your Cheatin Heart" by Hank Williams.
 

Attachments

  • IMG_7935.jpg
    IMG_7935.jpg
    1.7 MB · Views: 5
  • IMG_7932.jpg
    IMG_7932.jpg
    1.4 MB · Views: 5
  • IMG_7928.jpg
    IMG_7928.jpg
    1 MB · Views: 5
  • IMG_7939.jpg
    IMG_7939.jpg
    934.7 KB · Views: 5
Reattaching hardware to the bag lid. Early Buco fiberglass was thin. 60+ years later, the glass is brittle, therefore I'm hesitant to rivet the hardware to my repaired lids. Pics show the original look of one of the lids after being stripped down before the hardware being removed. I'm using plain brass Chicago screws, normally used for leather assemblies, as my new fasteners to secure the hardware to my lids. The Chicago screw at the edge of the lid hardware is slotted side up to provide a near flush fit on the bottom side where the lid underside meets the bag body. Later, down the road I may order brass washers to replace the galvanized washers used to make up the difference in length of the Chicago screw barrel to the thickness of the fiberglass. Another benefit to fasten hardware to the lid is the option to change out the hardware or fasteners should the spirit move me.
 

Attachments

  • IMG_7574.jpg
    IMG_7574.jpg
    1.8 MB · Views: 5
  • IMG_7941.jpg
    IMG_7941.jpg
    1.4 MB · Views: 5
  • IMG_7942.jpg
    IMG_7942.jpg
    1.3 MB · Views: 5
Later, down the road I may order brass washers to replace the galvanized washers used to make up the difference in length of the Chicago screw barrel to the thickness of the fiberglass.
"Down the road" came fast with a flash idea that popped up in my head. How do I shorten the Chicago screw barrel? Duh, easy! A thick but narrow strip of leather (kept from an old beat-up tool belt when they were actually made of harness leather), drill a hole in the leather to fit the screw barrel, in this case the leather thickness was the gauge that I needed, pinch the screw head and grind down the barrel on a burnishing wheel. Done. Now I can have matching button heads on my Buco lids.
 

Attachments

  • IMG_7950.jpg
    IMG_7950.jpg
    1.2 MB · Views: 5
  • IMG_7949.jpg
    IMG_7949.jpg
    1.2 MB · Views: 5
  • IMG_7948.jpg
    IMG_7948.jpg
    626.9 KB · Views: 5
  • IMG_7947.jpg
    IMG_7947.jpg
    1.1 MB · Views: 4
  • IMG_7946.jpg
    IMG_7946.jpg
    1.1 MB · Views: 5
Painted the inside of the bags today. The chalk white paint really highlights repairs. I never thought of smoothing out the fiberglass backing patch to the old mounting holes and repairs. Can't go back and fix without undoing my outside work, which came out pretty nice. Two pics. Newly painted inside bags sitting on my greenhouse potting table and my armed garden gnome with his laser cut AR.
 

Attachments

  • IMG_7966.jpg
    IMG_7966.jpg
    2.8 MB · Views: 7
  • IMG_7967.jpg
    IMG_7967.jpg
    1.9 MB · Views: 7
4-10-26 At this point in my Buco Project I'm waiting for my load equalizers to wire in for the LED running & brake lights. I understand load equalizers get hot, so I'm waiting to add the steel bag mount to the bags, just in case I need to mount the equalizers on the mounts to act as a heat sink. I may also need a wee bit more fiberglass resin on my backing for repairs on my now "outside" half of each bag. As previously noted, I swapped the original damaged inside half (mount side) with the untouched outside half. Backing was needed to assure my fills would not pop out. I would have added more resin before paint, but the white color highlighted my "hairs". Rubber seal installed, light mounts rethought and I decided to go back to the metal brackets Afterall.
Two bottom mats cut to cover ground strap leading to the bottom bag clip. The 62 at the ready to mount completed bags.
 

Attachments

  • IMG_7975.jpg
    IMG_7975.jpg
    1.9 MB · Views: 8
  • IMG_7974.jpg
    IMG_7974.jpg
    2.1 MB · Views: 8
  • IMG_7973.jpg
    IMG_7973.jpg
    2.1 MB · Views: 8
  • IMG_7972.jpg
    IMG_7972.jpg
    1.5 MB · Views: 8
  • IMG_7971.jpg
    IMG_7971.jpg
    633 KB · Views: 8
  • IMG_7970.jpg
    IMG_7970.jpg
    2.1 MB · Views: 8
  • ebay sale pic1.jpg
    ebay sale pic1.jpg
    358.7 KB · Views: 8
  • IMG_7957.jpg
    IMG_7957.jpg
    2.1 MB · Views: 9
  • IMG_7958.jpg
    IMG_7958.jpg
    1.8 MB · Views: 9
Thanks to all for following my Buco journey. Today, 1st hang to check fit. Only wiring, lights, front bag and bottom clip to complete my project.
 

Attachments

  • IMG_7985.jpg
    IMG_7985.jpg
    1.2 MB · Views: 2
  • IMG_7504 Buco Saddlebag Worn Mounts.jpg
    IMG_7504 Buco Saddlebag Worn Mounts.jpg
    317.1 KB · Views: 2
  • IMG_7996.jpg
    IMG_7996.jpg
    2.1 MB · Views: 2
Bags finished. Pics as they are hung on the bike after a short ride. Some slight adjustment of the hangers is needed, so off they come for more tweaking. I had issues with the LED dual filament bulbs and after trying all tricks reverted back to redesigning the light fixture and using regular bulbs for the running and stop lights. The LED turn signals work perfectly. Thus, looking at the inside of the bag, you see two types of clamps. The long clamp (as I thought of doing earlier in the project) is used to accommodate the extended bulb fixture base, and a metal copy of the original type of lamp body holder for the LED side. I chose to do a ground bar running to the lights figuring that I may actually put something in the bags. I also found Excelsior #40 keys for the locks. Speaking of locks, the locks are produced by Excelsior Lock Co. I see "Buco" keys on eBay asking $15 and up. Excelsior #40 keys run around $5.00. Thanks again for all who have followed my project.
 

Attachments

  • IMG_8023 done.jpg
    IMG_8023 done.jpg
    2.1 MB · Views: 5
  • IMG_8028 done.jpg
    IMG_8028 done.jpg
    2.3 MB · Views: 5
  • IMG_8021 done.jpg
    IMG_8021 done.jpg
    683.8 KB · Views: 5
  • IMG_8022 done.jpg
    IMG_8022 done.jpg
    820.4 KB · Views: 5
  • IMG_8030 done.jpg
    IMG_8030 done.jpg
    1.7 MB · Views: 5
Bags finished. Pics as they are hung on the bike after a short ride. Some slight adjustment of the hangers is needed, so off they come for more tweaking. I had issues with the LED dual filament bulbs and after trying all tricks reverted back to redesigning the light fixture and using regular bulbs for the running and stop lights. The LED turn signals work perfectly. Thus, looking at the inside of the bag, you see two types of clamps. The long clamp (as I thought of doing earlier in the project) is used to accommodate the extended bulb fixture base, and a metal copy of the original type of lamp body holder for the LED side. I chose to do a ground bar running to the lights figuring that I may actually put something in the bags. I also found Excelsior #40 keys for the locks. Speaking of locks, the locks are produced by Excelsior Lock Co. I see "Buco" keys on eBay asking $15 and up. Excelsior #40 keys run around $5.00. Thanks again for all who have followed my project.
Thanks again, for the very informative thread, I really enjoyed it. Lot's of pictures and good comments. These kind of threads are making this forum what it is, so much better than any FB post.
 
Back
Top Bottom