
I've used NE brand gaskets quite a few times, currently in the 450 with no issues
-
Don't overlook our Welcome Package, it contains many links to important and helpful information about functions at VHT like posting pictures and sending PMs (private messages), as well as finding the parts you need.
AD
You are using an out of date browser. It may not display this or other websites correctly.
You should upgrade or use an alternative browser.
You should upgrade or use an alternative browser.
My SL175 look alike project.
- Thread starter Richard Pitman
- Start date
Richard Pitman
Veteran Member
It was all down to camera (phone) angle and gasket placement. Taking a bit more care, I get this. Even so, just the angle the phone is held at gives a misleading image.

Richard Pitman
Veteran Member
I have a used standard size cylinder block, bores in good condition, along with new standard size pistons, and a set of +.25 oversize rings. I filed the ends of these to get the correct ring gap. FSM states 0.15 to 0.40mm gap. On most of the rings I've managed to get a sliding fit 0.15 gap, which looks tiny, hope this is correct. On a couple of rings I've filed a bit more off, and got tight 0.25 gaps.


Push the rings a bit down the bore using the piston to "square" it.... Then measure ring gap.....
Richard Pitman
Veteran Member
I reassembled the valve gear today. Camshaft loosely in place, then the rockers and rocker shafts, adjustment screws and nuts removed. Replaced the sleeve in the tacho end side of the cam, made sure that the tacho drive was present in the left cam bearing. Checked oil ways cleared the gaskets, then bolted up the cam bearing caps. I'm using socket cap screws here, as no one can see them, and they are easier to tighten (gently!) up. Reasonable used cam and selected used rockers, pads all good, with NOS cam bearings.
Made one mistake, forgot to check that rocker shafts engaged correctly with the end caps, meaning that cylinder stud passages were blocked, so it all had to come apart to sort this out. New seals in tacho drive and points cover.
Also reinstalled the cylinder studs in the crankcase, along with the tensioner assembly. That was enough for today, so I just dropped the cylinder and head into place for now, no cam chain, pistons or tensioner rod present.

I think the CB175 cam bearings look much better than the angular CB200 parts.

Made one mistake, forgot to check that rocker shafts engaged correctly with the end caps, meaning that cylinder stud passages were blocked, so it all had to come apart to sort this out. New seals in tacho drive and points cover.
Also reinstalled the cylinder studs in the crankcase, along with the tensioner assembly. That was enough for today, so I just dropped the cylinder and head into place for now, no cam chain, pistons or tensioner rod present.
I think the CB175 cam bearings look much better than the angular CB200 parts.
Richard Pitman
Veteran Member
It was all going so well ……
Rings on the pistons, then pistons and circlips fitted rods.

Base gasket in place, cam chain threaded under crank and through the tensioner idlers.

Lowering cylinder block into place. I've done this several times before without problem, but this time it didn't want to seat. And then I noticed a small piece of broken ring drop out, end of second compression ring. So its now on hold while I wait for a replacement set of rings. Kicking myself for being hamfisted.

Rings on the pistons, then pistons and circlips fitted rods.
Base gasket in place, cam chain threaded under crank and through the tensioner idlers.
Lowering cylinder block into place. I've done this several times before without problem, but this time it didn't want to seat. And then I noticed a small piece of broken ring drop out, end of second compression ring. So its now on hold while I wait for a replacement set of rings. Kicking myself for being hamfisted.
I found the factory ring compressors on eBay for $99 and offered the guy $75, he wouldn't do it. I've always wanted a set, this is the hardest part of a top end rebuild IMO. Since my 450 is bored 4mm oversize the taper is gone, so I put my pistons in the cylinders before attaching them to the rods... it wasn't easy but I think it was easier than fighting the rings in a difficult position with zero cylinder taper to help
Richard Pitman
Veteran Member
It would have been easier if it was a 180 degree twin, just one piston at a time to feed into the bores. I guess it wasn't helped by the extra 'spring' in my filed down 0.25 oversize rings. Replacement rings on order are the correct standard size.
The newly rebored 1mm oversize 200 engine that I pinched the head and idler roller from, cylinder block just dropped straight back on again without any drama, lulled me into a false sense of security.
The newly rebored 1mm oversize 200 engine that I pinched the head and idler roller from, cylinder block just dropped straight back on again without any drama, lulled me into a false sense of security.
Richard Pitman
Veteran Member
Amazing service !
I went online Friday afternoon, to try and source a set of standard size Honda 175 piston rings. Closest available ones were in the US, meaning I'd probably have to wait until December for delivery.
So I placed an order with IMD pistons for a set of their rings, which have just dropped through my letterbox, midday Saturday.
Conventional top and middle compressions rings, but oil rings are those 3 part things, which I've never fitted before. Not sure if I'll use these, or persevere with my ( so far ) unbroken Honda one piece oil rings.
AFAIK, the 3 piece oil rings are the later version and by all accounts work better. They're not as difficult to deal with as you might think, just a little more challenging to get on the piston properly.
The 3 piece rings are far better in oil control than the antique one piece rings.
Richard Pitman
Veteran Member
Interesting, I suppose I'll have to bite the bullet and have a go at installing these rings. They look fragile, hope they'll stand up to high rpms ?
That said, the only 175 that I've owned that burned oil was my first, brand new, CB175. I apparently ran it in too gently, and it puffed oil smoke on the over run. A new set of rings cured it, and it ran fine for the rest of the 22k miles that I thrashed it over.
One of the three engines I have running at present blows a trace of oil smoke at start up, but that might be valve guides, all these on old style Honda rings.
Install the expander ring first followed by the thin control rings. Space the gaps of the thin rings no closer than 1/2" to the split in the expander ring. I space those 90 degrees from the expander gap and 180 degrees apart from one another.
Richard Pitman
Veteran Member
Just been reading Jensens CB400F thread, there are some nice closeup photographs of these oil control rings there.
Richard Pitman
Veteran Member
Rings installed on pistons, after checking ring gaps of compression rings, spot on straight out of the packet.
Too stressed out after doing this to consider fitting the cylinder, daylight fading, excuses, excuses. Best left until I can do it at leisure, no other real life stuff interference ..

Too stressed out after doing this to consider fitting the cylinder, daylight fading, excuses, excuses. Best left until I can do it at leisure, no other real life stuff interference ..
Richard Pitman
Veteran Member
Decided that part of my issue was that I'd been working standing up. Knocked together a little 3 legged stool out of some left over wood.
It's OK, but has a major instability issue, I leant back and tumbled straight off the edge of the deck, taking out a potted plant on the way. Installed some outriggers on it now ….

It's OK, but has a major instability issue, I leant back and tumbled straight off the edge of the deck, taking out a potted plant on the way. Installed some outriggers on it now ….
I like to do the tedious stuff in a fresh situation myself, when you're tired or have time constraints is when your focus isn't the best. I can't work leaning over either, I have to sit or have it at standing height if there's any significant length of time involved.
Richard Pitman
Veteran Member
Cylinders installed this afternoon.

Followed by the head

Just need to get the cam timing correct, then fit the soft link. I've riveted several 525 drive chains, but never a cam chain. Not sure whether to just use two hammers, or try and use my drive chain tool.

Followed by the head
Just need to get the cam timing correct, then fit the soft link. I've riveted several 525 drive chains, but never a cam chain. Not sure whether to just use two hammers, or try and use my drive chain tool.
Richard Pitman
Veteran Member
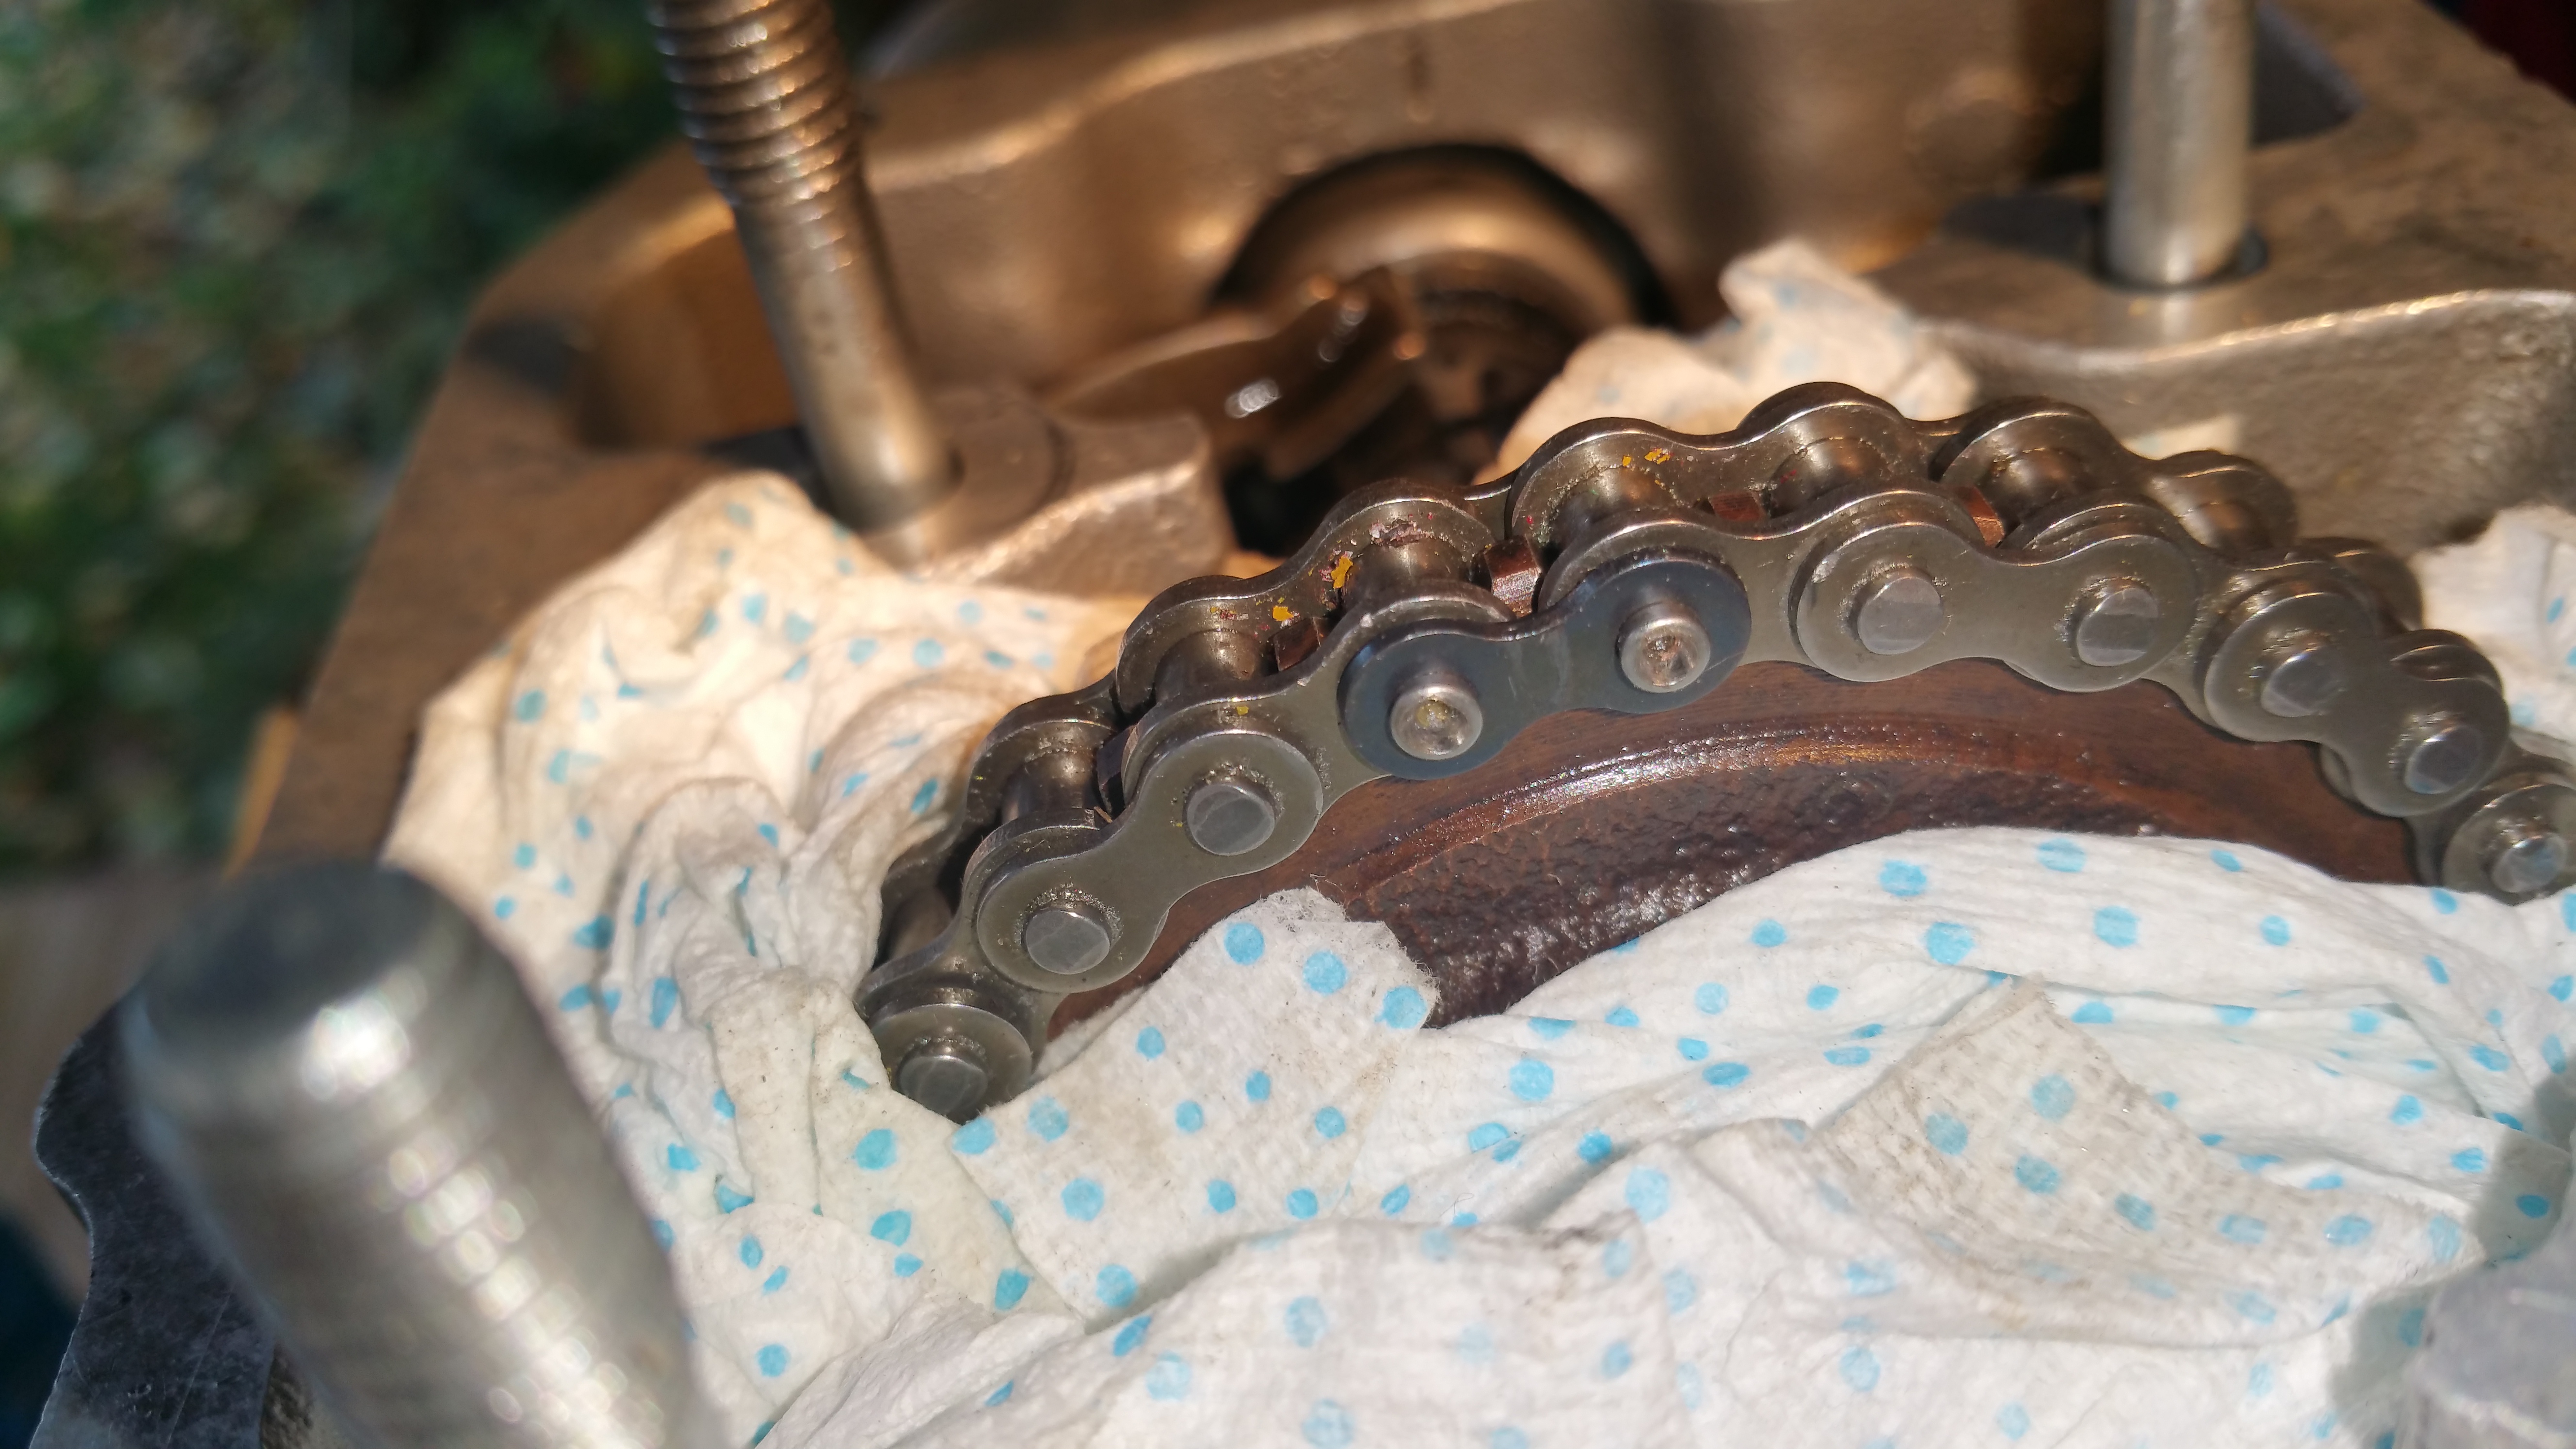
Link fitted this morning. Photos self explanatory.
I used my drive chain tool, which worked well. However, the hardened pin in the photo is really intended for pushing link pins out and bent when I misused it like this. Next time, I'll grind a point onto a much shorter and sturdier pin.


One pin done

Both done
I used my drive chain tool, which worked well. However, the hardened pin in the photo is really intended for pushing link pins out and bent when I misused it like this. Next time, I'll grind a point onto a much shorter and sturdier pin.
One pin done
Both done
Richard Pitman
Veteran Member
All torqued up and ready to go back into frame.

Richard Pitman
Veteran Member
I have CD250U forks fitted, which come with rubber gaiters as standard. I just replaced the fork oil seals initially, but always felt that it looked a bit lacking. I took a gamble and ordered some SL175 dust seals, pleased to see that they fit perfectly.
Before

After

Before
After
The dust seals definitely finish the fork appearance. Now it looks complete
Richard Pitman
Veteran Member
Engine back in frame, much easier in the SL than in the CB/CL frames.
Clutch will not release. I've taken off the alternator side cover to check the release mechanism, but that all appears to work correctly. Fault must lie in the clutch somehow. The clutch pushrod is not bent, but with the release mechanism removed, pushing quite hard on the end of the pushrod does not move it. It should go in a little way and release the clutch.
I've obviously assembled something incorrectly, but it's such a simple mechanism, hard to imagine what could be wrong. It'll have to come apart again, good job I've not refilled with oil yet. Any ideas what I've done wrong ?
Richard, I've never been able to push the clutch rod manually and get any disengagement movement, you're working directly against the 4 springs with no leverage at all. Unless you've mis-assembled something in the springs or pressure plate of the clutch (and you've done that job countless times) it's hard to understand what might be wrong
Richard Pitman
Veteran Member
Just reviewed the diagrams and FSM again. I'm clearly going to have to go in again, just to see what 'Plate B' is all about.

daveythewavey19
Well-known Member
I built a new PC last winter, had a heck of a time finding the graphics card I wanted...I think the crypto miners bought everything up + covid is seriously screwing up supply chains.
Richard Pitman
Veteran Member
Clutch problem solved. Feel free to laugh. Senior moment.
Release mechanism checked, working fine.
So I removed the clutch cover, took the clutch apart and reassembled, all correct. So, with the cover off, I worked the release mechanism using my fingers. All moved easily, clutch pressure plate lifting and plates separating correctly. Hooked up the clutch cable and went to pull the handle bar lever.
Guessed it yet ?
I'd only been pulling the front brake lever. Doh. Can only blame my cramped work space and onset of hypothermia ...
Using the correct lever, of course it all works fine. Wasted a few hours taking stuff apart again that I'd only just assembled.
Clutch problem solved. Feel free to laugh. Senior moment.
Release mechanism checked, working fine.
So I removed the clutch cover, took the clutch apart and reassembled, all correct. So, with the cover off, I worked the release mechanism using my fingers. All moved easily, clutch pressure plate lifting and plates separating correctly. Hooked up the clutch cable and went to pull the handle bar lever.
Guessed it yet ?
I'd only been pulling the front brake lever. Doh. Can only blame my cramped work space and onset of hypothermia ...
Using the correct lever, of course it all works fine. Wasted a few hours taking stuff apart again that I'd only just assembled.
Well, I can't say I've done that before...
") but the CB350K1 project I bought a couple years ago has the front brake cable connected to the clutch lever for whatever reason. The seller is a Norton guy so maybe it can be blamed on dyslexia because the Brit bikes had shifter and brake reversed from the US arrangement
but the CB350K1 project I bought a couple years ago has the front brake cable connected to the clutch lever for whatever reason. The seller is a Norton guy so maybe it can be blamed on dyslexia because the Brit bikes had shifter and brake reversed from the US arrangementRichard Pitman
Veteran Member
I'm definately loosing the plot. Came out to the car this morning, found that I'd left it unlocked, drivers window down. Good job it didn't rain last night. If I'd locked it, alarm would have been sounding with every gust of wind.
rortiz5
Well-known Member
One of my professors is calling this ‘Covid Brain.’ Everyone is effectively working at half capacity as the sheer mental exhaustion everyone’s been through the last year and a half.I'm definately loosing the plot. Came out to the car this morning, found that I'd left it unlocked, drivers window down. Good job it didn't rain last night. If I'd locked it, alarm would have been sounding with every gust of wind.
Richard Pitman
Veteran Member
All screwed back together, valve clearances and ignition timing set.
Just needs to be filled with oil and fuel, engine then cranked over with the cordless drill to circulate the oil, then we'll see if it runs. Probably wait until the latest storm front passes over, red weather alert tonight, usual UK over reaction.


Just needs to be filled with oil and fuel, engine then cranked over with the cordless drill to circulate the oil, then we'll see if it runs. Probably wait until the latest storm front passes over, red weather alert tonight, usual UK over reaction.
Number13
Member
Looking great.
Richard Pitman
Veteran Member
Thanks !
Weather has kept me out of the garage for the last few days, I really must try starting the rebuilt engine, see if it actually runs.
Weather has kept me out of the garage for the last few days, I really must try starting the rebuilt engine, see if it actually runs.
Thanks !
Weather has kept me out of the garage for the last few days, I really must try starting the rebuilt engine, see if it actually runs.
Of course it will run, we have faith in your efforts.
daveythewavey19
Well-known Member
Ooooffff that's pretty bad. On the other hand (no pun intended) I know the old Triumphs had the shift lever on the right hand side, not to mention you guys over there drive on the wrong side of the road so I can sort of understand it.
Saru
Veteran Member
I have CD250U forks fitted, which come with rubber gaiters as standard. I just replaced the fork oil seals initially, but always felt that it looked a bit lacking. I took a gamble and ordered some SL175 dust seals, pleased to see that they fit perfectly.
Before
After
Would those work on a cb200?
Last edited by a moderator:
Richard Pitman
Veteran Member
If you are asking if CD250 forks will fit the CB200, yes they will, with the proviso that the fork legs are too long, need to be pulled up through the top yoke. These are CB200 top and bottom yokes on my SL175 frame. And if you sourced a CD250 front wheel as well, it would be an easy way of getting a hydraulic front brake caliper.
However, I think you mean the SL175 dust seals. My CL175K7 has the same forks as a CB200, and here's a photo of them stripped down. Given that the fork stanchions are the same diameter, it is probably likely that you could discard the CB200 fork gaiters, then replace the chrome rings in the photo with the SL175 dust seals. No guarantees though ..

However, I think you mean the SL175 dust seals. My CL175K7 has the same forks as a CB200, and here's a photo of them stripped down. Given that the fork stanchions are the same diameter, it is probably likely that you could discard the CB200 fork gaiters, then replace the chrome rings in the photo with the SL175 dust seals. No guarantees though ..
Saru
Veteran Member
Thank you Richard, I think I'll give it a try. Yes the dust seals, although the cd250 forks sound interesting.
Richard Pitman
Veteran Member
Posted in wrong thread, doh ...
Yeah, I noticed it got off the rails there for a minute.
Richard Pitman
Veteran Member
Still too cold to work on the bike. I got this bash plate the other day. It is now marinating in phosphoric acid, and will then need some attention with a hammer to get some of the dents out. I'll also need to need to invent some brackets to mount the rear sides of the plate to the lower frame rails. CNMSL have the parts, inexpensive until you add in shipping and duties. Not paying 45 quid for a couple of little clamps, I shall either modify some Mikalor hose clamps or large P clips.

hydrosteve
Veteran Member
Thanks for documenting the engine rebuild here Richard, much appreciated. And I love that engine stand! (which I assume you built)
Richard Pitman
Veteran Member
Thanks for documenting the engine rebuild here Richard, much appreciated. And I love that engine stand! (which I assume you built)
I'm afraid I can't take credit for the engine stand, a UK Ebayer builds them. Useful for top end builds, no good for the bottom end. Nice for storing a spare engine.
honda cb 175 engine work stand | eBay
Richard Pitman
Veteran Member
After a couple of days in phosphoric acid and a quick scrub with a pan scourer.

Ready for a dose of this stuff. Who knew that this forum had its own paint brand !

Ready for a dose of this stuff. Who knew that this forum had its own paint brand !
Hondaholic
Veteran Member
After a couple of days in phosphoric acid and a quick scrub with a pan scourer. . .
Impressive. That's come up well.
The 'boys', or one in particular, got me on to Evaporust. Would be a costly option for something the size of your bash plate though!!
Richard Pitman
Veteran Member
Machine Mart sell their own version of rust remover, which from the hazard data sheet is basically phosphoric acid and active surfactants, whatever they are. I've used that in the past, along with the stuff that the POR people sell for cleaning out fuel tanks. But in the end of the day it's all phosphoric acid, delivered to the door dirt cheap via Ebay or Amazon.
059930250 COSSH Iss 2.pdf (dccf75d8gej24.cloudfront.net)
Hydrochloric acid based toilet cleaner also removes rust very quickly, but then flash rusts as soon as it is washed off.
059930250 COSSH Iss 2.pdf (dccf75d8gej24.cloudfront.net)
Hydrochloric acid based toilet cleaner also removes rust very quickly, but then flash rusts as soon as it is washed off.
Hondaholic
Veteran Member
Machine Mart sell their own version of rust remover
Good price on that if you need any more!
https://www.powertoolsdirect.com/cl...QsKeN3xRsUzWarVSfYKS-R-X6Z8cyG2hoCzKsQAvD_BwE
Richard Pitman
Veteran Member
That VHT paint is excellent stuff, leaves a satin finish as nice as powdercoat. Used my heatgun to warm the spray can and work piece, also to speed up curing.
Had a go at fitting it this afternoon, but my home made exhaust system gets in the way at the rear underside. So, in a bit of a rash mood, I made an offer on used SL175 system that I've been watching for several months. Offer accepted, still an eye watering price, but it was the only one out there, unlikely to find another. Just hope it's as good as they say.

Had a go at fitting it this afternoon, but my home made exhaust system gets in the way at the rear underside. So, in a bit of a rash mood, I made an offer on used SL175 system that I've been watching for several months. Offer accepted, still an eye watering price, but it was the only one out there, unlikely to find another. Just hope it's as good as they say.
Richard Pitman
Veteran Member
Does anyone know what the purpose of this removeable panel ( exhaust lid ) is for ? Part 12 on the diagram. The SL175 advertising flyer mentions a 'spark arrestor ', is it anything to do with that, something that needs to be decoked every so often ?


I've never quite understood the purpose of that little cover plate, it changes the sound very little except to make it a bit "hollow" and not much is available through it. Hopefully your used set on the way is good enough to make something of with what you have, if not usable as is.