
It sounds okay, but seems to be idling higher than I'd think it should. With no tach to tell us, it's hard to say just how fast it is idling but I remember my CA72 would idle with a loping sound of the 360° crankshaft firing much further apart than yours sounds and though the engine is smaller, it isn't that much smaller. And yes, as the float bowl fuel level diminishes it does run a little leaner and the speed will usually pick up a bit.
-
Don't overlook our Welcome Package, it contains many links to important and helpful information about functions at VHT like posting pictures and sending PMs (private messages), as well as finding the parts you need.
AD
You are using an out of date browser. It may not display this or other websites correctly.
You should upgrade or use an alternative browser.
You should upgrade or use an alternative browser.
1963 CA95 Restoration
- Thread starter nabs
- Start date
nabs
Veteran Member
It sounds okay, but seems to be idling higher than I'd think it should. With no tach to tell us, it's hard to say just how fast it is idling but I remember my CA72 would idle with a loping sound of the 360° crankshaft firing much further apart than yours sounds and though the engine is smaller, it isn't that much smaller. And yes, as the float bowl fuel level diminishes it does run a little leaner and the speed will usually pick up a bit.
great thanks, now that it is idling I will try and readjust the carb and idle speed tomorrow. Then I shall pump up the tires and see if it rolls, stops and changes gear etc
")
Many thanks to everyone who has offered encouragement and advice to get me this far, it really is appreciated, and I am delighted to be part of this excellent forum which has really added to my understanding (and my motivation!).
Many thanks to everyone who has offered encouragement and advice to get me this far, it really is appreciated, and I am delighted to be part of this excellent forum which has really added to my understanding (and my motivation!).
Nick, we're happy to have members like you with such an in-depth project and doing such a detailed job of the rebuild and the documentation of it all. It's been a pleasure to watch it unfold and see it come to fruition.
nabs
Veteran Member
partial progress: I still can't get it to idle but I have learned a bit more about how the carburettor works
After realising my mistake with the petcock I thought I had cracked it, but it was showing symptoms that I think indicate the idle mixture was too rich (I could start it without choke and the plugs were covered in dry soot and - after a few minutes running - this sooty covering built up and made it difficult to start).
I took the carburettor off and, on closer inspection, I can see that the mixture screw is in fact an air screw that restricts air entering from an air way on the air filter side.

.. what's more when I squirted carb cleaner through the air way it was blocked, "bingo!, that would explain it why it was rich when at idle", or so I thought. Having cleared the passage way the engine now starts first kick and seems to idle better at 1 1/4 turns of the air screw but - unless I use the throttle - it stalls no matter what adjustments I make to the idle screw or the throttle stop and the (new) spark plugs came out covered in soot again. Although I have not ridden it, it does rev freely which makes me think it is a problem with the idle circuit although I must admit that I have reached this conclusion based on a fairly sketch understanding of how it all works!
I have swapped back the old air screw, which has a very slightly different profile to the replacement (the air screw and throttle stop screw were the only brass parts I used from my keyster kit), but this does not appear to have made a difference. I noticed from various parts diagrams that the airscrew was not intended to be used with an o-ring, and indeed the keyster o-ring I had used clearly did not fit properly and had been mangled when I screwed it fully home, so I removed it (I suppose this might have stopped the screw seating properly messing up the 1 1/4 turn setting, although presumably this would have tended to make it more lean rather than rich). Anyhow, this made no difference either.

I checked the idle jet was clean and the correct size (35 - genuine keihin part).
The other thought I had was perhaps I simply have the wrong carb. It seems likely it is from a different bike as it had the wrong throttle cable installed, but the body is stamped CA95 and I have seen pictures of the same model on other bikes. There were two models used, the PW20HOV which is the earlier model and did not use power jets, and the model I have which did (I think Honda called this the PW20HA3). The service manual does not give separate setting instructions for the two versions, so I suppose it is possible the settings for the newer carb have been omitted, however the only other CA95 instructions I can find (on a service bulletin from 1973) say the float should be 19.5mm from the underside of the body and the air screw turned out 1 3/8th. It won't idle at all with the screw turned out this far and stalls if i open the throttle, and the float height when measured from the bowl makes no discernible difference.
the air filter is NOS.
The choke opens and closes fully and smoothly.
So I am a bit stuck. The only thing I can think is the fuel level is too high in the carb. I did notice the upper part of the carb body is warped (you might be able to see the slight curve to the edge in the picture above). This does not affect the seal with the fuel bowl, but I suppose might mean my float height measurement is out by a mm or two. Could this be an explanation or am I clutching at straws? Could there be another explanation for these symptoms? Questions questions questions - sorry!
PS Although not relevant to my investigations this might be of interest to other CA95 owners: I found out there is a misprint in the manual for this carb: it says the power jet and power air jet are both 130s, in fact the power air jet is 130 but the power jet (the one behind the cap screw) is 180 - this is the configuration that was in my carb and has been confirmed by others. There is some debate about whether the power air jet should be open to fresh air or connect to the air cleaner, but I am 99% sure Honda meant for it to get filtered air because they made a air cleaner with two inlets and it does not seem possible to explain the provision of the second connection otherwise. I think the confusion arises because the single hole filters - intended for the older carbs - are still available.
After realising my mistake with the petcock I thought I had cracked it, but it was showing symptoms that I think indicate the idle mixture was too rich (I could start it without choke and the plugs were covered in dry soot and - after a few minutes running - this sooty covering built up and made it difficult to start).
I took the carburettor off and, on closer inspection, I can see that the mixture screw is in fact an air screw that restricts air entering from an air way on the air filter side.
.. what's more when I squirted carb cleaner through the air way it was blocked, "bingo!, that would explain it why it was rich when at idle", or so I thought. Having cleared the passage way the engine now starts first kick and seems to idle better at 1 1/4 turns of the air screw but - unless I use the throttle - it stalls no matter what adjustments I make to the idle screw or the throttle stop and the (new) spark plugs came out covered in soot again. Although I have not ridden it, it does rev freely which makes me think it is a problem with the idle circuit although I must admit that I have reached this conclusion based on a fairly sketch understanding of how it all works!
I have swapped back the old air screw, which has a very slightly different profile to the replacement (the air screw and throttle stop screw were the only brass parts I used from my keyster kit), but this does not appear to have made a difference. I noticed from various parts diagrams that the airscrew was not intended to be used with an o-ring, and indeed the keyster o-ring I had used clearly did not fit properly and had been mangled when I screwed it fully home, so I removed it (I suppose this might have stopped the screw seating properly messing up the 1 1/4 turn setting, although presumably this would have tended to make it more lean rather than rich). Anyhow, this made no difference either.
I checked the idle jet was clean and the correct size (35 - genuine keihin part).
The other thought I had was perhaps I simply have the wrong carb. It seems likely it is from a different bike as it had the wrong throttle cable installed, but the body is stamped CA95 and I have seen pictures of the same model on other bikes. There were two models used, the PW20HOV which is the earlier model and did not use power jets, and the model I have which did (I think Honda called this the PW20HA3). The service manual does not give separate setting instructions for the two versions, so I suppose it is possible the settings for the newer carb have been omitted, however the only other CA95 instructions I can find (on a service bulletin from 1973) say the float should be 19.5mm from the underside of the body and the air screw turned out 1 3/8th. It won't idle at all with the screw turned out this far and stalls if i open the throttle, and the float height when measured from the bowl makes no discernible difference.
the air filter is NOS.
The choke opens and closes fully and smoothly.
So I am a bit stuck. The only thing I can think is the fuel level is too high in the carb. I did notice the upper part of the carb body is warped (you might be able to see the slight curve to the edge in the picture above). This does not affect the seal with the fuel bowl, but I suppose might mean my float height measurement is out by a mm or two. Could this be an explanation or am I clutching at straws? Could there be another explanation for these symptoms? Questions questions questions - sorry!
PS Although not relevant to my investigations this might be of interest to other CA95 owners: I found out there is a misprint in the manual for this carb: it says the power jet and power air jet are both 130s, in fact the power air jet is 130 but the power jet (the one behind the cap screw) is 180 - this is the configuration that was in my carb and has been confirmed by others. There is some debate about whether the power air jet should be open to fresh air or connect to the air cleaner, but I am 99% sure Honda meant for it to get filtered air because they made a air cleaner with two inlets and it does not seem possible to explain the provision of the second connection otherwise. I think the confusion arises because the single hole filters - intended for the older carbs - are still available.
Nick,
Positionally, part #7 is a MIXTURE screw, controlling how much Fuel/air mixture gets into the carb throat......
I suspect that part #10, (the #40 slow jet) is not sealing against the internal seat (due to corrosion pitting evident elsewhere), resulting in a much richer mixture.....
I can draw up a sketch of how this is occurring, but am not sure anything less than a replacement carb will solve the problem.....Which I MAY be able to help with....


This MIGHT be worth an international phone call, or at least a PM......... ************ ..... Steve
Positionally, part #7 is a MIXTURE screw, controlling how much Fuel/air mixture gets into the carb throat......
I suspect that part #10, (the #40 slow jet) is not sealing against the internal seat (due to corrosion pitting evident elsewhere), resulting in a much richer mixture.....
I can draw up a sketch of how this is occurring, but am not sure anything less than a replacement carb will solve the problem.....Which I MAY be able to help with....
This MIGHT be worth an international phone call, or at least a PM......... ************ ..... Steve
Last edited:
nabs
Veteran Member
thanks Steve, will be in touch. I am just going to have a look again at the slow jet and where it fits to see if I can get a picture of the seat (you are quite right about the corrosion, it was pretty bad). I would be interested to see the sketch, just for my edification, if you had time to do it. thanks again.Nick,
Positionally, part #7 is a MIXTURE screw, controlling how much Fuel/air mixture gets into the carb throat......
I suspect that part #10, (the #40 slow jet) is not sealing against the internal seat (due to corrosion pitting evident elsewhere), resulting in a much richer mixture.....
I can draw up a sketch of how this is occurring, but am not sure anything less than a replacement carb will solve the problem.....Which I MAY be able to help with....
View attachment 3949 View attachment 3950
This MIGHT be worth an international phone call, or at least a PM......... ************ ..... Steve
nabs
Veteran Member
after a PM exchange with 66sprint where he very generously offered me a replacement carb that might be made to work, I said I'd do one more test on the current carb.
My plan was to to look at the range of settings on float height and pilot screw position that I've seen for the CA95 and to pick the edges of the ranges that would give to the leanest possible setting. My thinking was that if it was still running rich at that point then Steve's prediction about a leak where the idle screw fits would be confirmed.
I set the pilot screw at 1 5/8th out. I understand the point about this screw being in a position (near the front) that normally indicates it is used for metering the fuel/air mix, but in this carb the screw closes off an air passage so I concluded turning it out to the maximum point allowed by the recommended settings would introduce the most air and create the leanest mix.
I used the float height measurement that would create the lowest fuel level (this was to measure 7mm from the top of the main jet, which is the same as 21mm measured from the underside of the carb body).
The result was that the engine still started from cold without the choke and, although it idled much better than before, as the engine got hotter it would not hold steady revs and eventually stalled.
After a few minutes of running the (new) spark plugs looked like this:

I tried to get a pic of the inside of the tube that holds the idle jet and you can see the evidence of the pitting (and I now remember that the original jet was ceased so badly it took a lot of force to get it out).

So it is with a heavy heart I've concluded that Steve's diagnosis is correct and the carb is kaputt. A bit disappointing, but I suppose you shouldn't be surprised to find problems with a bike that is nearly 60 years old and besides I have got luckily with just about everything else which could be easily repaired.
It looks like I will be trying to get an alternative carb to work - more on this later!
My plan was to to look at the range of settings on float height and pilot screw position that I've seen for the CA95 and to pick the edges of the ranges that would give to the leanest possible setting. My thinking was that if it was still running rich at that point then Steve's prediction about a leak where the idle screw fits would be confirmed.
I set the pilot screw at 1 5/8th out. I understand the point about this screw being in a position (near the front) that normally indicates it is used for metering the fuel/air mix, but in this carb the screw closes off an air passage so I concluded turning it out to the maximum point allowed by the recommended settings would introduce the most air and create the leanest mix.
I used the float height measurement that would create the lowest fuel level (this was to measure 7mm from the top of the main jet, which is the same as 21mm measured from the underside of the carb body).
The result was that the engine still started from cold without the choke and, although it idled much better than before, as the engine got hotter it would not hold steady revs and eventually stalled.
After a few minutes of running the (new) spark plugs looked like this:
I tried to get a pic of the inside of the tube that holds the idle jet and you can see the evidence of the pitting (and I now remember that the original jet was ceased so badly it took a lot of force to get it out).
So it is with a heavy heart I've concluded that Steve's diagnosis is correct and the carb is kaputt. A bit disappointing, but I suppose you shouldn't be surprised to find problems with a bike that is nearly 60 years old and besides I have got luckily with just about everything else which could be easily repaired.
It looks like I will be trying to get an alternative carb to work - more on this later!
...but I suppose you shouldn't be surprised to find problems with a bike that is nearly 60 years old
Nick - nearly 60 years old, AND corroded well beyond the usual for anything that had any semblance of care in its life. I think you've done very well under the circumstances, and the ton of cleanup effort you've put into it has been a big part of that success.
nabs
Veteran Member
replacement carb options
66sprint had let me know that "20 mm carbs were also used on the CB/CL/SL 175 and CB/CL 200 bikes, but their outlets are dropped slightly below the mount bolt/stud centerline. so although workable, they would be slightly more difficult to adapt....."
... and as it happens there was an incomplete carburettor on ebay advertised as CB175 which I purchased to see if it might work.
cb175 on the left, CA95 on the right


Will it physically fit? the old carb is slightly taller and I suppose that might create an issue with the throttle cable length(?) and as Steve says the mount holes are off centre, but I think it should just be able to get an air tight seal if I fill in the gap in the bottom of the bakerlite insulator that is used to create air turbulence for the original set up. Here is how the insulator would align with the carb:

and the gap that would need to be filled with e.g epoxy so that the carb would make a good seal with the insulator, or perhaps I could just put a gasket between the two.

.. but, I am now not sure the new carb is actually from a CB175. The casting looks the same as all the pictures i looked up, however, it was pretty obvious that the venturi was narrower than the CA95 PW20 carb. Apparently this is where the carb sizes are measured, so this is what started my suspicions that this is a different model. I tried to measure it by stuffing in some plasticine into the venturi and measuring the imprint (~16mm at the narrowest point by ~22mm). There are no marking on the carb body, other than the keihin name, and an 18 stamped on the choke plate.

I also saw this diagram in the 1971 manual which I think shows the measurement for the slide diameter (20mm), whereas the one I have just purchased would take an 18mm slide.

So, long story short, I don't think this is a 20mm carb. Is it worth me trying to get the missing parts, or am I wasting my time trying to get this one to work?
66sprint had let me know that "20 mm carbs were also used on the CB/CL/SL 175 and CB/CL 200 bikes, but their outlets are dropped slightly below the mount bolt/stud centerline. so although workable, they would be slightly more difficult to adapt....."
... and as it happens there was an incomplete carburettor on ebay advertised as CB175 which I purchased to see if it might work.
cb175 on the left, CA95 on the right
Will it physically fit? the old carb is slightly taller and I suppose that might create an issue with the throttle cable length(?) and as Steve says the mount holes are off centre, but I think it should just be able to get an air tight seal if I fill in the gap in the bottom of the bakerlite insulator that is used to create air turbulence for the original set up. Here is how the insulator would align with the carb:
and the gap that would need to be filled with e.g epoxy so that the carb would make a good seal with the insulator, or perhaps I could just put a gasket between the two.
.. but, I am now not sure the new carb is actually from a CB175. The casting looks the same as all the pictures i looked up, however, it was pretty obvious that the venturi was narrower than the CA95 PW20 carb. Apparently this is where the carb sizes are measured, so this is what started my suspicions that this is a different model. I tried to measure it by stuffing in some plasticine into the venturi and measuring the imprint (~16mm at the narrowest point by ~22mm). There are no marking on the carb body, other than the keihin name, and an 18 stamped on the choke plate.
I also saw this diagram in the 1971 manual which I think shows the measurement for the slide diameter (20mm), whereas the one I have just purchased would take an 18mm slide.
So, long story short, I don't think this is a 20mm carb. Is it worth me trying to get the missing parts, or am I wasting my time trying to get this one to work?
Richard Pitman
Veteran Member
I think that probably IS a CB175 carb. The throttle slide does only measure 18mm in diameter, despite having 20 cast on the carb top. Venturi size is a different issue, much debate concerning relative sizes of CB175 and CB200 venturi size.
think you'll struggle to find all the missing bits, easier to buy a complete carb. How about a CD175 carb, 22mm ?
Here's some pics of one my CB/CL175 carbs:


think you'll struggle to find all the missing bits, easier to buy a complete carb. How about a CD175 carb, 22mm ?
Here's some pics of one my CB/CL175 carbs:
Nick, Picture below shows a crappy partial CB/CL 175 carb and both sides of the CD 175 22 mm carb (I have two)...... The casting SEEMS to be very close to your original in physical size and lay-out, but has a 22mm slide and portal to the engine opening......I will gladly provide other measurements if you want them, but believe you might be slightly over-carburated for your engine's displacement......

Obviously, you best option would be to find the correct carb, but my offer of the C 200 (90cc) carb is still available......It has an 18mm slide and a 19mm portal size which might be opened slightly to match your engine's 20 mm intake port.......
Below is a disassembled PW22, CD carb picture you could scale from knowing the centered port is 22mm wide.......
nabs
Veteran Member
thanks Richard and Steve. The CD175 does look closer to mine in general proportions so might be an option.
As it turned out there was another incomplete cb175 carb lurking on ebay that has the slide, needle and top cap, so hopefully I will be able to make one good one and have a spare upper half that I can swap back for the one I will have to drill should it not work.
Given that I can get the spare parts in a couple of days I may as well try it out and - if it does not work - I'll take you up on your kind offer of the C200 Steve.
With any luck one of these options will be okay to get it running and at some point a PW20 will turn up so I can go back to the stock carburettor.
I will be back with many questions about carburation
nabs
Veteran Member
in my ever increasing collection of incomplete carburettors I have managed to get hold of what I think is 22mm version. It has power jets so I suppose might be a PW22, although there are no stampings apart from a 'B' and '06' on the engine side, indeed it doesn't even say keihin on it (although the two remaining jets are both keihin).
It was only a few pounds because much of it is missing, but I thought it was worth a punt just because it looked similar to the original. Unfortunately the port on the engine side is a touch too big and drilling new holes for the studs would interfere with where the o-ring fits. It is closer in overall proportions than the CB175 carb, but I do not think will be worth the time and money to try and find the missing parts.
So although it is still possible that Steve's C100 carb is the evasive goldilocks size I am looking for, I am beginning to wonder if I might just have to be patient and wait until I can find a genuine PW20. I now have enough parts to make a whole CB175 carb so I plan to go ahead and try that and decide on the next steps after that. More on this next week, along with my many carburetion questions!
from left to right: CB175 (18mm?) ; CA95 (PW20) ; CL175 early ? (pw22?)
Richard Pitman
Veteran Member
Left field thought, how about a generic Chinese carb, available brand new and dirt cheap on Ebay ?
Allen Millyard used six of these on his Honda 6 project, and got them running well enough.
Allen Millyard used six of these on his Honda 6 project, and got them running well enough.
nabs
Veteran Member
thanks Richard, I did have a very brief look at the pz19 copies . As you say, very cheap so I will look again...
Scaling from your picture, the questionable carb is NOT a 22 mm CL 175 unit...., it is a 24 mm carb, likely from a CB/CL 72
nabs
Veteran Member
it turns out that the carburetion questions I was going to ask were not needed.
I was puzzled because I knew the carburettor I plan to use was from a CB175 a bike that - although having roughly the same engine capacity - had two carburettors, one for each cylinder, whereas my CA95 had one feeding two cylinders and so I concluded it has to deliver twice as much fuel.
Now I have worked out that this isn't what is going on at all I am less confused (although it is a 360 degree engine with both pistons going up and down at the same time, while one of them is sucking in fuel/air from the carb the other is on the ignition stroke).
Hopefully this is correct!
So now my question is, assuming I can get the carburettor to fit and keep the original brass parts and it is clean and undamaged, is there any reason to think it *won't be* set up about right for my CA95?
nabs
Veteran Member
I suppose the best way to answer my own question is to try it and see what happens!
I got all the parts for a complete CB175 carburettor from my carb graveyard and - after much sawing, drilling and filing I managed to get it to fit.


it did run, but the carburettor was leaking so badly that I could not leave it running long enough to make any adjustments. I will have to investigate the leak next weekend. Still, progress of sorts!
I got all the parts for a complete CB175 carburettor from my carb graveyard and - after much sawing, drilling and filing I managed to get it to fit.
it did run, but the carburettor was leaking so badly that I could not leave it running long enough to make any adjustments. I will have to investigate the leak next weekend. Still, progress of sorts!
Sounded like it ran well enough (under the circumstances) that I believe the nominally 20mm C-200 carb (which should mount easier, and is closer to the port design) might be a viable and possibly the best option, barring an exact replacement......Please PM me your full name and mailing address and I'll send it to you for shipping cost.......
nabs
Veteran Member
thanks Steve, PM on the way. tbh, even if I can get it to work, I do not think I would be very comfortable with my Heath Robinson solution long term: I had to drill very close to the edge of the mount to get it to fit on the studs; the bowl almost touches the cylinder and there is no room to get a spanner (wrench) on the nuts holding it on to the engine. cheers!Sounded like it ran well enough (under the circumstances) that I believe the nominally 20mm C-200 carb (which should mount easier, and is closer to the port design) might be a viable and possibly the best option, barring an exact replacement......Please PM me your full name and mailing address and I'll send it to you for shipping cost.......
old timer
Veteran Member
I just found the thread and have to say I admire the amount of work you have put into this CA 95. I am very lucky to be working on one thats not quite that bad.
Bill H
Bill H
nabs
Veteran Member
A belated update on my (erratic) progress getting the CA95 to run.
I fixed the leak with on the CB175 carb but no matter what I tried I could not get the bike to idle: it always reved fast on starting up and did not respond to the idle adjustment screw. It was only when I took it off again that I noticed that, although I had a left hand carb body, the slide was from a right hand side carb so that the cutaway was facing the wrong way. I think that must have been what was causing the problem (one of the perils of using carbs of uncertain pedigree, I suppose).
A couple of weeks ago I found someone selling a PW18 carb on facebook. The seller thought it had come from a CA95 and - although it has CA stamped on it - I think it is more likely to be from a C95 since it is 18mm rather than the 20mm carb originally fitted. I have been a busy with other things so only got a chance to fit it today.
It was in a pretty sorry state - the needle jet and jet needle were missing, the spring loaded flap from the choke plate was missing, the float had been patched with braze and there was a weird (handmade?) throttle stop screw.

On cleaning it I discovered that the threads had been stripped from the housing for the slow jet and the jet had been glued in place. Having nothing much to loose at this stage, I replaced the missing and damage parts with bits from my other two carbs and superglued the slow jet back in place.
it started easily and idled okay when cold with the choke on but I could only get it to idle when warm with the throttle stop screw all the way in, and even then it tends to stall without a bit of throttle. Hopefully a bit more fiddling with the idle adjustment will improve matters.
I was able to ride it up and down the street a coupled of times and but not really far enough to conclude anything useful. At this stage I discovered the front brake barely worked, so I brought it back home to investigate that.
So a bit of progress (and yes, I know if I had taken Steve up on his offer of the C100 carb it probably would have running weeks ago!). Onwards and upwards!
cold engine/choke on:
warm engine/choke off:
I fixed the leak with on the CB175 carb but no matter what I tried I could not get the bike to idle: it always reved fast on starting up and did not respond to the idle adjustment screw. It was only when I took it off again that I noticed that, although I had a left hand carb body, the slide was from a right hand side carb so that the cutaway was facing the wrong way. I think that must have been what was causing the problem (one of the perils of using carbs of uncertain pedigree, I suppose).
A couple of weeks ago I found someone selling a PW18 carb on facebook. The seller thought it had come from a CA95 and - although it has CA stamped on it - I think it is more likely to be from a C95 since it is 18mm rather than the 20mm carb originally fitted. I have been a busy with other things so only got a chance to fit it today.
It was in a pretty sorry state - the needle jet and jet needle were missing, the spring loaded flap from the choke plate was missing, the float had been patched with braze and there was a weird (handmade?) throttle stop screw.
On cleaning it I discovered that the threads had been stripped from the housing for the slow jet and the jet had been glued in place. Having nothing much to loose at this stage, I replaced the missing and damage parts with bits from my other two carbs and superglued the slow jet back in place.
it started easily and idled okay when cold with the choke on but I could only get it to idle when warm with the throttle stop screw all the way in, and even then it tends to stall without a bit of throttle. Hopefully a bit more fiddling with the idle adjustment will improve matters.
I was able to ride it up and down the street a coupled of times and but not really far enough to conclude anything useful. At this stage I discovered the front brake barely worked, so I brought it back home to investigate that.
So a bit of progress (and yes, I know if I had taken Steve up on his offer of the C100 carb it probably would have running weeks ago!). Onwards and upwards!
cold engine/choke on:
warm engine/choke off:
nyweb
Veteran Member
Wow ! What a good read ! I don't think I've ever seen anyone do that much work to a bike ! You don't give up ! You're an inspiration to me to get working on mine ! My problems are nothing compared to what you've gone through ! I guess no Bike is too far gone !! Nice work !!!!
nabs
Veteran Member
Back to the CA95!
In early November I embarked on some building work on the other end of the garage and the poor old CA95 became buried under more than the usual amounts of debris and mess. I have now belatedly finished the work on the garage and unearthed the bike. When I put it away several months ago I had got it running on a smaller than stock carburettor but I never could not get it to run well at revs: as soon as it went off idle it needed to be kept reving quite hard to stop it from stalling and I was not confident to take it beyond the end end of the street.
A stroke of good luck occurred over Christmas when someone in the US offered a very clean looking body for an original CA95 carb on ebay for a bargain price of £10.50*

I cleaned and fitted it today: took a lot of kicks to get it going, but it seems to run reasonably well so fingers crossed I have finally cracked it.
*+£18 delivery, erk!
In early November I embarked on some building work on the other end of the garage and the poor old CA95 became buried under more than the usual amounts of debris and mess. I have now belatedly finished the work on the garage and unearthed the bike. When I put it away several months ago I had got it running on a smaller than stock carburettor but I never could not get it to run well at revs: as soon as it went off idle it needed to be kept reving quite hard to stop it from stalling and I was not confident to take it beyond the end end of the street.
A stroke of good luck occurred over Christmas when someone in the US offered a very clean looking body for an original CA95 carb on ebay for a bargain price of £10.50*
I cleaned and fitted it today: took a lot of kicks to get it going, but it seems to run reasonably well so fingers crossed I have finally cracked it.
*+£18 delivery, erk!
Well hopefully this will sort out the running and you'll be down the road further.
I cleaned and fitted it today: took a lot of kicks to get it going, but it seems to run reasonably well so fingers crossed I have finally cracked it.
Sounds like it's running a bit rich, was the choke still on a bit? Sounds as though it was 8 stroking a little
nabs
Veteran Member
It eventually sprung in to life without the choke on AD - hopefully when I get a bit of fiddling time at the weekend I can get it a bit better
nabs
Veteran Member
not a lot of progress, although it now consistently starts first kick which is encouraging.
I was able to get the engine to idle but as AD suggested it is running rich and there is always a good dusting of black dust on the spark plugs from the unburnt fuel.
I have tried to make it leaner with the air screw but beyond about 2 turns out the engine no longer idles at all (it will run for a bit then it races, slows down again in a cycle until it eventually stalls)
Unfortunately this is a situation where not having any mechanical experience can be a bit of an obstacle to progress! It is a new air cleaner/filter so I assume that it is not the cause (although I do not know what check can be done to confirm it).
Am I missing something obvious? Unless there are other suggestions I planned to experiment with the float height as I understand that if there is too much fuel in the bowl it will make the mixture richer.
In other news I have managed to find a passable replacement for the now unobtainable tire pumps that came with the early Honday Benleys. more on that shortly!
Nick, when you got the used carb did you clean it before using it? Did you swap the jets from your previous carb into it? I'm wondering if the passages in the used carb aren't dirty, or the jets in it had been replaced by someone who didn't realize that aftermarket kits rarely come with proper jet sizes, might have too large a slow jet in it
nabs
Veteran Member
That's a good point Tom, I did clean it thoroughly when I got it (and gave it a quick spray with carb cleaner to confirm all the passages were still clear before fitting it the other day) but I can't remember if I swapped the jets over. I seem to remember they were all Keihin but had at least one of the pairs - possibly the pilot jets - had different size marked on them. I will double check tomorrow and try the smaller one (assuming my memory is reliable, which it rarely is these days!)
nabs
Veteran Member
Tyre pump
Here is my imitation tyre pump fitted:

and a picture of the real McCoy:
.png")
The immo version is a replica of a BMW pump (BMW part: 71111230394). It is metal bodied and painted silver like the original Apollo pumps used by Honda. Available in the UK from motorworks for a very reasonable £18.90.
You have to chop about 1 inch off to get it to fit, but if you are careful it will still work afterwards and thereby get you home if you have a flat tyre.

I can't claim credit for the discovery that the BMW part is a good match, it is mentioned on this website
The author has also found a copy of the instructions

edit to add a clearer picture of the original that was recently up for sale in the UK. Bidding got to £360 ($500) - reserve not met. I think I will stick with my £18 fake!
.jpg")
Here is my imitation tyre pump fitted:
and a picture of the real McCoy:
The immo version is a replica of a BMW pump (BMW part: 71111230394). It is metal bodied and painted silver like the original Apollo pumps used by Honda. Available in the UK from motorworks for a very reasonable £18.90.
You have to chop about 1 inch off to get it to fit, but if you are careful it will still work afterwards and thereby get you home if you have a flat tyre.
I can't claim credit for the discovery that the BMW part is a good match, it is mentioned on this website
The author has also found a copy of the instructions
edit to add a clearer picture of the original that was recently up for sale in the UK. Bidding got to £360 ($500) - reserve not met
. I think I will stick with my £18 fake!Attachments

You've gone to great lengths to achieve your goal, Nick. Few will know it isn't original, I'm sure.
old timer
Veteran Member
Glad you found a carb body. Once you get the right jets it will probably run better. I agree with the other members on the great job you have done on the bike.
I am held up looking for a drum stopper part number 24431-205-000. Some PO put the motor together with out one and caused some odd wear on the shift forks. I have tried every vender I can find and wrote to several but no luck. I need the stopper, spring and shoulder bolt. If you run across one over there let me know. I am thinking of taking it to a machine shop along with one from a 160 to see if they can make one that will fit the CA 95.
Stay safe.
Bill H
nabs
Veteran Member
thanks Bill, there is a NOS stopper guide and also a drum listed on ebay US at the moment if it is of any use:
https://www.ebay.co.uk/itm/Honda-NO...557121?hash=item547e14fb41:g:KqQAAOSw1XleKxJ1
https://www.ebay.co.uk/itm/NOS-Hond...840436&hash=item28488b3167:g:J8kAAOSweZJaJZqy
I will keep an eye out in the UK too. Did you try David Silver? It seems like they can get the pin and spring when I looked
cheers
Nick
old timer
Veteran Member
Thanks for the reply Nick. The part on e-bay is the guide stopper part number 24441-205-000. I looked thru your rebuild post and found on 6-6-20 you have a photo of the guide stopper marked as the stopper drum. I think you are right when you said they used the guide stopper for the stopper drum on the later models. Your motor , the one I am working on and 2 others I have looked at do not have the stopper drum though it is listed on the parts list and shown in the shop manual. I think I am looking for a part that is no longer used. looking at your rebuild was a great help and I will proceed with my build.
Thanks a bunch.
Bill H
Thanks a bunch.
Bill H
nabs
Veteran Member
I compared the jets from my original carb and the one in the replacement and they were both #35. I swapped them over and it made no difference to idling, so I experimented with the float height: The manual says to measure from the top of the man jet as per the diagrams below (note these show the non-powerjet carb used on the C95 model):
This is equivalent of between 21-22mm when measured from the edge of the float chamber on my carb, however this disagrees with the other Honda carb listings for the CA95 which say it should be 19.5 mm.


In the end the best setting I found for idle is to open the air screw 1 3/4 turns out (compared with 1 1/4 specified in the manual) and set the float height at 21.5mm when measured from the float bowl.
Who knows if this is correct, but it is an improvement on previous attempts in any case and good enough for me to take the bike for a ride.
I did not go to too far as it is not registered/insured, but during the short ride the engine ran smoothly in all the gears. First impressions were excellent and It was much nicer to ride than I was expecting, with a quiet engine and a smooth comfortable ride. The only disappointment was that, despite my attempts to adjust it, the front brake is still very poor so I need to look at that again. I also need to fix a small oil leak, which I think is coming from the tach cover so hopefully won't be too troublesome.
So just a couple of small jobs and I can start the process to get it MOT'd (the UK vehicle safety inspection) and then registered, hopefully in time for some summer riding!
This is equivalent of between 21-22mm when measured from the edge of the float chamber on my carb, however this disagrees with the other Honda carb listings for the CA95 which say it should be 19.5 mm.
In the end the best setting I found for idle is to open the air screw 1 3/4 turns out (compared with 1 1/4 specified in the manual) and set the float height at 21.5mm when measured from the float bowl.
Who knows if this is correct, but it is an improvement on previous attempts in any case and good enough for me to take the bike for a ride.
I did not go to too far as it is not registered/insured, but during the short ride the engine ran smoothly in all the gears. First impressions were excellent and It was much nicer to ride than I was expecting, with a quiet engine and a smooth comfortable ride. The only disappointment was that, despite my attempts to adjust it, the front brake is still very poor so I need to look at that again. I also need to fix a small oil leak, which I think is coming from the tach cover so hopefully won't be too troublesome.
So just a couple of small jobs and I can start the process to get it MOT'd (the UK vehicle safety inspection) and then registered, hopefully in time for some summer riding!
old timer
Veteran Member
Bill H
Sounds good with the newest carb settings.
Did you arc the front brake shoes?
Did you arc the front brake shoes?
nabs
Veteran Member
I did make a half hearted attempt LDR but I am going to do it again and be more careful this time round.Sounds good with the newest carb settings.
Did you arc the front brake shoes?
nabs
Veteran Member
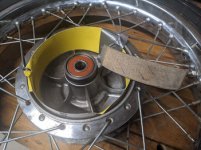
Attempt #2 to arc the brakes, and this time I marked lines on the face of the shoe and kept a rubbin' until they were all removed. By the time all the marks were removed consistently I had generated a surprisingly large amount of dust , but it did the job and I now have working brakes
I found the trick was to cut the sandpaper slightly taller than the inside wall of the hub: this means you can fold over the lip and hold the paper in place with the palms of your hands. You can then move the shoe back and forth against the sandpaper by alternatively pushing each end of the shoe with the middle finger of each hand. This results in achy fingers but no bruised knuckles.


no such luck with my carburetton problems. I have been for a couple more short rides and it runs well, no hesitation and pulls well in all gears, but even a short time idling the ends of the spark plugs are soot black.
I'll give the carb another clean. Before my latest testing I double checked all the passageways were clear and I can squirt carb cleaner into the air bleed passage that goes to the slow jet and get it to exit from the discharge hole in the carb body and the air screw hole but I suppose there still might be a partial blockage somewhere. I'll also clean the filter (It was NOS and in a box so I just fitted it, but I perhaps it could be clogged with dust).
I have not been able to find a smaller slow jet. CMN stock several sizes but frustratingly the only one smaller than the jet already installed is unavailable. The screw thread is M3.5 x0.6mm which seems a bit uncommon so I am not sure I will have much luck finding alternatives but will keep looking.
I refuse to be beaten, but also am running out of ideas! I have some new spark plugs on order and recommence testing when they arrive.
I found the trick was to cut the sandpaper slightly taller than the inside wall of the hub: this means you can fold over the lip and hold the paper in place with the palms of your hands. You can then move the shoe back and forth against the sandpaper by alternatively pushing each end of the shoe with the middle finger of each hand. This results in achy fingers but no bruised knuckles.
no such luck with my carburetton problems. I have been for a couple more short rides and it runs well, no hesitation and pulls well in all gears, but even a short time idling the ends of the spark plugs are soot black.
I'll give the carb another clean. Before my latest testing I double checked all the passageways were clear and I can squirt carb cleaner into the air bleed passage that goes to the slow jet and get it to exit from the discharge hole in the carb body and the air screw hole but I suppose there still might be a partial blockage somewhere. I'll also clean the filter (It was NOS and in a box so I just fitted it, but I perhaps it could be clogged with dust).
I have not been able to find a smaller slow jet. CMN stock several sizes but frustratingly the only one smaller than the jet already installed is unavailable. The screw thread is M3.5 x0.6mm which seems a bit uncommon so I am not sure I will have much luck finding alternatives but will keep looking.
I refuse to be beaten, but also am running out of ideas! I have some new spark plugs on order and recommence testing when they arrive.
Attachments
In the distant past when we couldn't find jets the size we wanted, we would solder the hole shut and re-drill the size we needed with jet drills (of course, you have to find the next smallest drill bit size prior to soldering). Admittedly, it is easier on a main jet due to the hole size.
nabs
Veteran Member
I am still hoping it is just a matter of better prep AD, but your post did remind me that I bought a keyster kit (in search of o-rings and a gasket for the fuel bowl) and I have never tried the slow jet that came in that kit. It is unmarked, and I suppose it is possible it will be a different jet size to the original keihin and, if not, could be a candidate for butchery. Would there be any merit in drilling additional air bleed holes in the shaft of the jet? I only ask as because it seems like this might require less skill/precision than trying to fill and drill the jet.
It's a good point, but not one I'm qualified to answer as I am not the most experienced with carbs and the atomization of fuel they perform. I'm a clean-them-up-and-jet-by-the-seat-of-the-pants trial and error guy
Glad the brakes are sorted out.
I don't know this carb so limited advice. Adding extra holes is generally a bad idea. The thing to remember about emulsion tubes is that they work top to bottom meaning low speed is using the upper holes and the more throttle used the more holes open going down until full throttle when all are used.
I don't know this carb so limited advice. Adding extra holes is generally a bad idea. The thing to remember about emulsion tubes is that they work top to bottom meaning low speed is using the upper holes and the more throttle used the more holes open going down until full throttle when all are used.
nabs
Veteran Member
Cleaned the air filter and used an ultrasonic cleaner on the carburettor. Triple checked I could get carb cleaner to spray cleanly through every passage way; new spark plugs, fresh fuel, fully charged battery ... and .... it started first kick and idled smoothly. On the road it was a different matter though, now the engine blubbers and stutters and wont rev at all beyond mid throttle. grrr
I could not find anything obvious wrong: the choke lever is moving freely (and stalls the engine when on, so I presume is working properly); the battery still has full charge and both spark plugs - although now covered in soot -produce a blue spark.
I am in urgent need of a beer so back to the fray tomorrow. Could I have inadvertently unplugged something on the harness when refitting the air filter/cleaner that might cause these symptoms?
It sounds obviously rich at this point so I can't imagine anything unplugged would cause it. Excess draw from a restrictive or clogged air filter can make that happen, can't recall what your air filter situation is but I seem to remember it's stock and in decent shape.
Midrange "blubber" is more likely a timing advance (does it fully advance to remain between the advance lines?), or a "fat" main needle setting in the slide (sooty plugs favors this) so drop the needle once proper timing advance is verified......
nabs
Veteran Member
thanks both, before seeing your comments I had an unexpected rush of enthusiasm and took the carburettor and air filter off again. No loose electrical connections and yes Tom the air filter is NOS and in good condition (I also cleaned it for good measure yesterday).
I had not seen 66's comment about timing so will check that in the morning. However, the comment about the needle setting has made me wonder if I have accidentally fitted the wrong jet needle/needle jet (I had brass parts from the original carb and the one from the replacement on the bench at one point). I just went for a short ride and while in 1st gear the blubbering goes away as you get closer to full throttle, so I will try and swap them over tomorrow also.
thanks again for the advice
nick
PS I have only ever checked the static timing, are you supposed to check the advance timing as a part of routine maintenance or is this just something you do when investigating a problem?
Timing properly set includes both initial static timing and then a check of full advance as it allows you to be sure the advancer is working correctly. Of course, later intervals could simply be static timing check to be sure nothing has varied, but the more miles put on overall would eventually necessitate checking the full advance anyway since the advancer will show signs of wear at some point
nabs
Veteran Member
my new strobe light should arrive before the end of the week.
In the meantime I experimented with my 3 sets of jet needles/needle jets in my possession. As Sod's law requires, the last of the 6 permutations was the best. The engine continued to blubber though: lowering the needle one position removed the blubbering in 1st and 2nd, and dropping it to the top position got rid of the blubbering in all the gears. I did not want to run the engine too much at higher revs because of the rebore, but I let it rev reasonably high in 1st gear a couple of times and the revs picked up very quickly from mid throttle but this did not seem to deliver a corresponding amount of power. Given the limited testing none of this is very conclusive though.
If the spark plugs are anything to go by, it still runs rich at idle (I tried the keyster supplied slow jet and it made it worse), so I suppose the above adjustments might just be compensating for this?
Will report back on the timing at the weekend.
cheers
Nick