• Don't overlook our Welcome Package, it contains many links to important and helpful information about functions at VHT like posting pictures and sending PMs (private messages), as well as finding the parts you need.

    AD

Loose cam chain on CA160.

kmil

Member
Joined
Jul 26, 2022
Total Posts
39
Total likes
1
Location
Jonesborough, TN, USA
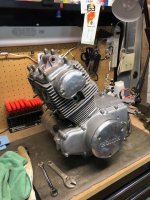
I replied on the thread for noise from the cam chain that someone else started and mine was making the same noise on a newly rebuilt engine. I have pulled the engine and put it on the bench and while sitting on the bench I loosened the cam chain tensioner and to my surprise I heard a click and it sounded like something slid and seated. My question is, would there be a way to check to see if the cam chain is under the correct tension without reinstalling the engine on the frame and running it. Could the cam chain tensioner push rod have been bound up due to the engine being mounted in the frame? I really don't want to put the engine back on the frame just to find out it still is loose. I also don't want to disassemble a brand new rebuilt engine any further than I have to. Any ideas?
 
When I got my 160 this summer, I thought I heard it click and the chain was adjusted but it ran funny and then found aluminum in the oil spinner. Long story short, the PO had done work on the head/pistons but failed to route the chain through the tensioner correctly. I just rebuilt it. See project thread CB 160 Blue and White maybe.

If it's not routed correct there will be slop and it'll have to come apart. I don't know if careful observation of cam movement while turning crank will reveal it or not.
 
I replied on the thread for noise from the cam chain that someone else started and mine was making the same noise on a newly rebuilt engine. I have pulled the engine and put it on the bench and while sitting on the bench I loosened the cam chain tensioner and to my surprise I heard a click and it sounded like something slid and seated. My question is, would there be a way to check to see if the cam chain is under the correct tension without reinstalling the engine on the frame and running it. Could the cam chain tensioner push rod have been bound up due to the engine being mounted in the frame? I really don't want to put the engine back on the frame just to find out it still is loose. I also don't want to disassemble a brand new rebuilt engine any further than I have to. Any ideas?

Did you rebuild the engine or someone else? If you did then you have some knowledge of the reassembly and routing of the cam chain and as noted above, it is possible to not route that chain correctly through the different rubber wheels. Are the associated parts all new in there, or did you reuse the rollers and tensioner spring and pusher rod? The rod can bind if it has various bolt marks from the previously tightened lock bolt areas. That pusher rod spring can also be weak from 50+ years on the pusher rod if not replaced.

Worst case have a look option:

It should be possible to remove the top engine cover with the motor out to see down into the area and the chain routing. The lower cylinder 6mm bolt should hold the cylinders to the top engine case. Depending on how long you ran the motor the head gasket should still be OK and seal if you don't take the head off.

Trying to run it out of the frame is pretty difficult unless you have an engine test stand with all the associated gear to run the motor. Richard Pitman in the UK built a stand for these small motors and if you check out his post on that you will see what it entails.
 
Since the engines out, I'd try Flying900's plan, unless your absolutely sure the chain was correctly routed inside the tension roller. If you'd like a preview of what it looks like here is the link to my tear down plus the routing diagram. See post #75.
CB160 Blue on White maybe - Page 2 (vintagehondatwins.com)

It shows the chain outside or to the rear of the roller, which is wrong. The spring rod still engages the push end of the tensioner, but it won't tighten the chain that way.
 
Thanks for the answers. The motor was built by a guy who races the CB160 class with AHRMA and builds lots of these motors for other racers. I would think that he wouldn't make the mistake of not routing the cam chain correctly. The cam chain, tensioner, push rod and spring are all original I assume, being as they were not listed on the parts replaced list on the bill. I have owned this bike since new and this noise was why it was parked in the first place back in 1984. I told the builder all these things when I dropped the motor off. He said he would check it all and replace what need to be replaced. I'm wondering if I have a com bination of problems. The valves check looser than the .002inch spect which could cause some noise. I guess I will pull the top plate off the motor and take a look down inside. Hopefully the head gasket will reseal. The motor hasn't been run more than 10 miles I would say. I will post what I find. I still trying to post pictures with no success.
 
I would also expect the chain is routed correctly, yet not replacing the chain and the other items I would question. These chains are a simpler design and after 10K miles likely clapped out, since most PO's never adjusted them at the correct intervals as Honda required. They are not the stronger Hyvo multi plate design used on late 70's and 80's bikes.

Setting the valves correctly is a must. Then if the builder is close by, reinstall it in the bike and get it running. If it is still noisy, I would ride it or trailer it there for his opinion.
 
I agree with the 50 plus years on the parts. Also the motor has 23,252 miles on it. Parts are probably worn out. I just ordered the complete tensioner assembly, and spring so I now need to check on the cam chain. I have a cam chain which was listed as being for the CA160, CB160, CL160, CB175 and so on but it is 78 links. I see on here that 82 links is what everyone says is right. Which is it? Also has anyone tried to buy the 219 series of chain in bulk and cut it to size? Does anyone know if there is a difference in what the original chain is compared to the bulk chain? You can buy 5 feet of 219 chain for $32 on Amazon. Ebay prices are around $100 for a cam chain.
 
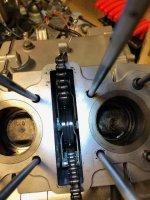
I need to add that I opened the top of the motor and everything looks good. I can't tell much about the proper tension on the chain because of the head bolts being off which lets everything be loose. Best laid plans don't always work out.
 
Adjusting the cam chain is one of the last things to do when assembling the motor, could be your motor guy just overlooked that step. Buying bulk industrial roller chain is a crap shoot,quality wise, most of it is for low speed applications not up to the stress of a motorcycle engine.
 
That is a very good point about quality and low speed applications. I have just tried to attach a picture so I don,t know how it's going to work. I guess it's best to just bite the bullet and pay a big price but it's a crap shoot with these foreign vendors also.
IMG_1187.jpg
 
Last edited by a moderator:
I would also not buy a bulk chain as Mike noted too sketchy. The chain is a 219-82 link Morse or Honda unit. I think a lot of other motors used that specific 82 link length and 219 size, so look at DSS or CMSNL or EBay for a 219-82 link cam chain. I would be sure to get a split link chain, as some of them are a peen link style and you need the correct tool to peen the cam chain vs a split link one.

THE ISSUE IS FINDING A SPLIT LINK CHAIN! LOTS ON VARIOUS SITES FROM $38-50 US - BUT WITH AN ENDLESS CHAIN OR PEEN STYLE LINK.

I am pretty sure I paid around $50.US for the CB350F chain last year, which I was a 219-82 link cam chain with a split link clip... no peening required.
 
I agree with the 50 plus years on the parts. Also the motor has 23,252 miles on it. Parts are probably worn out. I just ordered the complete tensioner assembly, and spring so I now need to check on the cam chain. I have a cam chain which was listed as being for the CA160, CB160, CL160, CB175 and so on but it is 78 links. I see on here that 82 links is what everyone says is right. Which is it? Also has anyone tried to buy the 219 series of chain in bulk and cut it to size? Does anyone know if there is a difference in what the original chain is compared to the bulk chain? You can buy 5 feet of 219 chain for $32 on Amazon. Ebay prices are around $100 for a cam chain.

Based on what I found at Partzilla, CMSNL and Amazon (4into1) as well as other suppliers, the part number is 14410-216-003 and it's a 219H with 82 links. No one I could find but CMSNL carries the original part number and they have higher shipping costs, but I found 2 options for you from David Silver. One is OEM and the other is an OEM supplier's replacement (DID) that comes endless for less money and you can use the rivet link for a 450 in it which is available from 4into1 at a decent price.

OEM, later part number also used on the CB350F and 400F

https://www.davidsilverspares.com/CL160-SCRAMBLER-1966-1967-USA/part_318443/

OEM supplier's replacement (DID)

https://www.davidsilverspares.com/CL160-SCRAMBLER-1966-1967-USA/part_318444/

master link from 4into1

https://4into1.com/genuine-honda-d-...l72-77-cb-cl-350k-450k-sl350k-cb500k-550-750/

OEM cam chain from CMSNL, p/n 14410-216-003

https://www.cmsnl.com/honda-ca160-touring-1966-usa_model998/chaincam_14410216003/

and hopefully you didn't pay too much for the tensioner assembly

https://www.davidsilverspares.com/CL160-SCRAMBLER-1966-1967-USA/part_318447/
 
Cool, now that you can do pictures , take one of the routing down through the head. Again the smaller tension roller should be next to the rear cylinder tunnel wall and the chain in front of it. Even with head nuts off you should be able to see if that roller is riding the chain pushing it forward.
 
I ordered the Tensioner assembly from CMSNL for I think it was $53.00 and got a new spring and an extra master link. You never know when one is going to break or flip of into neverland when installing. I just ordered the chain recommended by Flyin900. Hopefully it will get here earlier than they are estimating. Top end gasket kit ordered just to make sure. As I said earlier I took the top plate off and the chain is routed properly. Everything inside the motor looks great. I will try to get some pictures that show something, it's tight in there. I noticed that Ancientdad edited my picture to get into the right place. Where did I go wrong? Thanks for all the input and wisdom, just what I was looking for in a forum. When the parts get here I will let you guys know.
 
I noticed that Ancientdad edited my picture to get into the right place. Where did I go wrong?

You didn't really go wrong but as you noticed, the placement changes the look of the post and often separates portions of sentences. Since I have to view every post as part of my job, I like to tidy things up so they look as intended. What happens, often from posting with a mobile device, is the picture gets added to the very end of a sentence (no spaces) and that causes a length issue for the formatting, so it usually bumps some portion of the sentence down to the next line and leaves the picture hanging at the end of the next to last line of text. All it takes is to space down one line before attaching the picture, like hitting the "Enter" key on the computer keyboard or the equivalent key on the mobile keyboard like below

enter symbol.jpg

Just be a student of the process as you go and you'll pick up on these little things, and when you don't know the solution for something don't hesitate to ask - you can PM myself or Jim (LDR) anytime.
 
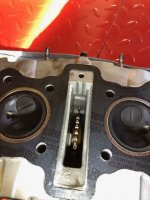
Well, here I sit waiting on parts and I decided to pull the head off and see what I could see. Everything looks good. The cam chain is routed correctly, no scraping or wear marks to be seen, and the spring was strong enough to launch the push rod all the way across the garage when totally loosened. I can not see a smoking gun anywhere. I took a few pictures just to let you guys see.

IMG_1193.jpg


IMG_1194.jpg

IMG_1195.jpg

IMG_1196.jpg

It looks really clean as I would expect.
 
I also wanted to ask if there is a link to a proper CA160 repair manual on the site? I am using a Clymer manual and it leaves a lot to be asked for. Thanks.
 
Those pistons look to the 1st oversized with the 025 on the dome. Did your builder add those in the work? A new chain and tensioner should help with your issue.
 
That's the way (a huh, a huh) it likes it. Now take the bottom plate with the drain plug in it, off. You can see the chain on the crank gear (I had to do this to get my chain on). These kind of rare bikes probably don't even have a real shop manual. I'd use a CB/CL manual for the motor and a CA95 manual for the rest of the bike. Start copying CMS parts fiches or if there is a parts catalogue, get it. Ask AD to get you into our library.
 
The builder did bore the engine .025 over and I supplied the pistons. The tops of the piston look like I'm running a little rich. I just got an update that my tensioner assembly, spring and master link have shipped. The cam chain on the other hand keeps shifting it's delivery date further and further out. The seller is now saying that it might not get here till January 15th. That's almost two months from order date to receive date. I've never had a shipping date that long even during the shutdowns in 2020. One of the reasons I hate dealing with the far eastern dealers.
 
The builder did bore the engine .025 over and I supplied the pistons. The tops of the piston look like I'm running a little rich. I just got an update that my tensioner assembly, spring and master link have shipped. The cam chain on the other hand keeps shifting it's delivery date further and further out. The seller is now saying that it might not get here till January 15th. That's almost two months from order date to receive date. I've never had a shipping date that long even during the shutdowns in 2020. One of the reasons I hate dealing with the far eastern dealers.

Since it's apart and you've got time. pull it out and count 82 links incl. master, then measure it from center pin to center pin, maybe we can determine if excess stretch is the culprit. It is hard to imagine, though, that that would exceed the limit of the tensioner's capability.
 
I do have a parts manual for the 1966 model CA160 and this Clymer manual that I've had for years seems to be mainly for the CB/CL models. It just leaves way to many questions unanswered and some of the illustrations don't show up well. I have noticed that the cam chain is really hard to get back on the crank gear after it drops loose. After having been a Diagnostic Imaging Engineer for almost 30 years I am very picky about documentation.
 
I do have a parts manual for the 1966 model CA160 and this Clymer manual that I've had for years seems to be mainly for the CB/CL models. It just leaves way to many questions unanswered and some of the illustrations don't show up well. I have noticed that the cam chain is really hard to get back on the crank gear after it drops loose. After having been a Diagnostic Imaging Engineer for almost 30 years I am very picky about documentation.

That is why the drain bolt has a plate.
 
I have both a CB160 Honda FSM and a parts manual. If we don't have it in the archives, I can load it if someone would explain how to do that procedure.
 
I started cleaning the head to get it ready to go back on when I get the parts for the rebuild and found these marks where the cam chain was rubbing the head on the front of the cam chain tunnel. I guess this is my smoking gun as to my noise. It's not bad just shows that I was having an issue on the drive side of the chain. As requested I removed the cam chain and measured the links laid out straight and pulled tight. It is 82 links and measures 630mm from the center of the first link to the center of the opposite link. I don't know what it should measure on a new chain because my new chain hasn't arrived yet. I have included the picture of the the rub mark on the head.

IMG_1198.jpg
 
I don't think that amount of wear will be an issue for you, I've seen that level of wear from a loose cam chain many, many times in the past with no consequences. The issue was lack of maintenance/adjustment, and since the engine rotation typically tightens the front of the chain while the adjuster is designed to tighten the rear of the chain, it slaps the front when allowed to get too loose but has the tensioner roller to slap against in the rear. I am curious about the measurement comparison between the 2 chains once you receive the new one, particularly based on the wear marks shown.
 
I started cleaning the head to get it ready to go back on when I get the parts for the rebuild and found these marks where the cam chain was rubbing the head on the front of the cam chain tunnel. I guess this is my smoking gun as to my noise. It's not bad just shows that I was having an issue on the drive side of the chain. As requested I removed the cam chain and measured the links laid out straight and pulled tight. It is 82 links and measures 630mm from the center of the first link to the center of the opposite link. I don't know what it should measure on a new chain because my new chain hasn't arrived yet. I have included the picture of the the rub mark on the head.

View attachment 18950


I got the same marks in my head too, must be common, like Tom said, poor maintenance. My used chain was 630mm + 8 for the master link. Sorry I didn't measure the new one.
 
I don't think that amount of wear will be an issue for you, I've seen that level of wear from a loose cam chain many, many times in the past with no consequences. The issue was lack of maintenance/adjustment, and since the engine rotation typically tightens the front of the chain while the adjuster is designed to tighten the rear of the chain, it slaps the front when allowed to get too loose but has the tensioner roller to slap against in the rear. I am curious about the measurement comparison between the 2 chains once you receive the new one, particularly based on the wear marks shown.

I have a NOS brand new RK 219/82 chain in my parts stash. It measures 635mm from centre pin to centre pin measuring the entire length of the chain to the last two holes or rivets. I am including the split link in these measurements. So you chain has not stretched more than a few mm's it seems. Those wear marks are poor maintenance as previously discussed. With the chain hitting the aluminum head stretched or not, while your in there a replacement is best practice IMO.

Too bad about the delay.

Thanks for the new chain length. Mine probably wasn't worn in the normal sense (it had been mis-routed) so is only 3mm longer than yours. This makes me think that kmil's 630 had to be without the master(split link) so really only 81 links measured (all chain lengths are even numbers, they have to be). Still would like to see a pic of his tensioner's non roller end (where the rubber push bar meets it).
 
I would also expect the chain is routed correctly, yet not replacing the chain and the other items I would question. These chains are a simpler design and after 10K miles likely clapped out, since most PO's never adjusted them at the correct intervals as Honda required. They are not the stronger Hyvo multi plate design used on late 70's and 80's bikes.

If there was a 'click' I would assume the chain was still at minimum tension after re-build and all you actually did was set tension
The chain will last a minimum of 30,000 miles or more, I've worked on various bikes with excess of 70,000 on original roller chain.
I've had way more issues with Hy-vo cam chains than roller chains. (CB900 is infamous for destroying cylinder block when chain wears a slot through casting)
My brother even has one link of primary chain fail on CB400f (it's same chain as CB550 which is a lot heavier and a bit more power)
Must have been faulty manufacture?
Theoretically they are stronger but are often lighter made.
The worst were on Kawasaki and Yamaha 600/750 in mid 90's, often, they just about made it through warranty period.
The VF range were such a joke even Honda changed to gear drive (which wasn't much better the first year models plus a LOT more expensive to replace)
It made me hate the VF range with a passion, working at a Suzuki/BMW dealer and doing 2 or 3 VF every week for a couple of years
 
Just love hearin these stories of what the line mechanic's eyeball saw. I remember a few years back they found a Leonardo DaVinci drawing of a roller chain, looked just like todays. Tried and true.
 
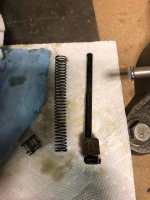
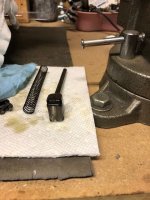
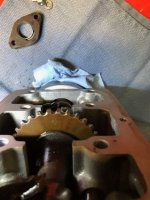
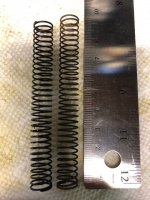
Well, I'm sitting here, waiting on the cam chain to be carried on a pack mule from Indonesia. I have received my parts from CMS and was surprised that the parts were in Original Honda packaging. I have taken a picture of the new tensioner spring next to the old spring. The new spring is on the right next to the ruler and it measures 90mm. The old spring is 5mm shorter due to over 50 years of compression. I have also attached two pictures of the cam assembly with the question of first: is the O mentioned in the Clymer the one in the picture of the cam gear. The second question is: the Clymer manual says that the alignment key for the auto advance assembly should be up. I checked on disassembly and mine was pointing down as shown in the picture. What is the proper positions for the O and the alignment key when I put this motor back together? I'm just trying to get things straight before I start, when the cam chain gets here.

IMG_1209.jpg

IMG_1210.jpg

IMG_1211.jpg

IMG_1212.jpg
 
I have taken the info from the FSM on the CB160/CL175 which are very common in their design. I read that question you have on the pin in the cam shaft not as what is being described here. I feel it is talking about the points plate and a cutout on that plate facing up and not the pin in the cam shaft.

I have also included the info on timing the engine and that O on the main cam gear faces up at 12 o'clock and the pointer on the stator assembly off the stator coils is aligned to the T mark on the rotor. At this setting both of the pistons will be at TDC. These are a 360 degree design, so both pistons will be at TDC when the rotor aligns with the pointer and the T mark on the assembly.

I think that pin facing down at 6 o'clock isn't an issue for you timing the motor. It does align the points cam rotor and the advancer assembly on the cam shaft though, so it only goes on one way. Maybe a good time to check that the advancer does turn slightly on that assembly, just don't take it apart.
 
The site won't accept a Windows written document???

This forum software was written during the era of Office 2002. Seriously, no it won't. But, you can copy the contents of it and paste it into your post, though you might have to do some slight revisions since any version of Word beyond 2007 is probably more capable of rich text than the forum is.
 
​Ok, that worked as a work around. LOL.


Clean and inspect the cylinder head interior and exterior for cracks, damage and warpage, also inspect the head gasket, valves, valve guide and spring for satisfactory condition. Perform the head assembly in the reverse order of disassembly.

2. When installing the cylinder head to the cylinder, the cam chain should be assembled as shown in Fig. 3-14 and attention should be given to the proper valve timing. Align the "T" timing mark on the generator to the timing index mark (the piston is at top-dead-center, position the camshaft sprocket so that the "O" mark on the face of the sprocket is at the top, and then assemble the com chain.
3.The joint clip must be installed with the opening facing in the opposite direction to the normal chain movement. 3. If the cam chain tensioner pushbar is not completely pushed in, the com chain cannot be connected.

The contact breaker point base can be removed by loosening the four mounting screws. (Fig. 3-21)

3. The spark advancer center piece serves as a bushing for the camshaft. It is oiled by the oil vapour and does not require special lubrication.
4. Perform the assembly is the reverse order of disassembly.


5. The cut out on the contact breaker point base should be aligned so that it is at the top .
 
Well, I'm sitting here, waiting on the cam chain to be carried on a pack mule from Indonesia. I have received my parts from CMS and was surprised that the parts were in Original Honda packaging. I have taken a picture of the new tensioner spring next to the old spring. The new spring is on the right next to the ruler and it measures 90mm. The old spring is 5mm shorter due to over 50 years of compression. I have also attached two pictures of the cam assembly with the question of first: is the O mentioned in the Clymer the one in the picture of the cam gear. The second question is: the Clymer manual says that the alignment key for the auto advance assembly should be up. I checked on disassembly and mine was pointing down as shown in the picture. What is the proper positions for the O and the alignment key when I put this motor back together? I'm just trying to get things straight before I start, when the cam chain gets here.

View attachment 18997

View attachment 18998

Don't get confused by Clymer's, the points pin has nothing to do with the cam and the crank being aligned to put the cam chain on. This is why you want to first look at the FSM, not Clymer's.
 
Well, the cam chain, which was not supposed to be here till January 15th, showed up today. I checked the new chain against the old chain. There was no measurable difference in the chains. I have a friend who works as a maintenance engineer for one of the factories in the area and they have a device that measures chain stretch. Both chains measure 630mm without the master link. The old chain passes the test for use. I did notice that the center roller for the tensioner assembly was slightly larger on the new part. The tension roller measured the same on both old and new. I guess I will start staging for the build. I am open for any advice as to the easiest way to put it together. Such as, is it easier to install the cam chain from the start or route it later after putting the cylinder and head on. Looking for sage advice from experience.


IMG_1215.jpg IMG_1216.jpg IMG_1214.jpg
 
Last edited by a moderator:
Well at least you will be getting some hands on experience in building the motor yourself. Personally you can do the routing either way wit the motor fully assembled as you have the trap door bottom plate for access. Building from the barrels up is easier with more access to routing the chain and then installing the head.

I am thinking your rebuilder possibly didn’t release the cam chain tensioner assembly after he reassembled your engine. Easy to overlook and your comment about it clicking when you adjusted it initially, or the rod assembly was stuck in the bore hole.

The good news is you will have a new tensioner, spring and a new cam chain for the motor so your all new in that area.
 
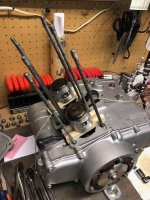
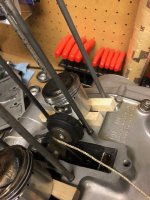
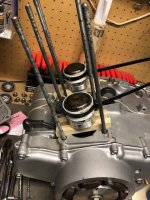
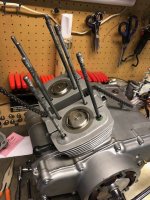
As I put out in my last post, I got the cam chain and took the advice from Flyin900 and routed the chain before installing the cylinders. In the pictures I have added, I show the 1/2" square wood pegs supporting the pistons at top dead center and something I learned working on my Triumphs. I am not rich enough to own all the fancy ring squeezers and engine builders tools so I take a strip of plastic that is about 1/32" thick and cut it to length then tie wrap it around the rings on the piston. You don't pull the tie wrap really tight just snug enough to hold the rings tight in their grooves. The cylinders then just gently slide into place pushing the plastic strips and the tie wraps down on the piston skirt. I haven't broken a ring yet doing this procedure. I'm sure I'm not the first person to come up with this, just thought I would add it. I was not happy with the head gasket that came in the top end gasket kit so I have ordered an OEM head gasket and am waiting for it to arrive. I will then continue the build.

IMG_1217.jpg IMG_1218.jpg

IMG_1219.jpg IMG_1220.jpg

IMG_1221.jpg IMG_1225.jpg
 
Last edited by a moderator:
I like the creativity. I'd love to have a pair of factory Honda ring compressors myself, but at $100 a pair they're just more expensive than I want to invest in something that will get used so seldom. When the bore is still stock, or at least no larger than the 1mm max (recommended by Honda) oversize, there's typically plenty of taper in the bottom of the sleeves to make things pretty easy, but using any compressor method makes it even easier.
 
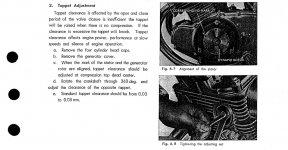
I have received the OEM head gasket and continued with the build. I installed the gasket and the head, lined up the "T" and the "O" and installed the new cam chain. I replaced the gasket for the top plate and torqued the head bolts to 13 ft lbs and am now setting the valve clearances. Here is my next question, the factory owners manual says .001, the Clymer manual says .002, and the factory manual I was looking at off the list provided says .004 for exhaust and .003 for intake. What do you guys use or recommend??????
 
I have received the OEM head gasket and continued with the build. I installed the gasket and the head, lined up the "T" and the "O" and installed the new cam chain. I replaced the gasket for the top plate and torqued the head bolts to 13 ft lbs and am now setting the valve clearances. Here is my next question, the factory owners manual says .001, the Clymer manual says .002, and the factory manual I was looking at off the list provided says .004 for exhaust and .003 for intake. What do you guys use or recommend??????

According to the FSM for the 125/160 ti shows .001" to .002" (.03mm to .05mm). I'd set them at .002"

160 valve adj.jpg
 
I have received the OEM head gasket and continued with the build. I installed the gasket and the head, lined up the "T" and the "O" and installed the new cam chain. I replaced the gasket for the top plate and torqued the head bolts to 13 ft lbs and am now setting the valve clearances. Here is my next question, the factory owners manual says .001, the Clymer manual says .002, and the factory manual I was looking at off the list provided says .004 for exhaust and .003 for intake. What do you guys use or recommend??????
Have to be careful when reading the specs on some of these older models, Honda interchanged using mm and .000" at random.
 
Thanks for the replies. I'll just use a tight .002 and go from there. I probably misread the mm and the inch. These valves sure are touchy to set.
 
It will be fine with a typical fit of a .002" feeler, most of the older Hondas from the 160 era (singles and twins) used .002" lash
 
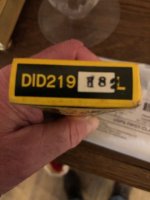
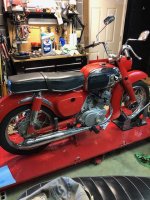
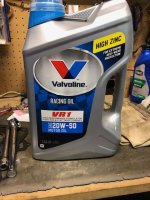
Well, the motor is back together and it started really well. It seems to be a little noisier than I expected but it could be the valves clattering a little bit. Maybe I'm expecting to much from the poor little motor. I got only a small amount of smoke from the build oil, it cleared nicely and settled right in to idle after warming up. I have included a couple of pictures of the CA160 and a picture of the the oil that the builder told me was the best stuff to use in these little engines. I'm wondering if the recommended straight 30 SAE oil would quieten the motor down. Just a thought. I will try to do a video of it running as soon as I can.

IMG_1235.jpg IMG_1236.jpg IMG_1234.jpg
 
Last edited by a moderator:
Back
Top Bottom