• Don't overlook our Welcome Package, it contains many links to important and helpful information about functions at VHT like posting pictures and sending PMs (private messages), as well as finding the parts you need.

    AD

Found a local Honda CL77 Scrambler and bought it!

Flyin900

Veteran Member
Joined
Nov 28, 2020
Total Posts
1,706
Total likes
656
Location
Canada
Found a local Honda CL77 Scrambler

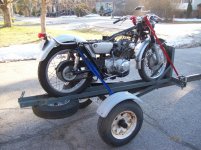
I recently found a local CVMG*** fellow member looking to sell a long term ownership of a 98% complete 1966 CL77 bike. It has sat for 5+ years and will no longer kick over on the kicker, yet the motor is free on the alternator bolt test.
It has lots of really good condition parts which was my main attraction, as these bikes are expensive to restore to a higher level. That is my plan to go through this one completely and fully rebuild the motor, vapour blast the cases and every component rebuilt or replaced.
The great thing is there are still lots of OEM Honda parts available and a strong aftermarket quality parts reproduction scene out there too.

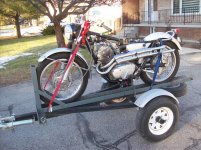
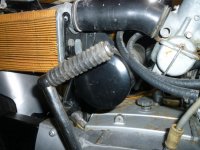
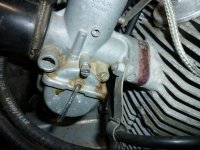
Some as it arrived to my home a few days ago.

View attachment 11470View attachment 11471View attachment 11472


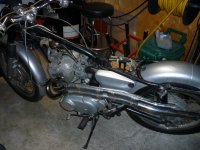
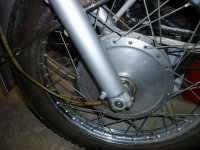
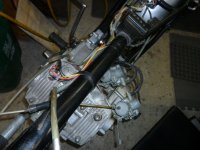
I moved it inside and started the disassembly as we have had a great shot of warm weather allowing for the delivery and teardown for the move into my - WARM BASEMENT- for further restoration and cleaning of the parts.


View attachment 11473View attachment 11474View attachment 11475View attachment 11476View attachment 11477


Some further work today and I am down to the short strokes of a sub frame and motor. Since I need another senior with a third on stand by to do the heavy lifting stay tuned. ;)


View attachment 11478View attachment 11479View attachment 11477


***(Canadian Vintage Motorcycle Group) 2200 paid members strong Canada wide group.
 

Attachments

  • 100_7000.jpg
    100_7000.jpg
    226.5 KB · Views: 106
  • 100_6999 (1).jpg
    100_6999 (1).jpg
    248.4 KB · Views: 101
  • P1070786.jpg
    P1070786.jpg
    158 KB · Views: 92
  • P1070791.jpg
    P1070791.jpg
    139.3 KB · Views: 77
  • P1070850.jpg
    P1070850.jpg
    156.3 KB · Views: 74
  • P1070798.jpg
    P1070798.jpg
    159.2 KB · Views: 76
  • P1070859.jpg
    P1070859.jpg
    133.1 KB · Views: 74
Today I worked at getting the frame completely stripped and the motor slimmed down on both side cover areas. I then set the frame on its side with the motor attached. i removed the already loosened frame bolts by hand. The frame is light and compact, so it was easy to manipulate it off the motor laying on it's side.
I then started to disassemble the motor down to the short block now. I removed all side components, the head and barrels and pistons. I will split the cases tomorrow to clean up and inspect the inner gears and crank area. A new cam chain is being installed too.


P1070866.jpg P1070878.jpg P1070882.jpg P1070884.jpg P1070890.jpg P1070894.jpg
 
Last edited by a moderator:
Great pick up!

Always good to read of these falling into the right hands instead of being made into a rat bike or street fighter. Not that I should have any say in our fellow brothers' preferences, I just believe 'classics' should remain classics.(y)
 
Nice find indeed! And you got right on it, I see.

Side note, our software only allows 10 pics per post and the "missing" attachments in the first post total 11, might be why they didn't all show up.

Great pick up!

Always good to read of these falling into the right hands instead of being made into a rat bike or street fighter. Not that I should have any say in our fellow brothers' preferences, I just believe 'classics' should remain classics.(y)

In the case of more rare bikes like the CB450K0 and CB/CL77 I completely agree that original restoration or at least a refresh with patina is the only way to go. There have already been enough of them junked or ruined so the remainder need to be around for the long haul.
 
Last edited:
Nice find, it's rare to see one with all the sheet metal intact, without hacksaw cuts on the exhaust system. You may as well start looking for a new first gear bushing and a kickstart pawl, these are known wear items and should be replaced when the bottom end is disassembled. Also take a close look at the kickstart knuckle, located in the right side cover, for cracks where it slips over the kickstart shaft splines. Oversize gear cotters are available to adjust the depth of gear engagement in the trans if needed.
 
Thanks Guys,

I am excited about the condition of this bike and yes it does need the usual wear and tear items, yet man this one is really original and clean. Even the underside of the fenders are still a nice Honda grey colour with zero rust. It was amazing how much UGLY old oil sludge was in the lower motor case and likely due to a poor oil change regime.

That centrifugal oil filter is a joke... or the oil back then was freshly squeezed DINO.... no additives. ;)

So I am working away on a parts purchase now and future list. I bought some .50 O/S pistons from a British manufacturer for the complete set (ie) rings, pins, clips etc. A member of our CVMG local has a decent home machine shop (yes they exist), so hopefully I can use his services for the boring, honing and decking as needed.

I need a "new" cam chain tensioner assembly. Preferably "new" if you have a source for one please let me know.

Here's where I ended up today.


P1070912.jpg P1070914.jpg P1070919.jpg P1070920.jpg
 

Attachments

  • P1070910.jpg
    P1070910.jpg
    134.5 KB · Views: 66
Last edited by a moderator:
That last pic reminds me of my 450 lower case when I tore it down after buying the bike, sludgy goo. I'd imagine the centrifugal oil filter would work decently well with oil that would actually circulate properly, not that stuff. Looks to have lived a life of maintenance neglect as you mentioned. Transmission parts look good in the pics.

https://www.vintagehondatwins.com/forums/attachment.php?attachmentid=926&d=1591731641
 
Back in the day, Honda recommended 30w non-detergent motor oil in the 305s, with that oil it was pretty common to find a layer of sludge in the bottom of the crankcase.
 
Back in the day, Honda recommended 30w non-detergent motor oil in the 305s, with that oil it was pretty common to find a layer of sludge in the bottom of the crankcase.

It seems all of these engines have some level of sludge for sure and those were different times with oil technology still pretty basic. What is a recommended oil for these motors now? A long way though from there yet.
 
Ok it has been an interesting holiday and I have made progress on the bike teardown and boxing of the parts. So far 7+ boxes and counting, as items are cleaned and disassembled into smaller bits.

Anyone looking for a project.... anyone?

I have started to order the items that I know are needed such as cables and JIS screw kits and bearings for the transmission kick starter area. I will only be able to really clean up parts and prep items for the spring when I can start painting the bigger pieces. I am looking for a Vapor Honing service in the area and Covid has changed all that locally. The one person has shut down for the next few months that is local, so I am looking in the GTA larger region. I was sent a link to a Lazer cleaning system that looks interesting and may also be an option.

The motor and carbs need a proper cleaning, since they are bare metal when finished correctly. I am also collecting all the chrome pieces for a trip to the platers, as I have a load of items there already from the 1972 CB350F I want to finish up. Those should be ready in January.

P1080050.JPG P1080056.JPG P1080064.jpg P1080065.jpg P1080066.jpg P1080067.jpg P1080069.jpg P1080071.jpg P1080074.jpg P1080078.jpg
 
Last edited by a moderator:
I am slowly working through sorting and cleaning parts and ordering replacement motor pieces. I found a business that does both the Vapor Honing and a Laser Cleaning process and dropped off all the larger motor cases and 20+ smaller items for cleaning. They should be ready this coming week, so I will post the results when they are back.
My local member with the machine shop can do the motor work of over boring and cutting new valve seats if necessary. I have purchased all new valves, complete new valve spring sets of inner and outer and new rocker arm pins. I am looking to replace the rocker arms, yet they are very expensive and trying to find a deal first.

I figure if I am doing this I will spend the money and do it right with a full rebuild of everything where possible. I have ordered and will replace all the brass end bearing supports for the transmission gear shafts and one roller bearing for sure on the output end of the shaft.

I cleaned up the stator assembly, as it was full of old dirt particles and nasty oil sludge. This is the other reason I am doing a full rebuild is the condition of the sludge throughout all areas of this engine.
The cloth covering on the windings was thin in areas after cleaning and some small internal wiring lost it's outer protective covering in the cleaning. So I coated the thin wires with a chemical resistant epoxy and the caps on the windings with liquid electrical tape, then all the smaller wires too. It is resealed for another 50 years of service.

Interesting little brass placard with DENSO noted as the supplier. I also replaced the petrified plastic sleeving on the stator wiring harness with much newer shrink tubing, only partially shrunk and nice and flexible still.

P1080123.JPG P1080125.JPG P1080126.JPG P1080127.JPG P1080128.JPG
 
Last edited by a moderator:
Looking at that tag on the stator outer shell is a reminder of how things used to be in that era, manufacturers took the time to put a fairly impressive brand tag on their products because they were good, solid components they were reasonably proud of and not short-term throwaways.
 
Since the bike has unusual (no markings) bolts at least for my experience with Honda bolts. There are non of the earlier style bolts with the "double 8" or a 0 with a line under it designs.

I initially thought someone has replaced the original bolts with aftermarket ones, yet this is not the case given the age of how these bolts present and and they look original given the bikes overall other non molested form.

I did a recent CB350F complete restoration using all new bolts and JIS screws on the entire bike. It was lots of work just sourcing the pieces, so I invested recently in a home based zinc plating set up. I think the whole kit was just under $100.00 for everything including the power supply, household mostly chemicals/water/vinegar etc.

My plan is to re plate in zinc with a little nickel anode added to the mixture all the existing larger bolts and smaller brackets. Here are two bolts and the valley bracket on the motor top that holds the valley metal cover. I did these yesterday and here's the tank set up for the plating. There are no noticeable chemical smells when plating and full disclosure it is finicky overall, yet pretty quick to do a half dozen bolts.

I also bought a large walnut shell and plastic pellets media vibrating 18lb chamber to finish off the polishing of the plated items which takes 12-24Hrs in the chamber. It was not as cheap to buy the larger unit as the plating set up was, yet you can buy a smaller 5 lb vibrating system for a lot less.


P1080172.jpg P1080170.jpg P1080165.jpg P1080164.jpg P1080163.jpg P1080173.jpg

Here's that bracket installed on the motor down in the valley. Looks a little better now for sure.

P1070890.jpg
 
Last edited by a moderator:
Zinc plating DIY is easy, getting a dull zinc layer. Passivate and pickling is the step most people don't do at home. Blue (clear) passivate is a nasty process, just like yellow passivate.

file.jpg

I figure if I am doing this I will spend the money and do it right with a full rebuild of everything where possible. I have ordered and will replace all the brass end bearing supports for the transmission gear shafts and one roller bearing for sure on the output end of the shaft.

Graham (G-man) can help you with that, he has a much better solution then the standard bushing and bearing.
 
Zinc plating DIY is easy, getting a dull zinc layer. Passivate and pickling is the step most people don't do at home. Blue (clear) passivate is a nasty process, just like yellow passivate.


Graham (G-man) can help you with that, he has a much better solution then the standard bushing and bearing.

So who is Graham (G-Man) for the bushing info?


I am keeping it simple with nothing nasty in my basement chemical wise, so nothing like that "blue passivate" I have a proper business place that handles all my chroming needs and they can also do the yellow chromate etc. I just wanted to try this as a possible option (zinc plating) and will do largely the bigger items/bolts and replace the smaller bolts with new where possible.
 
Last edited by a moderator:
Since the bike has unusual (no markings) bolts at least for my experience with Honda bolts. There are non of the earlier style bolts with the "double 8" or a 0 with a line under it designs.

I initially thought someone has replaced the original bolts with aftermarket ones, yet this is not the case given the age of how these bolts present and and they look original given the bikes overall other non molested form.

I did a recent CB350F complete restoration using all new bolts and JIS screws on the entire bike. It was lots of work just sourcing the pieces, so I invested recently in a home based zinc plating set up. I think the whole kit was just under $100.00 for everything including the power supply, household mostly chemicals/water/vinegar etc.

My plan is to re plate in zinc with a little nickel anode added to the mixture all the existing larger bolts and smaller brackets. Here are two bolts and the valley bracket on the motor top that holds the valley metal cover. I did these yesterday and here's the tank set up for the plating. There are no noticeable chemical smells when plating and full disclosure it is finicky overall, yet pretty quick to do a half dozen bolts.

I also bought a large walnut shell and plastic pellets media vibrating 18lb chamber to finish off the polishing of the plated items which takes 12-24Hrs in the chamber. It was not as cheap to buy the larger unit as the plating set up was, yet you can buy a smaller 5 lb vibrating system for a lot less.

Those are the original fasteners, different size bolt head and nut dimensions for a given bolt diameter. Mostly the same thread, the small tank badge and points plates screws are different, pretty hard to find these days.
 
So who is Graham (G-Man) for the bushing info?


I am keeping it simple with nothing nasty in my basement chemical wise, so nothing like that "blue passivate" I have a proper business place that handles all my chroming needs and they can also do the yellow chromate etc. I just wanted to try this as a possible option (zinc plating) and will do largely the bigger items/bolts and replace the smaller bolts with new where possible.

This is G-man, he's a member here but hasn't been around much lately and hasn't posted much either. Not sure if you'll find anything in his vast collection of pictures here, but the 305 site is pretty much AMF now and much of his contributions and information there is no longer accessible.
 
He's active on FB, I'll will reach out to him with messenger to ask him to stop by this forum more regularly (done !) since there is more and more activity at the 305 section....
 
I was surprised at the finish and turn around time for the vapor honing and laser cleaning of 26 pcs of motor, side cases, carbs and all at a reasonable cost. There was 3 hrs of highway driving to the business which was smooth both ways each time.

So as parts for the motor are arriving now and my friend with the machine shop garage has confirmed he can do the work later this month on the over bore and the head work now. I have all new OEM valves and both inner and outer valve springs for replacement parts and measured and confirmed the cam journals and lobes meet factory spec. The rocker shafts are within spec too. There is wear on the pads of the rocker arm where it rides on the cam lobe, so I am thinking of a hard chrome resurface when the time comes. The NOS parts new would be $600.00 Canadian to buy from a supplier. I know I can have that done for $200-250 Canadian for the set of four in a hard chrome finish on the pad.

So here are the pictures of the parts as picked up today.

P1080182.JPG P1080183.JPG P1080184.JPG P1080186.JPG P1080187.JPG P1080188.JPG P1080189.JPG
 
Last edited by a moderator:
Carb parts vapor honing done

Here are the carb bodies.


P1080192.JPG P1080193.JPG P1080194.JPG
 
Last edited by a moderator:
Just saw this post. Looks like a great project in the hands of a person who’s doing it right! The CL77 is my all-time favorite vintage Honda.
 
"It was lots of work just sourcing the pieces, so I invested recently in a home based zinc plating set up. I think the whole kit was just under $100.00 for everything including the power supply, household mostly chemicals/water/vinegar etc."

Do you have a link for this? Thanks
 
"It was lots of work just sourcing the pieces, so I invested recently in a home based zinc plating set up. I think the whole kit was just under $100.00 for everything including the power supply, household mostly chemicals/water/vinegar etc."

Do you have a link for this? Thanks

I sourced everything off Amazon that I needed chemical wise; which was a few items only, as most of the mixture is water, vinegar, Epsom salts, sugar from the grocery store. The power supply and the other stuff I will try to attach a Amazon link to for those pieces. The plastic container at any Dollar Store/ WalMart. You will need to source a piece 16-20" piece of copper pipe and a medium sized kit of alligator clips for the electrical and plating process, plus a small roll of 16 GA wire.

Easy to do actually as a process, although it is tedious work so best kept to the unusual bolts and bits that are NLA.

Here is the link to the materials for the solution and a brief description of the process. There is lots of info on the net about zinc plating. The big deal for me is the vibratory chamber does all the polishing, as that requires hand cleaning work too without the chamber, since the items come out of the plating process a flat dull grey finish and require brushing and cleaning to shine.

https://www.gomog.com/allmorgan/ZincPlatingAtHome.html NOTE: Only a partial link here, so search a fresh link to the site.

https://www.amazon.ca/gp/product/B07WLYSJW6/ref=ppx_yo_dt_b_asin_title_o02_s00?ie=UTF8&psc=1

https://www.amazon.ca/gp/product/B087YSQG2W/ref=ppx_yo_dt_b_asin_title_o02_s02?ie=UTF8&psc=1

https://www.amazon.ca/gp/product/B00T6I1SKS/ref=ppx_yo_dt_b_asin_title_o02_s00?ie=UTF8&psc=1

Some links to the items you will need.
 
Great thank you so much. Did not mean for you to do so much work, I misunderstood your meaning of "home made set up" thinking it was a kit. Great info on the tumbler.
 
No problem.... It is out there now if someone is interested they have the basic info for the parts and process.
 
Good to know as there likely cheaper than the Amazon zinc plates. I would like to find a source for a tin plate anode to add to the mix. Any thoughts for products other than Eastwood's with the US exchange and shipping costs of their tin anodes.
 
there aren't any household items that are pure tin but lead free plumbing solder contains about 65% tin. The 50/50 solder is tin and lead. I've read that pewter contains about 90% tin but probably too expensive to buy mugs for plating purposes!
 
So I was able to get my friend to help with the head work and a recut of my valve seats on the head. I had bought all new OEM valves and both valve spring sets and new cam roller bearings X 4 for the cam pieces. He used a Neway brand cutter system by hand and it was really interesting to see the 3 angle grind progress in action and how you can manipulate the contact patch on the valve face by using the different cutters.
He needed to do some valve guide work too, as the new intake valve stems were a little tight at the top of the guide. Some filing and reaming with a very tiny ball hone did the trick.
I just finished putting the cams back into the head with the new roller bearings and new tappet adjusters, since the adjusters bases are always mushroomed from past valve stem contacts.

P1080203.JPG

P1080201.JPG P1080202.JPG
 
Last edited by a moderator:
Nice looking build. I bought a CL77 in high school and the owner let me ride it for about a week before I made the purchase and the right side camshaft snapped off leaving me with one cylinder as I was slowly making a left turn at a traffic light with only a couple of blocks to go. I went to the Honda dealer and bought a replacement and it made fire come out of the carb. I was puzzled until I matched the parts up and saw the new one was wrong. I went back to the dealer and all of their stock was wrong as well and I was told I could not order a new one so I went to a place that sold used parts and they fixed me right up with a usable part. The pic of the head with the cam in place brought me back in time. I purchased it and rode that bike for years after without any hiccups at all.

I sold it to a guy who took it to a repair facility for an oil change and after draining the oil they forgot to put new oil in it and it seized up. Made me sick.

Really nice work. Thanks for posting.
 
Thanks for the comments on the build. It is moving slowly, as we are in the dead of winter and I cannot shoot any paint until the spring now. I did get all the frame bits media blasted and they revealed some bondo in the tank and top fork ears and rear fender. Not surprising for a 55 year old bike.

I am receiving many new parts from lots of suppliers and Visa has made me "customer of the month" :lol: I have rebuild the transmission mostly now and I did find a useable shift fork, so my shifter drum is now good to go. Just waiting on the .020 oversize cotters for the second gear to fix known gear dog engagement issues.

I am taking all the hubs and brake plates to Laser Clean to work his magic on those parts. I will see how they look afterwards and decide if I will buff them out or leave them alone.

Here are the metal tin parts kept inside now to avoid any rust starting on the bare metal while I wait for spring.

P1080269.jpg P1080277.jpg
 
Last edited by a moderator:
I found the gas tank was lined with a liner using the old style product "Kreme". This has been known to fail with our modern gas. The liner was poorly applied from my initial observations when I bought the bike. When the outer tank was sand blasted to remove the paint quite a few spots inside the tank let go of the liner with small pieces falling away.

I used Acetone and Lacquer thinner to dissolve the Kreme liner and after a few days the tank was stripped down to bare metal inside. There were patches on the outside bottom of the tank that I suspected were pin holes. There was a large section near the front with over a dozen holes, some large in size. A second smaller section near the petcock had some smaller holes.

I decided to soldier the holes to fill them and reinforce the larger spot, as it was pretty thin metal. I pooled a large patch of soldier to build up and strengthen this area. I will likely reline the tank with Caswells tank liner, since I like how that product sets up and is much better at dealing with modern gas.

I used a propane torch to heat the area and a plumbers soldier of 70/30 mix which flowed out well to fill in the areas, even the larger holes in a few spots.
Here are some pictures of the finished repair as I didn't take any before pictures of the holes.

P1080284.jpg P1080282.jpg P1080283.jpg
 
Last edited by a moderator:
Yes I did use a flux liberally applied to the surface and it will need to be degreased both inside and out, as some of the soldier fell through into the tank, since a couple of the holes were 3/16" across. My thin solder roll wasn't enough to fill these initially. I had a plumbers roll of solder that was 1/8" thick and somehow it set up and sealed the larger holes.

I will use lacquer thinner again to remove any flux that fell through into the tank and then Evaporust to clean up the remaining rust in there. I will sand the tank all over to clean off some of the Kreme that spilled onto the outside area, then acetone or brake clean to wipe everything down. There is some tin worm on the top of the tank, so some glazing putty will help smooth out those tiny imperfections.
 
Thanks for all the detail response. I was always unsure of how to deal with the rosin or acid flux. Soldering is, no doubt, a better fix than JBweld or similar. Can't wait to see finished job.
 
So I spent part of yesterday cleaning the gas tank and found one small pin hole that I missed on the other side of the tank, so it is now soldered solid again. I have the tank now filled with Evaporust to clean up the interior, as it was pretty rusty on the bottom of the tank.
I am just applying some spot glazing putty to blend in the solder areas smooth with the bottom of the tank. I have also ordered some POR 15 gas tank sealer to reline the tank, since I don't like the rust and sketchy areas inside still.


P1080289.jpg
 
I m still plodding along with the bike and did some work on both fenders and the fork ears as they all had either bondo in some areas and stress fractures in the fenders from vibration. I did some metal repair and then messed around with glazing putty to get the areas nice and smooth again. This is not my strong suite for sure, as I took many attempts to get the areas smooth. I just shot some primer over the areas to see how well I did and I am finally happy with the results.

Regarding the motor I have put the top and bottom cases back together and a part I bought from Thailand to handle the cam chain just above the crank was poorly made IMO. This is a rubber support wheel that mounts into the top case that the cam chain runs on either side. My experience with OEM Honda parts are these are quite a ridged rubber in their design. This one was very soft and flexible and likely manufactured locally in Thailand, even though the seller claimed it was made in Japan. :frown: Picture shows how easy it is to deflect the rubber wheel sideways with little pressure, so I can't imagine it would stand up to lots of wear long term.

I also had quite a struggle with the head assembly and had to take it apart a few times to get the bearings located correctly, where they would allow the end cam caps to seat in their recesses. It also required getting the main cam chain gear located centrally in the middle of the head opening. Took a full day of messing with it to get everything correct.

I also discovered that there was a Japanese JIS screw standard on these early bikes that changed to JIS- ISO later and the thread pitch on some of the cam cap screws were a different thread pitch than the newer JIS - ISO parts I received. One was a .8 TP where the other is a .9 TP and not compatible, so I recut the threads on one test bolt in the alternator cover mounting bolt as a test and it worked.

I signed up for an adventure and so far it hasn't disappointed.

P1080312.jpg P1080313.jpg P1080314.jpg P1080315.jpg P1080307.jpg P1080306.jpg P1080304.jpg P1080305.jpg
 
Last edited by a moderator:
From Honda SERVICE BULLETIN 27 - 08-06-1967
Change in Thread Pitch -- The standard thread pitches for all bolts, nuts, and screws in the 3 mm, 4mm, 5 mm and 12 mm sizes are changed as indicated below: Normal Dia. (Size of Bolt or Nut) 3 mm 4 mm 5 mm 12 mm Thread Pitch Present J.I.S. 0.6 0.75 0.9 1.5 These changes will affect the interchangeability of threaded parts in these sizes. Care must be taken to use the correct pitch to avoid stripping. These changes will also require new taps and dies. New tools, where required, will be available through parts department. Modified J.I.S. (I.S.O) 0.5 0.7 0.8 1.25
 
I just got my hubs and other parts including the clutch basket and plates back from the laser/vaper honing place and they came out excellent compared to the original parts. The clutch basket and plates look new vs the baked on old oil from the engine.

I am also working on smoothing out parts that have been welded previously from vibration breaks in the metal. Per Mr. Honda the CL bikes suffer from more vibration compared to the CB and other series, that don't use a fully enclosed engine frame. Seems there is a resonance created within the full frame that leads to stress cracks in metal body parts. I have repaired the rear fender already and shown is part of the bracket for the tool box, plus the rear taillight mounting bracket has numerous weld points.

So some Tech Steel and some sanding to smooth out the weld job done by a PO on these parts.

I also finished the gas tank and have it nice and smooth now in primer and received a replacement rubber idler wheel from Mr. Honda that is much better than the Thailand piece with a solid feel to the rubber density.


P1080346.jpg P1080349.jpg P1080345.jpg P1080344.jpg
 
Last edited by a moderator:
I received the new control switches from CMS in Holland today and they look great with no storage wear that some parts old suffer. They are from a 1968 CL175K0 model and will be perfect to add the the handlebars on the scrambler. They have all the correct electrical functions including the starter button delete, which is correct yet interesting. The picture on the website did show the control with a starter button, which would be ideal for a CB or CA model with that feature.

I have the handlebars at the platers presently and these switches are designed for inside wiring within the bars, which the scrambler bars don't have presently. So I will need to decide if I wish to create holes in the bars for the wiring, or modify the lower switch housings to allow the wire an easy exit path.


P1080352.jpg P1080353.jpg
 
Last edited by a moderator:
I'll bet those weren't cheap. They look great though, the wiring takes me back to my first Honda shop job and connecting all those wires in the headlight after putting the bars on the bike.
 
Well they were not as expensive as one would expect from say an EBay vendor. They were around $200 for the set and $20 shipping all in Canadian. The aftermarket black newer style Chinese switch stuff is in the $60 each range and up depending on the seller here in Canada, so I consider an original Honda part a deal for the slight upcharge that they cost me.

Since I will likely ride this bike once finished I would like signals on there and I plan to use the Honda acorn early style signals that I can mount easily off existing places on the bike, without cutting or damaging the body sections.


P1070636.jpg
 
Well they were not as expensive as one would expect from say an EBay vendor. They were around $200 for the set and $20 shipping all in Canadian. The aftermarket black newer style Chinese switch stuff is in the $60 each range and up depending on the seller here in Canada, so I consider an original Honda part a deal for the slight upcharge that they cost me.

Since I will likely ride this bike once finished I would like signals on there and I plan to use the Honda acorn early style signals that I can mount easily off existing places on the bike, without cutting or damaging the body sections.


View attachment 13542

OEMs are better. I put some on my bud's Dream with some generic handlebar clamps. I think they were for mirrors.
 
Back
Top Bottom