• Don't overlook our Welcome Package, it contains many links to important and helpful information about functions at VHT like posting pictures and sending PMs (private messages), as well as finding the parts you need.

    AD

'64 Dream 305 CA77 carburetor covers

HondaDreamer

Veteran Member
Joined
Jul 25, 2021
Total Posts
138
Total likes
5
Location
Providence, RI, US
Hi all,

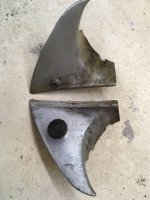
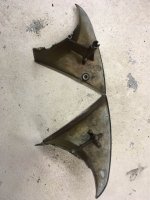
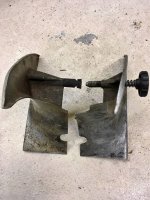
I've gotten my hands on a pair of carbueartor covers for my 1964 Honda Dream 305 CA77.
Being new to motorcycle restoration, I had a couple questions.

A. Would cleaning these with WD40 and a brush be enough to get the grime off? Is there anything extra I could to do to really make 'em shine?

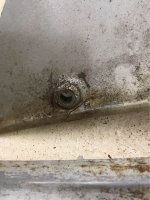
B. These is a small crack, but I'm wondering if it's a big deal or not. Should I be concerned?
 

Attachments

  • 146706673_3655902611195240_1304809806143358132_n.jpg
    146706673_3655902611195240_1304809806143358132_n.jpg
    130.5 KB · Views: 13
  • 146890686_3655902587861909_7517605955141788438_n.jpg
    146890686_3655902587861909_7517605955141788438_n.jpg
    116.3 KB · Views: 10
  • 146995047_3655902607861907_2376814303122053978_n.jpg
    146995047_3655902607861907_2376814303122053978_n.jpg
    126.2 KB · Views: 7
  • 147310421_3655915907860577_3316972176578401643_n.jpg
    147310421_3655915907860577_3316972176578401643_n.jpg
    147.6 KB · Views: 7
Last edited by a moderator:
No worries, it's why we're here, keeping order because we're ADHD about it. :)

You can't hurt them with any cleaning solvent that won't hurt your hands, but I doubt WD40 would be strong enough to loosen old grime that's been on there and exposed to engine temperatures for years if not decades. If you really want them shiny then go through the process of sanding the outsides of them with fine sandpaper, 220 and up to 400 or even 800, then use a polishing (rag) wheel and some polishing compound sticks to make them like a mirror. As for that crack, it looks like someone previously overtightened the screw or bolt that goes in that hole. I'd get it clean and oil free, sand it to rough up the surface and reinforce it with some JB Weld.

This thread might be of some help.

https://www.vintagehondatwins.com/forums/showthread.php?3293-Sanding-Polishing-Aluminum-covers

This is super helpful. I'm going to go this route. Good CSI work with the screw, that must have been it.
Just went through that thread, I'd love if my back braking plates looked as good as yours.
 
This is super helpful. I'm going to go this route. Good CSI work with the screw, that must have been it.
Just went through that thread, I'd love if my back braking plates looked as good as yours.

Just takes time and patience, and maybe a new rag wheel too if you do all the parts I did (all 4 cam bearings, front valve cover points and alternator covers, oil filter cover and both backing plates). And the shinier you want it, the more heat developed during the polishing process so wear a good glove on the hand that holds the part to be polished... and hold it tightly or it will go flying.
 
Back
Top Bottom