• Don't overlook our Welcome Package, it contains many links to important and helpful information about functions at VHT like posting pictures and sending PMs (private messages), as well as finding the parts you need.

    AD

The build of The Three Twins (CB450's, maybe 4), an inquiry into Differences and Similarities

jensen

Veteran Member
Joined
Jun 1, 2020
Total Posts
1,234
Total likes
401
Location
Blaricum, The Netherlands
The build of The Three Twins (CB450's, maybe 4), an inquiry into Differences and Similarities

Hi,

As a long time member of the HondaTwins forum I only started a few threads over the years, so I thought, it's time to start another one.

In this thread I will build three, or maybe four CB450's at once. It will take many months, if not years, so if you're expecting a quick read, skip this one. If I start a thread I do it thoroughly, no shortcut's here.

Over the years I acquired a lot of CB450 bikes and parts and stashed them in boxes and crates. Actually, after 20 years of collecting, (or hoarding) it's a huge amount of parts. I could build many bikes from those parts, and that's exactly what I'm gonna do, but let's start moderate and start with four:


The bikes I want to build are :


  • CB450 K0, 1966, a Dutch / German version
  • CB450 K1, 1968, an early Dutch / German version
  • CB450 K1, 1968, an early US version
  • CB450 K2. 1970, an early US version


I will mainly concentrate on differences between the parts used in these bikes, and when I say parts, I mean all parts. From cam followers to mudguards, every part will be examined and compared within the bike types. I hope that people chime in to comment or to point out errors in my assumptions. I would appreciate that questions or comments are related to this thread and not to ask questions about your own bike or issue's with your bike.

Here are the pictures of the bikes I start with, the K0 is a picture from a folder, since I acquired only parts, and not a complete bike. There should be at least 3 bikes in the K0 parts though.

The CB450 K0 as it should look like when it's finished:

79873043_10157572791608758_3070549467976433664_o.jpg


Here a picture of the CB450 K1, early Dutch version, which I also got in boxes, but the owner had a picture of the bike and I made a scan from that picture:

CB450 K1 Dutch.jpg

A picture of the CB450 K1, early US version, which also came in boxes:

CB450 K1 1967.jpg

And last but not least, a picture of the CB450 K2, US version:

Cb450 k2 1969 small.jpg

Although it seems that the bikes (except the CB450 K0) are more or less the same, the amount of differences are huge. Many parts are different, sometimes in an obvious way, sometimes in a very detailed way.

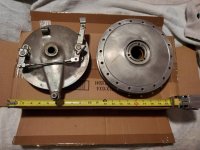
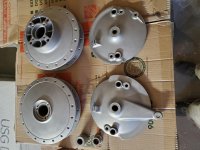
The first thing I'm gonna do is to dive into the engine parts. At the moment I'm in the process of classifying engine parts only, it's a huge job since I have many parts. In the process of cleaning, measuring and classifying I noticed many (small) differences in parts and it's clear that Honda improved parts over the years.

This thread will mainly focus on all these (small) differences.


btw, don't expect an weekly update. I have a busy job (R&D manager), two sons and a wife (not necessary in that order of importance).
 
Last edited:
I will follow this with interest for sure. Please post as many pics as possible along the way. I am particularly interested in the European versions of these bikes.
 
Hi, Thanks for the kind words. It is an opportunity given by COVID-19, we, in the Netherlands have an intelligent lock-down, it does mean that if you don't have to go out, you stay home. Going out is not prohibited. I have to travel 2 hours a day to work and back normally, but nowadays, I travel only twice a week, resulting in a 6 extra hours a week at least. In the weekends we go nowhere, so, an additional 8 hours at least.

I unpacked a few crates, mostly CB450 K1 USA, wheels K0, K1 and break drum's. I have to catalogue the items and see if they are correct for the model and year, after this, cleaning and inspecting (and make a list what to look for). These crates were designated as "CB450 K1 USA and other parts", the crates that will follow next week are all kind of parts, bomber, K1, K2 and some K5 parts. Before start building,

To get organised, it takes a lot of time, time which is given to me, so I started to get organised. I cleaned the basement out, bought some used wooden warehouse shelving (very cheap because most companies get rid of their paper administration and relay on digital only), and voila room to organize. Total costs of all you see and the rest is below 150 euro (around 160 USD).

IMG_8750.JPEG
 

Attachments

  • 20230621_135038.jpg
    20230621_135038.jpg
    153.9 KB · Views: 2
  • 20230624_150700.jpg
    20230624_150700.jpg
    137.5 KB · Views: 2
Last edited:
Thanks Gentlemen,

A few days ago, Ashley Derrick showed some pictures on FB of a CB450 K0 rear wheel hub, you can read it here:

FB_1.jpg

FB_2.jpg

I promised to look into it, since I'm in the process of organizing and documenting the parts like the title says. I decided to answer on VHT instead of FB. I noticed that the same questions are asked over and over again so my conclusion is that on FB information is lost very quickly.

In total I checked 4 CB450 K0 rear break hubs, 5 CB450 K1 rear break hubs and 1 K5 rear brake hub (for comparison). First of all it's important to know the differences between the rear brak hubs, I started this thread for that particular reason.

I wrote on HT the following : The K0 rear wheel hub is easy to recognize on the castings, when you see the horizontal casting pattern perpendicular to the longitudinal casting it's a CB450 K0 (assuming that it's a 450 rear break hub). A CB450 K1 lack these transversely placed castings, resulting a a much smoother appearance.

Here is a picture of a CB450 K0 rear wheel hub:

IMG_9002_s.jpg

A later CB450 doesn't have this typical casting.

To wrap up our about the differences on rear break hubs :


  • CB450 K0 hubs differ from later hubs (easiest way to identify are the casting differences as described in this thread).
  • CB450 K0 rims (front and rear) differ from the later ones (only D.I.D. stamped next to the hole for the airvalve, no indication of rim size stamped into the rim)
  • CB450 K1's can have both type of rims, with and without the size stamped on the rim
  • CB450 K1's seems to have the later rear brake drums, but there are probably exeptions due to the Honda way of manufacturing.
  • CL450 K1's can have the early (CB450 K0) rear brake drum, more info is needed to conclude if this is a consistency)
  • CL450 K1's have the later rims with the size stamped in the rim, more info is needed to conclude if this is a consistency)

Later, actually last weekend, I opened another box of rear hubs, and found out that it's more complex then the above wrap up. I found that there are two types of rear wheel hubs with the horizontal casting pattern perpendicular to the longitudinal casting, being the CB450 K0 hub, and the early CB450 K1 hub. They seemed the same to me, but after a close inspection I concluded they where not. The key to this knowledge were the sprocket bolts.

The new wrap-up is :


  • CB450 K0 hubs differ from later hubs (easiest way to identify are the casting differences as described in this thread).
  • CB450 K0 rims (front and rear) differ from the later ones (only D.I.D. stamped next to the hole for the airvalve, no indication of rim size stamped into the rim)

so far so good, but now it gets different,


  • CB450 K1's seems to have the later rear brake drums, but there are probably exceptions due to the Honda way of manufacturing.
  • CB450 K1's have a drum break with the typical horizontal casting pattern perpendicular to the longitudinal casting, but differ from the CB450 K0 hubs in the sprocket area (more info later)
  • CB450 K1's can have a CB450 K0 drum, I believe only the very first bikes had them, but more evidence is needed (I found 2 examples only).

  • CB450 K1's can have both type of rims, with (CB450 K1 rims) and without the size stamped on the rim (I found the very early ones had bomber rims)
  • CB450 K1's can have the later (K2 and up) break drums, probably on the late CB450 K1's.


  • CL450 K1's can have the early (CB450 K0) rear brake drum, more info is needed to conclude if this is a consistency)
  • CL450 K1's have the later rims with the size stamped in the rim, more info is needed to conclude if this is a consistency)


The P/N of a CB450 K0 hub is 42602-283-000, the CB450 K is P/N 42602-292-000 and later hubs have P/N 42602-346-000. The sprocket bolts of a CB450 K0 differ from the CB450 K1.
 
Last edited:
So, both rear break drums (CB450 K0 and the CB450 K1) have the typical horizontal casting pattern perpendicular to the longitudinal casting, and from a distance both rear drum break hubs seem to be the same. In the process of organizing and categorizing I found this:

IMG_8839.JPG

IMG_8840.JPG

IMG_8841.JPG

IMG_8839.JPG

What you see in the pictures is a CB450 rear wheel break hub (sprocket area), and a stubborn a few stubborn sprocket bolts (I thought). But when looking closely to the pictures it's clear that three sprocket bolts are broken, and parts are stuck in the sprocket itself. A closer loo at the surfaces of the broken bolts it revealed a fatigue issue.

For "a" reason these bolts broke-off, but overpower seemed to be unlikely, nor wrong torque seemed to be the issue. So what was the reason that these bolts broke (sheared) off ?

I rescued the only complete bolt and compared it with a few stock bolts. The top bolt is CB450 K0, the lower bolt is a CB450 K1 sprocket bolt. The CB450 K0 bolt is smaller, and has a lower collar.

IMG_8867.JPG

For comparison I took a CB450 K1 rear wheel break hub and fitted both bolts in the damper.

IMG_8865.JPG

IMG_8866.JPG


It can be seen that the CB450 K0 bolt that the top of collar doesn't have the same deck-height as the area were the sprocket is resting on when secured with the circlip (picture below).

The difference between the CB450 K0 rear wheel break hub and the CB450 K1 rear wheel break hub is determined by the deck-height of the sprocket stop area, and the bolts should hacve the same deck-height. In the pictures which shows the broken bolts in the sprocket, it appears that the wrong bolts are used in the wrong hub, this way there is too much clearance between deck-height of the bolts and hub, and will finally result is shearing of the bolts and damaging the hub.


IMG_8863.JPG

I'm not finished yet with cleaning the hubs, disassemble the wheels and re-chrome the rims....

IMG_8862.JPG

So, conclusion is that you have to use the -283- bolts in the -283- hub, and the -292- bolts in the -292- hubs ! The sprockets all have a -282- P/N, so one can use CB450 K0 sprockets on a CB450 K1 hub without risks of damaging.

Another dark mystery solved (for me at least...) !

Jensen
 
Last edited:
I started the above post with the discussion about the cracks, and it seemed that the CB450 K0 and the CB450 K1 rear wheel hubs seem to have cracks that cannot be found in the later hubs, but for now, my lunch pause is over thus I have to crack some other mystery's in our machines.....

Soon, I will go into the crack issue, because I found even more issue's then shown on HT...

Jensen
 
Hi,

With the above mentioned information, it's easy to differ the CB450 K0 rear wheel break hubs from the CB450 K1 and later rear wheel break hubs. As written earlier, the "cracks"are only visible on the cb450 K0 rear wheel brake hubs, here a few pictures :

IMG_8996_s.JPG

Overview picture of a rear wheel brake hub of a CB450 K0

IMG_8997_s.JPG

and a close up reveals the same pattern as Ashley talked about (actually, it can be seen on the overview picture too.

IMG_9007_s.JPG

Clear relation between the "crack" position and the "crack" at the outer part where the spokes are connected.

IMG_9009_s.JPG

Another rear wheel brake hub of a CB450 K0

IMG_9010_s.JPG

And a detailed picture of a "crack". One the first hub I found three "cracks", all on the same position, a little off-centre to the right in almost every cush-drive bushing casting area.

It seems that these cracks are part of the moulding process, I couldn't find any real cracks in my set of CB450 K0 rear wheel hubs, but that doesn't say that it would not be possible.

Jensen
 
Enough about cracks for the time being (until new information can be added).
In the process of organizing engine parts, I compared the CB450 K0 valve retainer arm with the CB450 K1 part and noticed differences.

The K0 valve retainer arms are thicker, especially in the fork part, and they weigh more too.

IMG_8848_s.JPG

Left is K1, right is K0

IMG_8849_s.JPG

And a bunch of them in two sets:

IMG_8845_s.JPG

It seems that thelater valve retainer arms are not numbered, and the K0's are. The number is the mould or batch, I see this all over the parts of the engine.


IMG_8846_s.JPG

Parts are numbered from 0 to 9, I haven't seen double digits.


IMG_8847_s.JPG

Jensen
 
Hi,

Today I started to categorize parts of CB450 K0's. It's one big jigsaw puzzle. Accumulated the parts over the years, it's now time to compare and classify.
Below a picture of front and rear fork parts, and other small stuff. As it seems I can easily build 2 bombers out of it, and probably for (but missing some small parts).

I will build at least one Dutch spec CB450 K0, maybe a US spec CB450 K0 (but will not be documented in this thread) and a Ken Ives Bomber (tempting because I have a set of chromed mudguards, front and rear).

IMG_9071.jpg

It seems there are also difference within the K0 parts, differences you won't notice when looking at the part, but only when comparing with a bunch of them.
For example the dynamo covers, when looking closely, there are at least two types when looking at the mould they came off.
Another thing I noticed is that I have four (!) different wire harnesses, two types of front fork bushings (1 mm height difference), two type of headlight shells, two types of side stands, two types of rear forks (small differences, but still....

Anyway, all these parts will be examined, photographed and placed in this thread. I hope I can offer a serious library of pictures of parts, including a short text with the main differences and similarities, just like it is mentioned in the thread title,

Jensen
 
Subscribed.

Looking forward to your reverse engineering / detective work on Honda's 450 production engineering with interest Jensen :

Both of the K1s look great. (I am gradually warming to the Eurospec front and rear guards btw)

Any idea what type of exhaust headers/silencers those are in the pic of the Dutch bike ?
 
Fantastic 450 studies Jensen! I will follow this thread closely and look forward to more discoveries and updates (y)
 
Hi Alan,

Enjoy the ride, but it won't be a short one.....

I think you talk about the headers and pipe of the Dutch K1 ?

Well, certainly not original, and they didn't come with the pile of parts, so I can't answer the question, I'm afraid. I did get a few pages of descriptions and history where the bike came from, who bought it and what happened with it. If I have time I will translate it and put it here on display.

Jensen
 
Hi,

Today I was in the boxes with ignition and generator / rotor parts for our member AsjimototK0 and it occurred to me that the bombers have different coils then the K1's or later bikes (forgotten I think).

IMG_9090.jpg

CB450 K0 Bomber type ignition coil

IMG_9091.jpg

Later CB450 K ignition coil

IMG_9092.jpg

Both coils for comparison in one shot, both coils can be used on all years CB450's.

Just for your information,

jensen
 
I never had noticed any difference in the coils themselves and since you mention they could be swapped and used on any of the bikes the resistance values must all be the same. It may be worth pointing out though there is a difference in the coil brackets of a K0 and all the other K models. The K0 bracket is wider and is a must if piecing together a Bomber.
 
Actually I don't like it when I have to write a new response directly after my response, but anyway.

The riding season is over, my daily rider (CB450'K0) is stored and ready for next year, I finally can move on with the other 450's.

The whole summer I was thinking what colours both K1's should get, and what colour the K2 would have. I decided I don't want to have a black K1 since I have a black bomber already. There where not many colours to choose from, since the K1's are only delivered in 3 colours and black is one of them. The other colours where Candy red and Candy blue, so that choice was a simple one. Since the European K1 is Candy blue, I keep it that way, as I keep the US K1 in candy red.

The K2 was the most difficult choice, because I don't like to have another Candy red or blue bike anyway. After a lot of thinking and research I decided that I wanted the Candy Blue-Green for the K2, however, I doubt that the K2's where ever delivered in that colour.

So , the list is:

Euro K1 Candy Blue
US K1 Candy red
US K2 Candy blue-green

Then another choice came into my mind. Originally all K1's and K2 have the front fork bushing, headlight and headlight ears painted black, either the gaiter or bushing type, and I really don't like it. I decided to move away from originality for my bikes, but since I have all the above parts at least twice, I will have one coloured set bolted on the bikes, and one black set for each bike as a spare.

The next step was to find perfect examples of all three colours, so I had to search for a NOS parts in Candy blue and Candy Blue-green. I looked first in my stash to see if I had NOS parts with these colours and I did (CD50H and CB450 K3). The candy red K2 bike side covers where good enough being an example for the painter.

IMG_9897_s.jpg
Both candy red tanks as comparison

IMG_9884_s.jpg IMG_9887_s.jpg
The K1 tank stood outside in the Californian sun for a long time !


IMG_9891_s.jpg
Side cover in Candy sapphire Blue

IMG_9893_s.jpg IMG_9892_s.jpg
Chain protector in Candy Blue

IMG_9896_s.jpg
Headlight shell in Candy Blue

Honda colours.jpg

Unfortunately, Honda wasn't very accurate in colour coding and the actual colours. The Candy colours are very difficult to paint, and parts with the same paint numbers are looking different, and parts with different paint numbers are looking the same.

Yesterday I brought everything to the paint shop, and I''ll report back on the colours as soon I get my parts back. In the mean time I have to sort out all the black painted parts, like frames, rear forks etc, and all bomber parts for the next paint cycle....

Keep you informed, and hopefully there will be a few more posts in between mine.....
 
I've heard of the difficulties involved in duplicating the Candy paints. Apparently Honda couldn't even do it. I don't often contribute to your topics but I never fail to follow your projects. You provide us with a level of expertise not many can duplicate and I find your work an inspiration. Thank you for sharing.
 
I missed this thread when it was started. I'm amazed by the amount of detailed work you put into it. Look forward to more!!
 
I've heard of the difficulties involved in duplicating the Candy paints. Apparently Honda couldn't even do it.

I found a good and reliable guy, who also does great candy colours. As long as you deliver parts with the colour you want, he will duplicate by the eye, he's a very expertised person with a lifetime experience on painting. I wished he worked for Honda the early days :).

The guy also painted some parts of my CD50, Candy sapphire blue, and I cannot see any colour differences between the original parts and the repainted parts. The repainted parts are the front fork covers and headlight case. I bought this bike at the age of 16, new, and if you look carefully (at least IRL) you'll notice that the rear mudguard has a slightly different colour, from the factory.

.jpg


I'm really exited how the Candy Blue Green comes out, since this is the most difficult colour of the colours I want. Not only there is a critical balance between the silver under-layer and the coloured top layer, but an even difficult balance between a silver under-layer and two top layers ! I found an almost perfect NOS front fork cover of a K3 in my stash, and will use that colour as an example. I included a picture of CMSNL, mine is just like that one. Even in this NOS part you will notice that not all area's are evenly Blue/Green. I hope my painter does a better job...


coverlfrontfork_medium51606319000AZ-01_8ad6.jpg

This is mine, hard to get the colour pictured, but this picture is moot closely to what you see with your eyes IRL

IMG_0011.jpg

BTW, this picture is from a Japanese frontfork cover, it has the winker holes and the reflector thread. Mine is from a Dutch model (black), it has the winker hole, but hasn't the reflector thread, as those weren't mandatory in the Netherlands and Germany (and as I think of it, not in whole Europe). In the US, there seem to be K1's without the winker hole, I got one NOS part -292- sanded. However, I never found a picture of any CB450 K1 without winkers, still the part has the 292 modelcode (n the original package).

IMG_0008.jpg

Good to know that I have some readers and followers, and I hope that you will chime in, comparing your parts and make this thread a success. The CB450 K1 is one of the most difficult (for me) Honda's to restore correctly, since so many parts differ from country to country and even within country's you will come across small differences too. And that for a motorcycle that was made for one year only (1968) !

I will focus on the two K1's and the K2 mainly, since the bomber is the easiest to restore. All the parts are more or less the same and I have a good and original example in my shed. The search for the typical Dutch winkers, tail light and rear mudguard with the small reflector is complete.

All the Bomber parts are sorted out, and it seems that I indeed can build two complete bikes and have a lot of spares left.
 
Welcome! I started this thread 06-01-2020, an early adapter (I think the forum started a few weeks before this date), so it makes sense that the people that came after me never found their way to this thread :).
 
The forum opened the very day you started this.

An early adapter indeed, but I guess this thread is not the oldest apart from the threads from the moderators ?

Anyway, time for pictures, and now from the torsion bar assembly :

IMG_8855.jpg

One-piece torsion bars, found on the K1's and up. These are marked A and B, but I also seen them marked as INL/XR and INR/XL (see picture below).

IMG_8857.jpg


IMG_8856.jpg

A one (above) and a two piece assy. The two piece assy's are used on the Cb450 K0 only. I found that the torsion strength of the two piece is a little higer than the one piece version.

IMG_8858.jpg

Just like on the valve retainers, the torsion bars of the later version (one-piece) are also numbered, again, only one digit from 1 to 9.

IMG_8859.jpg
 
Hey Jensen,

I will definitely be following your projects. I have a US version of a K1 that seems to be pretty much original except for the mufflers of course.
If you need any reference photos let me know.
20150501_161434.jpg20150510_144250.jpg20150620_160711.jpg
The first 2 pics where from the day I bought it and the last one is after I cleaned it up. All it needed was the tank and carbs cleaned, new points, plugs and it fired right up.
 
Thanks, as far as I can tell it appears to be original paint.
The guy I bought it from got the bike after his dad passed. The dad was the original owner of the bike and bought it in 1969.
I did ask the guy if his dad ever had it painted and he stated that he did not think it was ever painted.
Looking at the back of the side covers and underside of tank I don't think it was painted.
The paint and the rest of the bike is really in nice shape for the age. It still had the original tires on it when I got it! Besides the handlebar set back clamp and the mufflers I don't think much was ever done to it.
 
This pic is a better representation of the color, for some reason the other pictures make it look more red than it is.
20150510_141830.jpg
 
Last edited by a moderator:
Nice survivor! I got a NOS side cover for the colour (Candy Red, colour code AA), and matches your bike colour and both of my fuel tanks.

Does anyone else found that the early torsion bar (two piece) needs more toque to turn the same angle as the newer (one piece) torsion bars ?
I really like to work with the two piece bars, since it's possible to check the whole length for wear, rust and scratches. Anyway, here a few close-up pictures of the valve retainers, and enjoy the quality of the parts!

IMG_8853.jpg

Valve retainer close-up, and it can be seen, but only when comparing that the above picture is from the K1 and on, and the picture below is from the K0. Maybe hard to see, but the K0 is beefier,

IMG_8852.jpg

IMG_8850.jpg

An other close up, of the valve retainers, right the newer type, left the heavier earlier K0 type. You can use both types for all years.

In general I found that all(engine) parts used in the K0 are thicker, beefier, heavier and maybe stronger.
 
I was always a fan of the K1 CL model but the CB was quicker as it had a less restrictive exhaust. IMO the "Candy Ruby Red" was Honda's finest color ever. The K1 I rode ('68) was wrecked by the previous owner and rebuilt by the dealer into a 1970 model using a new tank and side covers. This is a great thread! Thanks for posting, lots of subtle changes from year to year. The earlier model 450s had a higher red line on the tach than later ones but I do not know when that change actually occured.
 
The earlier model 450s had a higher red line on the tach than later ones but I do not know when that change actually occured.

Maybe the stronger torsion valve springs have something to do with that ? The early 450's (K0) also had a lower compression (different pistons then later bikes).

Below a comparison between a dyno run of my K0 (red line), a K0 run from the manual, and a CB450 K1 run from an article. It could be that my K0 has a higher red-line than is displayed, however, I didn't want to push the bike further, since it's clear that the power is already dropping at 8500 rpm. Anyway, if interested, you could read further here : https://www.vintagehondatwins.com/forums/index.php?threads/149

curves.jpg
 
In my CB400F thread I wrote that I have lists of used O-rings and seals used in the CB450's, you can read here:

All critical O-rings that contact oil and should withstand temperatures above 120 degrees Celsius are Viton rings, the rest are made of NBR. Some O-rings are not made in Viton, so unfortunately, not all critical O-rings are Viton. The same for the oil-seals. Sometimes I changed the type of oil seal and added a dust seal where Honda did not.

All Honda NOS O-rings are made of NBR, even the newly made O-rings for this bike. Since it's an air-cooled bike, I always look for better materials with a higher temperature resistance and chemical resistance. Since Viton and petrol are not compatible, all O-rings for the carburettors are NBR-type O-rings. I always try to buy Viton rings and seals for the cylinder head and cylinder, these part are getting really hot.

Here a list of used O-rings and seals. For some reason I didn't fill in the O-ring size that is used between the crank bearings and cases, but I'm sure I had them measured, and as soon I find the info I will add them to this list. These O-rings are preferably made of Viton, since the temperatures are high on these parts. Viton rings are mostly 80 shore A (a little harder then NBR 70 shore A). This article gives an explanation of how to interpret shore A scale.

Differences between NBR (Nitril) and Viton:

Nitrile Rubber


  • Temperature: Nitrile is effective within a temperature range of -30[SUP]°[/SUP]C to 100[SUP]°[/SUP]C.
  • General Suitability: Used for general purpose applications requiring resistance to aliphatic hydrocarbons, petroleum oils, water and hydraulic fluids.
  • Environmental Properties: Nitrile vs Viton® is not resistant to degradation from weather and ozone exposure. Designed to resist most oils and lubricants, more importantly petroleum based lubricants, these seals have other benefits, such as superior abrasion and tear resistance, making them suitable for heavy duty industrial applications.
  • Applications: A cost effective product, that works well with constrained temperatures and chemical resistance.

Viton® Rubber


  • Temperature: Viton® seals can withstand temperatures up between -20[SUP]°[/SUP]C to 210[SUP]°[/SUP]C. Viton® seals are prone to failure below -15[SUP]°[/SUP]C in dynamic applications, as they become inflexible and hard.
  • General Suitability: Viton® is best suited for diverse sealing jobs that require high temperature and chemical resistance. Applications involving contact with petroleum oils, acids, silicone fluids and gases, halogenated hydrocarbons (trichloroethylene and carbon tetrachloride), aromatic hydrocarbons usually have seals and o rings made of Viton®.
  • Environmental Properties: Viton® O-rings and seals have a wide range of chemical resistance (involving mineral acids, fuels, and oils) and this material is also highly resistant to oxidation, UV exposure, fungus, weather, ozone, and mould. This makes Viton® far superior to Nitrile in these regards. They are also designed to resist most oils and lubricants, more importantly petroleum-based lubricants.
  • Applications: Viton® functions well in different automotive, chemical and appliance-processing industries.
  • Cost: As an approximate guide, Viton® compound is ten to fifteen times more expensive than NBR.


O-rings and seals CB450 K0.jpg

Lots of reading in I guess, but hoping to explain why the original O-rings in our bikes give up after a while, since NBR rubber deteriorates above 100 deg Celsius (212 Fahrenheit).
 
Starting to look into my stash of camshafts for all four 450's. The older camshafts (CB450 K0 and the early K1's) have fat cam lobes (width) then the newer ones, but so far I only have seen these fat lobes on the exhaust cams.

IMG_8791.jpg

One of the three boxes of cams, not all are good, so a lot of choices to make.....


nokkenassen CB450.jpg

Literary not one cam is the same as another, they all are different, some differences are large, some are small.


IMG_8764.jpg

CB450 K0 cranks and cams, at least cam's I took from parted out CB450 K0 engines, not saying that these cams are all CB450 K0. After a quality inspection and measurements I have to have five sets good camshafts, two good sets for the K0 (as I'm building two engines at the same time), and three sets for the K1's and K2.
 
While working on the engines (sorting parts), I decided which frames I want to use. For both K1's I have two very low serial numbers, the K2 has a early number as well. Later I will build-up the frames with the later K1 and K2 serial numbers. The frame for the Bomber is already painted nicely.

IMG_7159.jpg
 
In total I have 8 K1's and a couple of K2's, most European versions, some US versions. I'm sure I don't have to buy parts for building three bikes.
 
Yesterday I got the last plated stuff back from the plater, and the fun can start. In the mean time I started to compare the plated parts, starting with the rear heel sprocket bolds.

IMG_0365.jpg

The better I look and the more precise I measure, the more differences I see....And this is only a 1/4 of the amount I have of these bolts, time to find the other ones and compare !
 
In total I have 8 K1's and a couple of K2's, most European versions, some US versions. I'm sure I don't have to buy parts for building three bikes.

Are you familiar with the American English expression: "That's sick!" You would hear it if you ever show this collection of goodies to an American CB450 aficionado under 50 years of age.
 
Are you familiar with the American English expression: "That's sick!" You would hear it if you ever show this collection of goodies to an American CB450 aficionado under 50 years of age.

Even sicker that all those shiny parts are sitting on a granite countertop.
 
Jensen,

I've always watched your posts with awe. You must not have a wife, kids, dog or a job!?!? I have all 4 and I can hardly find the time to change my oil. Keep it going and us mortals will continue to follow along.
 
A wife, 2 kids (17 and 21 years old) and a 50+ hour job as a research manager mainly focussed on data-acquisition and process control data analytics at a global machine builder (2200 employees), and only one hobby :) . Since we have a new CTO, I have some time left to work on the bikes. The past two years where way too buzzy. I ride the bikes regularly to my work, so the km's add up. What others call sick, I call it rather a hobby which is distraction of the work I'm doing. I really like wrenching, and sometimes, when I see a mechanic struggling with a machine, my hands are itching to grab the tools out of his or her hands and doing it myself (but I can't, because then my colleagues know that I can wrench, and I rather keep that as a secret).

salome_img_4606.jpg

This is one of our machine platforms I'm involved in, lot's of new developments and more to come.
 
Just to be clear: we're using "sick" in a slang form that means really cool or impressive.

It's funny that you must keep your wrenching skills a secret at work - parking a Black Bomber out front of the building may give you away someday...

For me, working on bikes is about as far away from my day job as one can get and that's part of what makes it so relaxing and fun.
 
Some people are aware of that, most not. For most people a motorcycle is a motorcycle, only the older people know what they see. And that you have to totally not interested in motorbikes people, as they can walk by and not even see it's a moped or a motorbike.

My back-ground is Physics (photonics, machine Vision) and Mechanical engineering, a nice combination to understand why things work or not. What is your occupation ?

You're, of course, right about the average person recognizing one motorcycle from any other. Here in the US, I would guess the chances go up considerably in any setting where sophisticated machines are designed and/or built.

I have a background in Mechanical Engineering that ended in school, where I studied vibration and acoustics. I then switched to mathematics and became a professor.
 
Nice, you're also teaching regularly? Interesting field, vibrations and acoustics. At the moment I started a research project on using vibration sensors to predict (machine learning) when to do maintenance. Predictive maintenance so to say, mainly focussing on the main drive bearings and other important servo axis, as an addition to the torque and electrical data of the main drives.
 
Nice, you're also teaching regularly? Interesting field, vibrations and acoustics. At the moment I started a research project on using vibration sensors to predict (machine learning) when to do maintenance. Predictive maintenance so to say, mainly focussing on the main drive bearings and other important servo axis, as a

I teach during the fall and spring, leaving the summer largely open for hobbies. The lab I worked in as a master's student back in the late 90s focused on real-time active control of sound and vibration, largely using feed-forward control algorithms. Your AI maintenance project sounds interesting. I don't want to divert the thread, but it would be interesting to know more about the training data. Did you use the recent time history from the sensors directly or was it transformed in some way (fft, perhaps)?
 
Diverting the thread a little too much for most people, I'll pm you my work email / whatsapp, so we can discuss a little deeper on the subject.
 
Since my Honda CB400f reaches completion within two weeks, I will re-start the build of the three twins and another CB450 K0, Dutch / German version.
 
Back
Top Bottom