
Heat won't be an issue, only a spark. Think about how hot the engine gets on a really hot day, especially on an SL350 while dirt riding (and I did a ton of that) and the tank sits right above the engine absorbing all that heat. And, think about the carb drains on bikes where the hoses have been pulled off the bowls and never put back on and the carbs flood right on top of the hot crankcase. Drain the tank, let it sit for a few days open so as much of the vapors leave it as possible, run a hose from a car exhaust pipe into it with the engine idling for an hour or so to finish it off and solder away. When I worked for the City garage we used to do that with gas tanks we needed to get welded by the City body shop before we sent them there, never once had a problem.

-
Don't overlook our Welcome Package, it contains many links to important and helpful information about functions at VHT like posting pictures and sending PMs (private messages), as well as finding the parts you need.
AD
You are using an out of date browser. It may not display this or other websites correctly.
You should upgrade or use an alternative browser.
You should upgrade or use an alternative browser.
Deacon's CB350 Cafe Build
- Thread starter HerrDeacon
- Start date
For gasoline to ignite it requires more heat than a soldering iron will ever produce. It's like the No Smoking signs in gas stations, the cigarette isn't hot enough to ignite the fumes but the match or lighter is.
HerrDeacon
Veteran Member
Totally makes sense.
HerrDeacon
Veteran Member
Exciting lunch time. Tried to fire up the bike...and no go. Turned over great just nothing. Never had much time to investigate but figured I'd just try swapping the spark plug wires since wiring it not really my forte ") To my surprise it fired right up. Wouldn't hold idle so made a small adjustment and it just ticked along. Checked for oil flow at the head and all good. Never had much time to do much else or even take a video but its going to be hard to concentrate on work now this afternoon
To my surprise it fired right up. Wouldn't hold idle so made a small adjustment and it just ticked along. Checked for oil flow at the head and all good. Never had much time to do much else or even take a video but its going to be hard to concentrate on work now this afternoon
To my surprise it fired right up. Wouldn't hold idle so made a small adjustment and it just ticked along. Checked for oil flow at the head and all good. Never had much time to do much else or even take a video but its going to be hard to concentrate on work now this afternoon Exciting lunch time. Tried to fire up the bike...and no go. Turned over great just nothing. Never had much time to investigate but figured I'd just try swapping the spark plug wires since wiring it not really my forte
Clearly you've crossed the likely-same color primary wires from the coils (both blue like mine?) at the points/condenser connections. Easy fix, and glad you can't stop thinking about it now. :dizzy:
HerrDeacon
Veteran Member
Yes, that must be the case, never had a chance to look but should be an easy fix.
I used a little 4" skinny yellow zip tie around the blue primary wire on my second coil to differentiate it from the actual blue one.
HerrDeacon
Veteran Member
Its been so long since I wired in the that section of the bike I can't even recall the wire colours. Should be an easy fix once I get a chance to take a look. May have some questions on wiring and cable routing soon too, need to get that sorted before I can put the tank on. One step at a time
Jim did an extensive search through as many pictures and FSM shots of cable and wiring routing on the 350 as he could find to put together as much of the proper routing as possible. I'll see if I can find the thread.
Its been so long since I wired in the that section of the bike I can't even recall the wire colours. Should be an easy fix once I get a chance to take a look. May have some questions on wiring and cable routing soon too, need to get that sorted before I can put the tank on. One step at a time
Here it is
https://www.vintagehondatwins.com/forums/showthread.php?329-CB-CL-350-cable-routing
HerrDeacon
Veteran Member
Yes! I remember that now, thanks for digging that out. My main concern is going to be the cable routing, I have them connected now but the combination of lower bars and the fairing support bracket is not making it easy to get a good path. I'll take a look at Jim's writeup later this evening.
HerrDeacon
Veteran Member
Swapped the ignition wiring around earlier this week but only got a chance to test it this afternoon, started and idled fine so win in my books. Spent yesterday trying to find the best routing for the throttle and clutch cables. Throttle was easy, just followed Jim's thread (thanks Jim!) but clutch was not as easy. First followed Jim's thread but wasn't keen on the angle after it gets past the steering stem. So, found a thread by outobie on the old site where he suggested fishing it to the right side before the engine mount, so tried that and even though its not perfect it ended up being a bit better. Problem is caused by the clipons and fairing stay, no easy route. Will leave it as it is and see how it works. Now that the wiring and routing is sorted I'm thinking I can put the tank on with the hope I don't need to remove it. Will be nice to see the body work start to go back on it.
One note on it running, it ran really nice, idled great and revved good when I blipped the throttle. Only weird thing was a slight whirring noise I can hear from the left side. It may be completely normal but just not yet used to the sound of this engine. I was in a garage too which changes the sounds a bit compared to out in the open. I'm thinking its in the alternator area, is it common to hear a whirring/rotating noise here? Tried to capture it on video but the sound doesn't come through.
One note on it running, it ran really nice, idled great and revved good when I blipped the throttle. Only weird thing was a slight whirring noise I can hear from the left side. It may be completely normal but just not yet used to the sound of this engine. I was in a garage too which changes the sounds a bit compared to out in the open. I'm thinking its in the alternator area, is it common to hear a whirring/rotating noise here? Tried to capture it on video but the sound doesn't come through.
The alternator shouldn't make any noise since there's no parts making any contact (brushes) so unless it's just a tight cam chain I can't imagine what it would be. Did you check for oil at the top end from the 6mm bolt at the back left of the rocker cover? Get it idling and remove this bolt briefly with a rag under it, should come out copiously.

HerrDeacon
Veteran Member
That was the first thing I did when I started it last week, was super nervous about oil getting to the top end so it was first thing I checked. Good flow coming out of there.
I want to check the timing with a timing light so will need to take the alternator cover off, will see then if the sound is coming from there. Agree that is shouldn't be though, could be cam chain like you said. Hopefully it's just a normal sound I'm not used to but will try and pinpoint it regardless.
I want to check the timing with a timing light so will need to take the alternator cover off, will see then if the sound is coming from there. Agree that is shouldn't be though, could be cam chain like you said. Hopefully it's just a normal sound I'm not used to but will try and pinpoint it regardless.
Starter chain and sprag clutch could make some noise.
HerrDeacon
Veteran Member
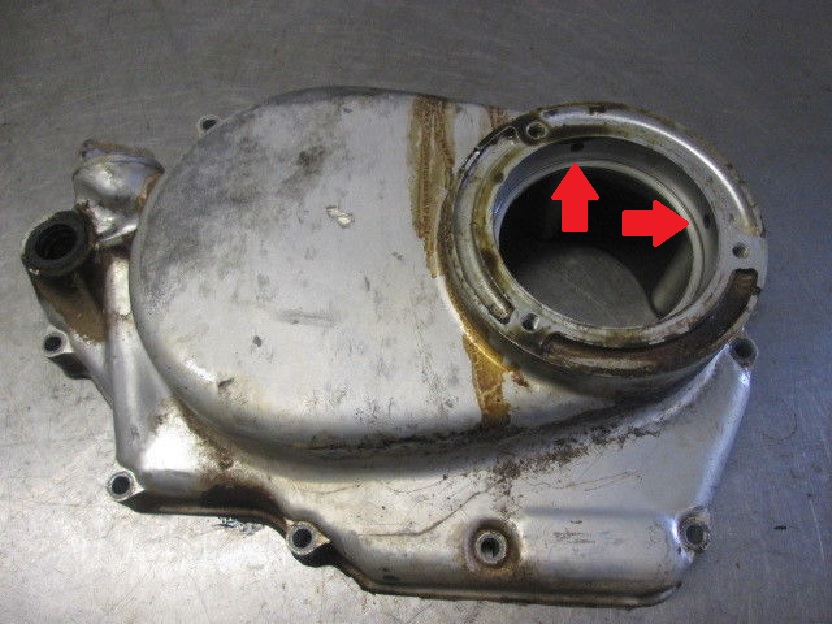
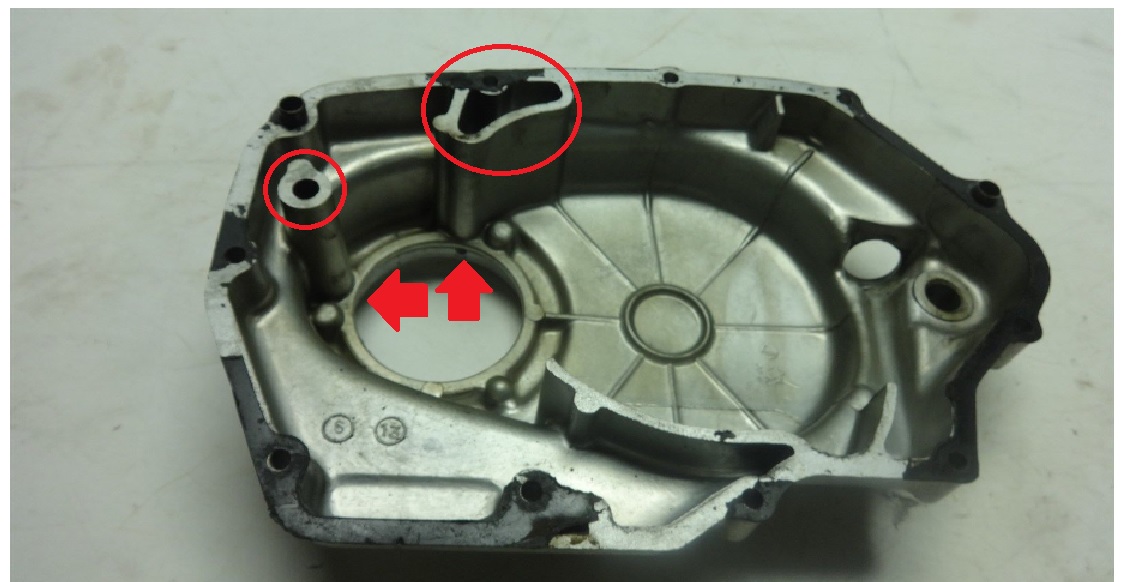
When I last had the bike running I had two oil leaks, one was from the alternator cover which I knew/expected since I was just reusing the old gasket until I had the timing dialed in and then I'd put on the new one. The other was from the oil filter cover. Never had a chance to look at the time but just figured I never had it fully tightened. Had a look today and appears I never put on the outer rubber o-ring and I can't recall if I ever bought new ones for this or if they came in the engine gasket kit. Regardless, no luck finding it in my parts stash so I'll need to source new ones anyway. The inner one is installed so I'm now wondering if that is a new one or an old one. If I can find new ones for sale somewhere I'll order two in case. Will hit up local Honda dealer first since if they are in stock they can get them in quicker than me ordering online. Googling the part number and it looks like they are also used in Honda cars so I'll hit them up if the bike dealer can't help.
When I last had the bike running I had two oil leaks, one was from the alternator cover which I knew/expected since I was just reusing the old gasket until I had the timing dialed in and then I'd put on the new one. The other was from the oil filter cover. Never had a chance to look at the time but just figured I never had it fully tightened. Had a look today and appears I never put on the outer rubber o-ring and I can't recall if I ever bought new ones for this or if they came in the engine gasket kit. Regardless, no luck finding it in my parts stash so I'll need to source new ones anyway. The inner one is installed so I'm now wondering if that is a new one or an old one. If I can find new ones for sale somewhere I'll order two in case. Will hit up local Honda dealer first since if they are in stock they can get them in quicker than me ordering online. Googling the part number and it looks like they are also used in Honda cars so I'll hit them up if the bike dealer can't help.
I'm sure you're aware of this but I'll show you anyway just in case. Be sure to align the oil flow holes in the small cover with the big cover.
HerrDeacon
Veteran Member
Yes, I'm aware, thanks for checking though!
HerrDeacon
Veteran Member
Found that missing o-ring this afternoon so I have that installed and the cover put back on, will check that area again next time I have it running. Also managed to get the tank put on.

Found that missing o-ring this afternoon so I have that installed and the cover put back on, will check that area again next time I have it running. Also managed to get the tank put on.
So close, you can almost smell the exhaust...
HerrDeacon
Veteran Member
So close, you can almost smell the exhaust...
Its amazing how just putting the tank on transforms the hunk of metal into a bike. Gas tank cap rubber seal came in the mail yesterday and got it installed this morning. The old one was severely cracked and splitting, didn't look like it would do a very good job at sealing.
Sure hope it runs soon, I'm not getting any younger :dizzy:
tomeben
Veteran Member
Nice looking build, simple and clean! Tank looks perfect for it.
HerrDeacon
Veteran Member
Nice looking build, simple and clean! Tank looks perfect for it.
Thank you Tom!
HerrDeacon
Veteran Member
Connecting the tank to petcock this afternoon and noticed one of the petcock tubes was loose and then it just came out. I assume these are just friction fit, anything I can do to make it a bit more permanent? I assume I must have loosened it and pulled it out bit by bit when I was test starting it a few times and had to remove the fuel lines a few times. Just not keen on this vibrating off while riding down the road :lol:
Tap it in as far as it goes then use a point punch to peen a couple places around it.
HerrDeacon
Veteran Member
Ok, sounds good, will give that a try. Thanks Jim.
HerrDeacon
Veteran Member
Installed the seat frame this morning and laid the seat on to get a look. Just need to hook it up to the rear end wiring and the rear should be done. Also, remembered I never hooked up the engine breather tube before putting on the tank, I certainly hope I can get that on without taking the tank off again. I hear people complaining about the CL pipes and what a pain they are, for me the tank setup on these bikes is a pure headache.


Boomer343
Veteran Member
Installed the seat frame this morning and laid the seat on to get a look. Just need to hook it up to the rear end wiring and the rear should be done. Also, remembered I never hooked up the engine breather tube before putting on the tank, I certainly hope I can get that on without taking the tank off again. I hear people complaining about the CL pipes and what a pain they are, for me the tank setup on these bikes is a pure headache.
View attachment 8927
View attachment 8926
That is an excellent tank and seat set up. Really smooth and classy. Love the color combination too.
I have a large evac tank I use for oil changes, Princess Auto special, that I use to get almost all the fuel out of the tank before pulling the crossover hose off. Always some fuel spills unfortunately.
Absolutely agree with Boomer, the combo looks great together and you did a marvelous job on the paint and stripe. And a clean, well-done cafe with fenders... as it should be.
HerrDeacon
Veteran Member
Thanks guys. Early on I contemplated making my own front fender out of fibreglass (mainly because the chrome on the stock fenders was in horrible shape) but glad I never. Old school braced fenders like these look way too cool to swap out, especially with all the front brake mechanical bits and bobs out in the open to complement it. These old Honda's have awesome looking front ends. Way too wet where I live to ride without fenders anyway Got caught in the rain last week on my MB5 with a short fender and the rain was flicking up on the spark plug and causing it to stutter, made for an interesting ride home.
I have a siphon pump that I used to drain the mower and blower tanks but the hose is too large so it can't get the last bit of gas. Need to look for something a bit more suitable.
Got caught in the rain last week on my MB5 with a short fender and the rain was flicking up on the spark plug and causing it to stutter, made for an interesting ride home. I have a siphon pump that I used to drain the mower and blower tanks but the hose is too large so it can't get the last bit of gas. Need to look for something a bit more suitable.
Yendor
Veteran Member
I lean the bike over on one side to force all the fuel away from one of the cross over tubes.
then pull the high side and cap it and put a short bolt into the tubing as a shutoff.
It helps to have a 2nd person but these 350's aren't all that heavy you can't lean them over and pick them back up.
then pull the high side and cap it and put a short bolt into the tubing as a shutoff.
It helps to have a 2nd person but these 350's aren't all that heavy you can't lean them over and pick them back up.
HerrDeacon
Veteran Member
I lean the bike over on one side to force all the fuel away from one of the cross over tubes.
then pull the high side and cap it and put a short bolt into the tubing as a shutoff.
It helps to have a 2nd person but these 350's aren't all that heavy you can't lean them over and pick them back up.
Sounds like a good plan.
james adams
Rest in Peace
I hope your right, really want it completed this summer.
I thought mine would be done summer of 2019. You can forget about that James . . . . . . . .
HerrDeacon
Veteran Member
I thought mine would be done summer of 2019. You can forget about that James . . . . . . . .
LOL, I know the feeling. I have a new deadline for mine now...it will be done when its done. With a family, work, three other bikes and countless other hobbies/projects sometimes its just hard to squeeze in any time. Mine will get done one day but I'm not worrying about it. It was bought as a project bike so I could have something to mess around with in my free time, and if this one was done I'd just be working on a different one. For me its just the fun of working on it, end goal of finishing it doesn't really mean anything to me. Plus I have other bikes that I can ride so its not like its something that is keeping me from riding. I'd say I'll probably be selling it once its complete anyway so the slower I am then the longer I'll still have it.
HerrDeacon
Veteran Member
Been picking away at the front end wiring the past week or so, trying my best to make it neat looking because since I'll be using a fairing I really have no way to hide the wiring like the stock headlight bucket. Not going to be really possible to hide much of it so will just tidy it up the best I can. Since I have the fairing support bracket hanging off the steering stem I can't use a stock speedo/tach since the cables would hit the bracket so I picked up a cheap eBay digital speedo to make the bike legal. Won't be able to hook up all the features but just the basics, speedo, turn signals and hopefully tach.
The speedo uses a Hall sensor to measure speed, so I needed to mount two magnets to the front hub but since the hub is not vertical I had to fab up a little way to mount the magnets vertically.
Found some leftover aluminum tube from the rearsets that was the perfect size to hold the magnets. Cut it on an angle, glued the magnets in with some JB Weld and then stuck the magnets to the hub with some two-part epoxy. Once it was cured I did a test by spinning the wheel and it worked great. Just need to measure the circumference in mm and input it into the gauge.
Tube cut:


JB Weld used to mount magnet and then filed flush:


2-Part epoxy used to stick to hub:


The speedo uses a Hall sensor to measure speed, so I needed to mount two magnets to the front hub but since the hub is not vertical I had to fab up a little way to mount the magnets vertically.
Found some leftover aluminum tube from the rearsets that was the perfect size to hold the magnets. Cut it on an angle, glued the magnets in with some JB Weld and then stuck the magnets to the hub with some two-part epoxy. Once it was cured I did a test by spinning the wheel and it worked great. Just need to measure the circumference in mm and input it into the gauge.
Tube cut:
JB Weld used to mount magnet and then filed flush:
2-Part epoxy used to stick to hub:
Great idea Perry, looks good. I'd like to see the gauge too if you can post a picture of it.
HerrDeacon
Veteran Member
Thanks, totally forgot to include a picture of the gauge. Only thing left now is to hook up the tach, hopefully won't be too bad.

tomeben
Veteran Member
Thanks, totally forgot to include a picture of the gauge.
That works really well, fits like it was meant to be there. Nice!
Tom - 1982 CM450E / Midwest USA
It's a good-looking gauge, so many you see that are inexpensive also look like cheese. I'd be curious to see it working to see what the overall display looks like
james adams
Rest in Peace
Installed the seat frame this morning and laid the seat on to get a look. Just need to hook it up to the rear end wiring and the rear should be done. Also, remembered I never hooked up the engine breather tube before putting on the tank, I certainly hope I can get that on without taking the tank off again. I hear people complaining about the CL pipes and what a pain they are, for me the tank setup on these bikes is a pure headache.
View attachment 8927
View attachment 8926
Love the paint job Perry. Excellent work there. Like me, I bet you had your heart in your mouth when wet sanding it. And two colours to re-do if it all went pear-shaped. Lovely job sir!
HerrDeacon
Veteran Member
Love the paint job Perry. Excellent work there. Like me, I bet you had your heart in your mouth when wet sanding it. And two colours to re-do if it all went pear-shaped. Lovely job sir!
Thank you very much! Yeah, I always do when wet sanding but was a bit more relaxed with this one, must be just getting more familiar with the process now
Funny thing is that I had a sort of accident with the seat and did have to respray a bit of the white. Had the bike on the work table and had to grind some metal. Forgot to cover the bike and scorched the paint a bit. Bit of a pain but still had a chuckle at it, no sense getting mad, plus they were shaped like flames, lol. 

james adams
Rest in Peace
LOL, I know the feeling. I have a new deadline for mine now...it will be done when its done. With a family, work, three other bikes and countless other hobbies/projects sometimes its just hard to squeeze in any time. Mine will get done one day but I'm not worrying about it. It was bought as a project bike so I could have something to mess around with in my free time, and if this one was done I'd just be working on a different one. For me its just the fun of working on it, end goal of finishing it doesn't really mean anything to me. Plus I have other bikes that I can ride so its not like its something that is keeping me from riding. I'd say I'll probably be selling it once its complete anyway so the slower I am then the longer I'll still have it.
Ahah! So I'm not the only one with more than one hobby?
SWMBO is always complaining 'You have your photography, computer programming, oil painting, pastel painting, guitar playing, guitar luthering, archery, constructing and painting model aircraft and now you have TWO bikes to pull apart and break, er, fix? What about the gardening . . . . ' And so it goes on. She's just jealous as she can't seem to find a hobby she likes. Me? I'm never bored . . . . . . !HerrDeacon
Veteran Member
I'm never bored . . . . . . !
Same here, don't recall ever being bored in my life.
HerrDeacon
Veteran Member
Some nuts, bolts and washers I ordered a while ago to mount the fairing arrived this week so I'm hoping to try and get that installed this weekend. Supposed to be a bit of a storm (Larry) hitting on Saturday so good day to spend in the garage.
HerrDeacon
Veteran Member
Fairing bolts showed up last week and I was able to get the windscreen bolted to the fairing and the fairing temporarily mounted to the bike. Still have to wire up the headlight so once that's done I'll do a final mount of the fairing. The bolts that I got had a sort of brushed finish to them which looked nice but to match the rest of the polished bits on the bike I decided to polish them up. Will try to finish off the wiring soon.
Sorry for the dull pictures, my old phone takes horrible pictures indoors. Will take the bike outside when I get a chance for some better pictures.


Sorry for the dull pictures, my old phone takes horrible pictures indoors. Will take the bike outside when I get a chance for some better pictures.
That's a proper cafe racer right there, it's looking really nice Perry.
1969 CL350
Veteran Member
The fairing looks great! If you tuck in, it should easily give you 10-15 mph on top end.
RockReef
Veteran Member
Are you going to run side covers?
Sent from my iPhone using Tapatalk
Sent from my iPhone using Tapatalk
HerrDeacon
Veteran Member
Are you going to run side covers?
Sent from my iPhone using Tapatalk
At this point no, I wanted to but my CB side covers don't really play nice with the CL pipes. I was also going to go with the stock air filters as well but going with the UNI's for now, will swap back over if I can get all the parts one day.
I was actually thinking about the side cover area today. As it is now, I can see the big yellow battery, which I don't really mind too much, but if I can find a thin sheet of black plastic or something I could slide it in between the battery and the box to help take the attention away from it a bit. Good spot for a VHT sticker or something, lol. Something to look at later.
