1968 CL450 restoration

Flight Risk

Veteran Member
Joined
Jun 15, 2020
Total Posts
147
Total likes
35
Location
Ottawa, Canada
The bike was pretty complete when I bought it, but it had had a pretty hard life. The last time it was registered was in the early 1980's. I spoke to the last registered owners son about the bike, and found out that his father bought and fixed it up, so that he could ride with his son when the son was a new rider.

IMG_5039(1) (2).jpg


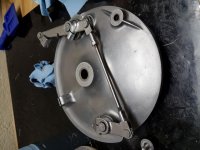
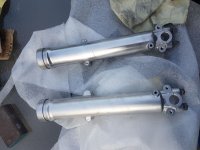
The bike changed hands multiple times in the 36 years that it was not registered, and it was definitely used off road (and hard). These bikes are heavy, don't really have a lot of shock absorber travel compared to modern dual sports so there are a lot of bent components!

Right side_edited-1.jpg
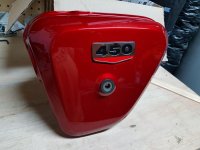
This bike has a serial number and an engine serial number that are only 4 digits apart, so this is definitely the original frame and engine pairing and it shows that this was one of the first 3800 CL450s manufactured in the first year of production. This makes me wonder about the Black Bomber clutch cover in the photo above. Original??? Hard to say. I have also heard that some of the earliest CL450K1s were sold with Black Bomber Tank Emblems. Any advice on this would be appreciated.

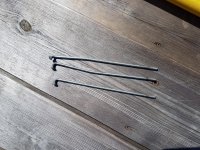
Random damage photos below, more to follow as I get to what I have done (and will continue to do):

Fork cover.jpg
Headlight.jpg
Brake pedal.jpg
 
Last edited by a moderator:
Four digits apart on the serial number is pretty rare. Yours is a fairly early numbers bike though. Definitely worth the effort to try and restore to a reasonable level.
I think you are talking about the stator cover when you mention the clutch cover. Those early stator covers were on the Bomber but also the K1’s so its original and if in good shape worth a pretty penny. Take care of it.
AFAIK, the original tank emblems were plastic on the Bombers and the K1’s. There were two different scripts (or fonts) for the word Honda on those badges. There is a slanted version which I’ve seen more of and there is an upright version that I’ve read was original to the K1 but I can’t reliably verify that. You see many K1’s with the metal badges which were replacements for the earlier plastic ones. Apparently the heat from the sun could warp the plastic ones and Honda had to change the design.

Edit: After posting I now see that the clutch cover is indeed a Bomber cover. Good eye! I’ve never seen that on a K1. I guess it could be original or it could have been a replacement for one that got damaged in the early days. Interesting.
 
Edit: After posting I now see that the clutch cover is indeed a Bomber cover. Good eye! I’ve never seen that on a K1. I guess it could be original or it could have been a replacement for one that got damaged in the early days. Interesting.

I saw that myself, and I think if original it further validates the fact (and what we believed to be true) that the Bomber clutch cover will work properly on a 5 speed engine.
 
What a beauty. Enjoy the restoration - you're in good hands here
I've got the evil blue twin to yours, lol. You may want to browse thru this on HT:

1968 CL450 K1 Refresh
 
Last edited by a moderator:
Dents and paint

Certain things I leave to professionals. I will open up an engine if needed (but only if needed), and I will do adjustments and replace components in the engine and elsewhere. If this bike were not so beautiful (to my eyes) I might try my hand at painting.... but Candy Paint forget it... my skills are just not up to that. And the idea of working the dents out seemed just too much of a pain in the butt as the tank sits around the cross-bar, not on top, and the only access points are at the fill cap and the petcock. I'm sure I would have done more damage than good if I had tried!

So, I sent the tank, and the side covers to be bare metal straightened, pressure tested and sealed with POR-15. This went out (I didn't take photos of the side covers, but they were both dented and had no emblems:

20170304_134106.jpg
20181119_193844.jpg
20181119_193927.jpg


This came back:

IMG_1844.JPG
IMG_1845%2B%25281%2529.JPG
IMG_1846.JPG


Then on to paint. It was hard trying to get the colour right, as everything was faded... even under the tank. I used a few pictures, and this reference bike as a model. I think we came up with something that was pretty close:

20190127_124019_resized_1 (2).jpg
20190127_124011.jpg

20200620_073134.jpg

The replacement emblems were installed on the side panels by the paint shop and I got them from Badge Replicas in Australia (The only place I could find that was not making a cheap sticker, which just would not do). I sourced a replica set of tank badges from e-bay, but I can't say that I'm really happy with them. Oh well, first world problems...

20190302_160657 edited (2).jpg
 

Attachments

  • 20200620_073134.jpg
    20200620_073134.jpg
    105.2 KB · Views: 7
The paint looks really good, and the side cover stickers look to be the right ones but I have to agree on the tank badges... still, it's quite the transformation (y)
 
Maybe I'm getting too picky for my own wallet. This has been an expensive summer!

It started with the decision to restore my forks and I found that each has a different damping system (see thread) https://www.vintagehondatwins.com/forums/index.php?threads/399 Additionally, I realized that the packing material between the fork covers and the gaitors was missing. I looked for this for weeks, then after posting here, some miraculously appeared on e-bay. I also found that one of the forks was missing the washer that separated the circip from the spring, though not hard to find, this took 4 weeks to get here. So the forks took over 2 months. During that time I buffed the lowers to a beautiful brushed finish. The original is on the left, buffed is on the right.

compare lowers.jpg


Here is what the forks look like today.

Forks installed.jpg

So the forks left me with a lot of time on my hands, so what to do? Move on to the wheels of course.

Since the spokes were in really good cosmetic condition, I decided to take the long way about and take them apart instead of cutting them. In doing this I discovered that three of the front spokes were bent (2 inside and 1 outside, probably just one good hit did that). I also noticed battery acid staining on the rear rim (it was well hidden under the layers of dirt).

acid stain.jpg


It's too bad because the rim itself seems pretty new, not much rust inside either compared to the front rim. The front rim has small rust spots (that are not playing nicely with tinfoil and Coke) on the outside and lots of rust on the inside.

I spent a lot of time individually polishing spokes with Luster Lace and also with white compound on my buffing wheel. I saw very little difference between them or by using them together, so Luster Lace it was as that as the easiest to do without risking flying metal. It is hard to see the difference in my photo, but these are the three bent spokes, the right one is untouched, the middle is Luster Lace and the left is buffed with white compound.

spokes.jpg


Next came the hubs. I decided to replace the bearings because I had it apart, but before I did that I noticed that the hubs were looking pretty poorly. Discoloration was under the 52 year old clear-coat.

front brake.jpg


I was sick and tired of polishing and didn't feel like stripping the clear coat so I decided to get them Vapor blasted (ca ching!). The funny thing was that when they came back I did not like to look of them, so I polished them to a brushed finish on my buffer :rolleyes:. Ack, at least I didn't have to buy stripper. Here is a photo from the same angle that I took tonight.

frontbrakeredone.jpg


I was about to start lacing the wheels back up when I realized that the fenders need to go on before the wheels do.

I mentioned previously that the same guy that did my tank repair used bare-metal techniques to take several dents out of both my fenders. They were appropriately sanded around the repair site, and they look awesome, except that I have always known that they need re-chroming (see photo). Putting that off is now no longer an option, and I guess, since both of the rims are "imperfect" it is probably best to get them rechromed while I have them apart. Glad I didn't start lacing...

repaired fender.jpg

Getting chroming quotes now...

If I stop updating this project it probably means that my wife has cut off our internet until we recover all of the money I've spent (or am about to).
 

Attachments

  • Forks installed.jpg
    Forks installed.jpg
    156.4 KB · Views: 18
  • spokes.jpg
    spokes.jpg
    313 KB · Views: 16
  • frontbrakeredone.jpg
    frontbrakeredone.jpg
    145.5 KB · Views: 15
  • compare lowers.jpg
    compare lowers.jpg
    172.6 KB · Views: 14
  • acid stain.jpg
    acid stain.jpg
    139 KB · Views: 15
Last edited:
If I stop updating this project it probably means that my wife has cut off our internet until we recover all of the money I've spent (or am about to).

LOL... I hear you.

As for your pictures, this might help you understand better. However, depending on your phone and/or computer operating system, they might be getting auto-corrected and you don't realize the orientation is wrong until you upload. I transfer mine to my computer from my phone, then rotate as needed, then upload, but if you're using the hateful Windows 10 it will auto-correct and you won't realize it's sideways until it gets here.

https://www.howtogeek.com/254830/why-your-photos-dont-always-appear-correctly-rotated/
 
April 2023 update and questions

So, I last posted on this build in 2020, and I haven't even updated my blog... Here goes:

I renovated my garage space in 2020, so that cost me about a year. I have been working pretty slowly, but I can see the light at the end of the tunnel (and hoping that it's not a train).

Photos first: Sorry for the strange lighting, the garage was dark so I put a couple of working lights up to give more detail. However it makes it look like it's at a badly lit show. I just took it off of the lift today, so this is the first day on her own feet.

PXL_20230430_204034316.MP.jpg PXL_20230430_204205444.MP.jpg

Things that you may notice, so I will bring them up myself: Yes those are Black Bomber Emblems on the tank (replicas), which match my Bomber clutch cover. Since the proper ones are unobtanium, I figure that these will have to do.

QUESTIONS:

The luggage rack: I bought it from a guy on E-Bay, who said that it came off of a '68 CL450. I have no issues there because it does fit, and it doesn't attach to the taillight assembly, so I love it. I wonder. however, because the rack sits almost on top of the taillight if it is actually for a 350 or something smaller. I would appreciate any insights.

PXL_20230430_204301843.MP.jpg

Lastly, I have questions about the back end: Both the rear brake and the center-stand. The kickstand hits the rear brake stay when it is in the up position. If I reach in to where the rubber cushion on the center-stand is supposed to hit the frame, I can feel that there is a very small gap where there should be none. I plan to ride this bike, so I really don't want the center-stand bouncing off of the stay every time I hit a bump. Can anyone please tell me what I might have done wrong?

PXL_20230430_204229131.MP.jpg

I have the same issue with my rear brake pedal. In the up position it hits the footpeg, as per the photo. I can find no way to adjust this. Is that normal?

Thanks again for looking. I will take some better photos outside when I get a chance.
 
Last edited:
Pretty sure the earlier 450s did not have the brake pedal stop bolt like the later ones did so it hitting the footpeg may just be normal. Can't speak to the centerstand stop unless it's just bent a little due to people letting the stand hit the stop full force all the time previously. (sidestand, or kickstand, is on the left and not near the brake torque stay)

Bike looks good, I've always loved the red color for that tank shape.
 
Beautiful bike you have there! I had a '69 CL450 many years ago.

Are you for sure talking about your kickstand, or do you mean the center stand? I don't see a kickstand present in your pictures. If you are talking about the center stand, do you have the rubber bumper in place? See item #33 in this diagram:


Those are available in different thicknesses from Ace Hardware if you have one of those where you live. You could also order the original Honda OEM part, of course.

For the brake lever hitting the step bar, the one on my 1970 SL350 does the same thing. Like you, I could see no way to adjust it, and there was a mark on the lever from the contact between the two parts. I cut about a 3/4" long piece of rubber hose and slit it on one side. Then I put that around the brake lever and glued it in place. The brake lever still hits the step bar, but it does so silently now. The home made bumper pad is not noticeable.

Ray
 
Thanks Ray,

I actually have the OEM #33 from the diagram in place, but it is not thick enough to stop the stand before it hits the stay. I like your idea about the hose for the peg. I may have to get a sheet of 1 mm rubber and fasten it to the frame where that cushion is supposed to hit. That would probably solve the problem of the center stand if I could ensure that is stays put. I think that there are ACE hardware stores in Ontario. I will have to take a look there.

Cheers

For a similar purpose on another bike, this shows three lengths that were available from the local hardware store. The rubber bumpers are made with a "tit" to poke through the hole that can then be grabbed with a pair of needle nose pliers and pulled through till it snaps into place.


The brake lever, padded with a short piece of hose:


The rear brake lever on my '68 does indeed stop on the right footpeg stem - no adjustable stop. Consequently it more easily bends and marks the cover.
Mine never had a center stand with it so I never bothered to find one.

does yours have the skid plate?
 
Sadly, mine does not have the skid plate. That optional part has evaded me for six years, but I'm still looking!
 
Sadly, mine does not have the skid plate. That optional part has evaded me for six years, but I'm still looking!

Beautiful bike, nice work.
I saw a brand new skid plate on Ebay in The UK last winter. They wanted $1000CAN for it. I didn't buy it.
As for your tank emblem, I was able to get a nice replica on Ebay this spring. The holes were about 1mm to close but the look is good.

PXL-20230502-165210765.jpg
 
^^^That prompted me to see if my SL350 K0 skid plate was on eBay. There is a NOS one listed for US $552! That makes my avatar picture seem a little less trashy!
 
^^^That prompted me to see if my SL350 K0 skid plate was on eBay. There is a NOS one listed for US $552! That makes my avatar picture seem a little less trashy!
Finding those is like Hen's teeth but they do appear at times, got one for $50 but it needs a lot of work to make it nice.
 
That emblem looks great Tracks! You cannot see that the holes are off at all in the photos. Mine are also replicas, and are bomber like yours, but they look a lot better than the CL450 replicas that I originally bought. Please see the photo higher up, with the tank hanging off my pegboard to see those disappointments :)
 
Jim, mine has been straightened, blasted, powdercoated, and bolted back onto the bike. I just didn't bother to redo my avatar. Someday!

OK, back to that nice CL450.
 
Beautiful bike, nice work.
I saw a brand new skid plate on Ebay in The UK last winter. They wanted $1000CAN for it. I didn't buy it.
As for your tank emblem, I was able to get a nice replica on Ebay this spring. The holes were about 1mm to close but the look is good.

View attachment 21730

Here are what I bought. The cheap ones from across the Pacific didn't look as good for half the price.

https://www.ebay.ca/itm/255979962590
 
So, I last posted on this build in 2020, and I haven't even updated my blog... Here goes:

I renovated my garage space in 2020, so that cost me about a year. I have been working pretty slowly, but I can see the light at the end of the tunnel (and hoping that it's not a train).

Photos first: Sorry for the strange lighting, the garage was dark so I put a couple of working lights up to give more detail. However it makes it look like it's at a badly lit show. I just took it off of the lift today, so this is the first day on her own feet.

Things that you may notice, so I will bring them up myself: Yes those are Black Bomber Emblems on the tank (replicas), which match my Bomber clutch cover. Since the proper ones are unobtanium, I figure that these will have to do.

QUESTIONS:

The luggage rack: I bought it from a guy on E-Bay, who said that it came off of a '68 CL450. I have no issues there because it does fit, and it doesn't attach to the taillight assembly, so I love it. I wonder. however, because the rack sits almost on top of the taillight if it is actually for a 350 or something smaller. I would appreciate any insights.

Lastly, I have questions about the back end: Both the rear brake and the center-stand. The kickstand hits the rear brake stay when it is in the up position. If I reach in to where the rubber cushion on the center-stand is supposed to hit the frame, I can feel that there is a very small gap where there should be none. I plan to ride this bike, so I really don't want the center-stand bouncing off of the stay every time I hit a bump. Can anyone please tell me what I might have done wrong?

I have the same issue with my rear brake pedal. In the up position it hits the footpeg, as per the photo. I can find no way to adjust this. Is that normal?

Thanks again for looking. I will take some better photos outside when I get a chance.

What colour did you finally paint your bike?
After about 100 paint chips, I found the Toyota Luminous Hypersonic Red (3Stage) was almost identical to the original Candy Red under my chrome side covers.
 
Last edited by a moderator:
The guy who painted it and I took a lot of time comparing paint chips to the underside of my tank, and I also used this article: https://www.motorcycleclassics.com/classic-japanese-motorcycles/1968-honda-cl450-zmsz15sozhur/ to try to figure out what the fading that we were seeing might correct to.

The base paint that he chose was a Kawasaki colour, but he augmented it and made me a chit for future use (with the formula on the back). I have that in my files somewhere and can dig it out if anyone wants that formula. I think it is pretty close, but I can only really compare it to my memory of a pristine specimen that I saw when I was 7 years old, so it could be way off. (I think that I made a fool of myself salivating over that bike)

Painter also tried to convince me to use large silver flakes instead of the fine ones because he thought it would look cool (and I agreed that it would), but I really want the original look as much as I possibly can get so it is original candy.

I now have to get a chit for the paint that you used and compare, because those side panels would have protected your paint better than anything on my bike!!
 
I SHOULD BE RIDING IT BY NOW!!!

I had always wondered what would lead a person to saw through a one piece pipe as beautiful as the '68 pipes, but I never dwelled on it.


20170420_194701.jpg
Unfortunately, this mystery has led to my having to pull the engine out again.

Last weekend I was putting the finishing touch on her... installing the pipes. This is one of the first 4000 CL450s that were built, and it should have a cylinder head that has 6mm exhaust pins (if it were original). It has 8mm ones, so I know that it has been replaced over the last 50 years and the exhaust ports seem to have gotten smaller over time (my original 1968 pipe end has the exact same diameter as the port... absolutely no room for play. What I believe occurred next was that the person who replaced the head cut up a 1968 muffler and welded on the pipe for whatever year that the head came from. How did I find this out?

Well, I didn't realize that the size of the pipe ends changed, so when I had to use a rubber hammer to get this new exhaust pipe to fit, I thought that.... well, I don't know what I was thinking really, I just did it. Then when it wouldn't go all the way in, I figured, just tighten up the bolts evenly, as if it was a cam shaft.

This was the best that I could make it look:

PXL_20230605_012214559.MP.jpg

And below is what the original joint looked like... note the pins show through the nuts much more than they do in the photo above.

20170225_101912.jpg

Tightening up my bolts, ever so slightly, like it were a cam, worked really well until one of the pins popped... tore the threads right out of the head. Worse yet, it was one of the inside pins, so in order to even helicoil it, I have to take it out of the bike, because otherwise the frame will get in the way. Upon removing the pipes, I found that the crush washers were perfectly crushed, so if I had not been so adamant that it go further on I could have been riding now.

So, the good/confounding news is that when I was cruising for bike parts on the internet a few years ago I found a head on E-bay that matched my year and serial number (the head changed three times in 1968) and I bought it for almost nothing. I figured that the first time that I had to open the engine up, I would swap it in. I have fitted the original head over the exhaust and the pipes go in easy. There is even a bit of play (as there should be).

My question is:

Would you helicoil the old head and get it running ( I have never helicoiled) OR Would you remove the head and transfer it's contents into the original one. (The original has helicoiled spark plug threads but the exhaust pins are perfect, the current one needs a helicoil in one pin but the plug threads are unspoiled (and of course, I would have to force the exhaust again!)

The last consideration is the exhaust joint with 6mm holes. I need a pair and they are unobtanium. I guess they were all drilled out when heads were replaced over the last 50+ years.

So my last question is:

I have found some 6mm Black Bomber joints at a supplier, but I will have to purchase one if I want to see if it will fit on the 6mm pin head and the original pipe (shop is a five hour drive from here so it would be a distance purchase). Has anyone used bomber exhaust joints as a substitute for 6mm CL450 ones in the past?
 

Attachments

  • 20170426_170157.jpg
    20170426_170157.jpg
    160.6 KB · Views: 24
Last edited:
...if I want to see if it will fit on the 6mm pin head and the original pipe...

First, if you have a problem with a picture, please don't double post to resolve it. I can fix pretty much anything, all you have to do is ask. Now you have 2 missing pictures in the second post for whatever reason. When you upload pictures to our server, sometimes they get corrupted or the link gets disconnected along the way and we don't know why it happens. This is why I set up and use an Imgur account, not hard to do and the pictures display better too.

I think what you mean is 6mm exhaust studs. Shame you didn't realize it beforehand, and I think they changed to the 8mm studs early in the first year of the CL. If it was mine I'd take the time to pull the engine and swap all your parts into a later head on it with 8mm studs so you can use the exhaust you already have. I know it's a PITA but it would be the right way to handle it. I wouldn't want the earlier 6mm studs, much less a couple of helicoiled plug holes.
 
...wouldn't want the earlier 6mm studs, much less a couple of helicoiled plug holes.

Not to get into a debate but I'm pro Helicoil threads. We use them on purpose on all of our flight equipment. It may sound like a repair but it doubles the thread contact area so if there's a problem, the bolt breaks but doesn't pull out the thread. In aluminum, that's critical and is required. We use lots of aluminum.

If it's decided to go the helicoil route, use "free running" and 1.5 x thread diameter for length. If M6, then 9 mm length, if M8, then 12mm length. Also consider wrap stock, how much boss thickness is available to accept a thread repair. I'm not familiar with the 6mm head version, is there enough stock for a repair?
 
It may sound like a repair but it doubles the thread contact area so if there's a problem, the bolt breaks but doesn't pull out the thread.

I never looked at helicoils that way before Jays... Thanks.

It is the 8mm pins that will need helicoiling, not the 6mm ones and I was concerned that there would not be room enough to drill a 12 mm hole. That is until I went an took a look at the thread I popped:

PXL_20230608_222516077[1].jpg
The one that held is helicoiled. Probably not a coincidence after what you said about surface area. I also noticed that this side did not crush the gasket at all (unlike the other side). It looks like someone else has done battle with this monster before!

So @Jays100, you are now my expert. The year specific head with the 6mm pins in good condition and the helicoiled plug openings are probably not helicoiled in the manner that you prescribed above. The helicoils only fill about two thirds of the opening, though you can see the threads in the uncoiled section (on the outside) Do you know if it is wise to try to remove and replace these coils so that the entire sparkplug thread is in contact with the block?

Photo below, though I'm not sure if you can see the coils clearly.
PXL_20230608_222319293.MP[1].jpg
 
Last edited:
two things.
1. The intact pin, or more commonly referred to as Stud, Exhaust in the micro fiche (we just say exhaust stud here) has a different thread repair called a "timesert". Also a great repair, Pratt & Whitney specifies them in their engines. They're more expensive and require specialized tools to install. That's the gold standard of repair with the proviso of enough wrap stock material to support a minimum wall thickness in the parent casting.

2. Your spark plug heli-coil question is "yes, heli-coils can be removed and replaced. (They can also be doubled - a heli-coil on a heli-coil FWIW) Recommended as the previous repair leaves unengaged threads. That said, it's likely strong enough to do the job at 1D thread engagement (if the thread is 12mm, 1 Diameter is 12mm) even though it should be more, stresses in a spark plug aren't exceptionally high. To remove is to just worry out a thread tail, from either end is okay, grab with a needle nosed pliers and just twist it out. In a perfect world you'd chase any debris from the casting thread before installing the new. At installation, the new heli-coil insert should be 1 to 1 1/2 threads below grade so there is no feathered or incomplete thread the heli-coil insert engages. Be sure to break off the installation tang and account for it - not a recommended lubricant inside of your engine.

hope this helps
 
So... Know your limits... I consulted professional mechanic who knows this engine well (father used to race them), then pulled it and took the engine only to his shop. He chose the head with the 6mm studs... did not ask why but it was probably because I was leaning that way and have found some joints with 6mm holes (for a bomber). I still have the one with 8mm studs as a "replacement for the replacement" if necessary. He agreed with @Jays100 that the coils as present in the spark plug orifice would work (Thanks Jays)

Because I knew that I was only getting about 120 PSI compression in each side, I decided to have him pull the engine completely apart, vapor blast and reassemble replacing any worn parts that he found (He found none (other than new rings of course)). After vapor blasting, he also repainted the engine to its original paint color (I never realised that it was painted until he mentioned it to me <shakes head in shame>). Engine is back in the bike and I am being more careful because I am learning a lot from reading about @danger4792's restoration. https://www.vintagehondatwins.com/forums/index.php?threads/1971-cl450-that-sat-for-40-years.9217/ .

***New Questions****

@ancientdad, You mentioned to Danger that the starter motor cable should run between the starter and the engine. Mine does not and did not when I bought it. Is there a trick to getting it through there without taking the starter motor off ? (Assume no, but have to ask)

Clutch and Throttle Cable routing:

PXL_20231008_154303050[1].jpg
PXL_20231008_154848861[1].jpg

That clip is built into the frame and if it is not for the clutch and Throttle cables, I do not know what it is for. I see the problem in that they are both being led right to the tank mount rubber by the clip,, which I believe is sub-optimal. Have I done this right?

Another-ill adviced decision that I would like advice on:

I purchased and OEM Exhaust Valve cover from David Silver Spares so that the head and the covers were the correct part (and because the intake breather tube cover was in very rough shape). This moved the breather tube to the exhaust side. I did this after the rebuild, pairing the Exhaust OEM cover with the original Intake cover which was still on the bike, in the exhaust position. I realized that the baffle plate on the intake side was not needed but since the OEM Exhaust breather cover has one attached, I just left the intake side baffle in place, Will this be a problem?

Thanks
 
Last edited:
@ancientdad, You mentioned to Danger that the starter motor cable should run between the starter and the engine. Mine does not and did not when I bought it. Is there a trick to getting it through there without taking the starter motor off ? (Assume no, but have to ask)
If you remove the rubber boot and straighten out the cable, then pull the bolts on the end of the starter where it bolts to the bottom end, it will lift out a tiny bit and you should be able to snake the cable behind the starter. If you can't, then in order to do it the front sprocket cover and left crankcase cover will have to come off so you can pull the starter motor off because the starter motor sprocket will come off the splined shaft of the starter motor when you pull the motor out of the crankcase to get the cable behind it. It's typically why you see POs run the cable around front, but to me it looks bad.

That clip is built into the frame and if it is not for the clutch and Throttle cables, I do not know what it is for. I see the problem in that they are both being led right to the tank mount rubber by the clip,, which I believe is sub-optimal. Have I done this right?
While it looks less correct with the tank off, when you slide the tank onto the front rubber mounts while installing it you can guide the cables above the "cups" on the tank and they will comply with the fit in the space between the tank and frame there, with the clip helping keep them in position.

I purchased and OEM Exhaust Valve cover from David Silver Spares so that the head and the covers were the correct part (and because the intake breather tube cover was in very rough shape). This moved the breather tube to the exhaust side. I did this after the rebuild, pairing the Exhaust OEM cover with the original Intake cover which was still on the bike, in the exhaust position. I realized that the baffle plate on the intake side was not needed but since the OEM Exhaust breather cover has one attached, I just left the intake side baffle in place, Will this be a problem?
You've combined a 4 speed head with a 5 speed bottom end, something I've only done in reverse previously, so I have no opinion of the breather tube coming from the exhaust valve cover and since Honda changed it significantly on the 5 speed I'd suggest they felt it worked better that way (breather tube on the intake cover). With no breather tube on the intake cover there's no need for the baffle plate, but it also won't cause any problem except for bolt lengths. I do see a fair amount of sealer oozing out of the seam on the intake valve cover, hopefully it isn't very excessive on the inside.
 
Thanks Ancientdad,

The head and cover plate are the correct ones for my engine number according the CL450 Parts Manual from 1968, but I agree that there was probably a reason for switching to 8mm studs and intake breather. I just wanted this bike to be as original as possible, and I may come to regret that! I probably should have been thinking this way when I incorrectly left the baffle in.

The Sealer is Permatex Aviation Sealer, which is what the mechanic used and I then purchased. I'm still trying to get the hang of getting it on thin enough as his seams are better than mine. I read that it never truly solidifies, just bungs up the imperfections between the gasket and the part. If this is not true, then I will have to get out the alcohol again to remove it for more practice when I go in to pull the baffle! ;-)

I also think that the starter cable over the front looks bad, so much so that I ran it up between the engine braces to hide it somewhat. Will definitely try to move it behind.

Photos to follow
 
You all may have noticed, in the photo of the engine, that it is missing rubber pieces on the plug caps (both sides). I can confirm that both the top and bottom rubbers are missing on each cap. Is there a source for getting these rubbers without replacing the Caps?
 
You all may have noticed, in the photo of the engine, that it is missing rubber pieces on the plug caps (both sides). I can confirm that both the top and bottom rubbers are missing on each cap. Is there a source for getting these rubbers without replacing the Caps?
I don't think so, and getting non-resistor 120° caps that fit the 450 correctly is next to impossible now. You can find the 90° caps like the 350 engine uses in non-resistor version but the plug wire comes off the cap and has to turn up against the webbing in the 450 head before it clears the top. I mention non-resistor caps because most won't be able to find B8ES plugs anymore since NGK stopped supplying them and replaced them with BR8ES, a resistor version. Not good to have both resistor plugs and caps at the same time.
 
Best E-Bay find ever:

Have more non-resistor plugs than I'll need over the next 20 years, but still would likely not want resistor caps if they could be problematic for the next owner. Since the caps that I have seem fine (just loose and not waterproof) would it be advisable to purchase a 90 degree cap and just cannibalize the rubbers from them? I'm not sure if the tube sizes vary...

PXL_20231011_001332197[1].jpg
 
Good find, didn't think there were any left at this point. Yes, you could swap the rubber covers from one to another, they should be the same size.
 
I've had some time to get the bike back to where it was before I pulled the engine. Firstly, thanks @ancientdad for the advice on getting the starter cable placed properly. That looks so much better, but was not easy to do because the cable was between the front braces and there is not a lot of room to maneuver it in there.

PXL_20231015_180554244[1].jpg

I encountered another problem at the other end of this same cable in that it was getting in the way of air filter. I tried to stuff it behind the battery box, but the bends needed to make that happen seemed a bit much. Eventually I tightened all of the slack in the run of cable and was able to make it loose enough at this end to allow the filter behind. I'm not sure if this is right:

PXL_20231015_182812172[1].jpg

I used modern Honda fuel lines which are really hard to get on and off. Hopefully that tank doesn't need to come off any time soon. And this brings me to another question. The clips that are supposed to hold the fuel lines to the petcock and carbs will not fit on this thicker line. I have left it because I cannot imagine it leaking based on the seal it has, but I also don't want to have fuel leaking all over me or the bike. I have to use all of the strength in my fingers to get these off... Is that enough seal (in your opinion)?


PXL_20231015_205714559[1].jpg

I used the "spare head" that I purchased, and dismantled for parts, to make sure that both of the exhaust pipes hit metal at the same time. I don't want any repeats of that last installation fiasco, especially with 6 mm exhaust studs.
PXL_20231015_213338738[1].jpg

I need to get new exhaust gaskets before I put these on, so that is for next weekend. The bike is back to looking like a bit of a glamour girl!

PXL_20231015_205214033[1].jpg
 
Eventually I tightened all of the slack in the run of cable and was able to make it loose enough at this end to allow the filter behind. I'm not sure if this is right:
It looks okay, but be sure the post (terminal) on the solenoid doesn't make metal contact on the nearby air filter frame, or during cranking
you'll have a short and sparks from the area. Hard to be sure from the picture if there's plenty of clearance.
I used modern Honda fuel lines which are really hard to get on and off. Hopefully that tank doesn't need to come off any time soon. And this brings me to another question. The clips that are supposed to hold the fuel lines to the petcock and carbs will not fit on this thicker line.
Where did you buy the fuel line? 4into1 sells OEM Honda 5.5mm line that fits snugly and is the right OD that the Honda clips will fit, but honestly they're more window dressing as the lines can go without clamps and those aren't doing much clamping. I put them on my 450 for the visual, nothing more, and I'm using the fuel line from 4into1.

I used the "spare head" that I purchased, and dismantled for parts, to make sure that both of the exhaust pipes hit metal at the same time. I don't want any repeats of that last installation fiasco, especially with 6 mm exhaust studs.
Good that you test-fitted them. Be careful tightening those 6mm studs, they're much easier to break off.

I need to get new exhaust gaskets before I put these on, so that is for next weekend. The bike is back to looking like a bit of a glamour girl!
The bike does look great, but then I'm really partial to early red CL450s anyway. It's a beauty.
 
1697469736696.png

This is what I put on and you're right, they are snug. I ordered the clamps directly from Honda, so that could succession be the problem with those fitting.
 
Last edited:
Interesting, because I also bought the little wire clamps form 4into1 shown as OEM Honda fuel line clamps.
 
Finally together (minus Battery). The exhaust went on last night, with only one issue (and that issue may be me).

PXL_20231017_211216469[1].jpg

The fit up front was perfect IMHO, and it looks good on the bike...

PXL_20231017_211343291[1].jpg

The problem lies with the mounting bracket underneath:

PXL_20231017_211323031[1].jpg

This is a shot of the highest that I can get the muffler, and it is not enough to get the hole in the center so that the bolt fits. What I did was hung the bracket (because the mounting bolts for that are on the back side). I then hung the muffler loosely on the shock bolt and placed the bolt so that it wouldn't come off. Next, I got the front end in place. The bracket was supposed to be next, but the chrome mounting piece that it hangs off of the shock from will not allow me to lift it. If I take that piece out, then I can get it in, but the missing bracket is noticeable .

I tried loosening the bolts on the back of the muffler, where it connects, but there is no play there, even with loose bolts. I may take it off for now because it is very tight and I think it may not be needed on-road.

any advice?

Oh yeah, the bottom bracket was attached to this muffler when I bought it, so I assume that it was on the previous 1968 CL450 and should fit. I had bought another bracket before I found this muffler because my original muffler was missing this piece, but I have since given that away :-(
 
Did you tighten the front of the pipes (nuts on the exhaust studs) and the clamps on the removable header pipe at the muffler before trying to put the rear hanger bolts in? Sometimes it takes all of the fasteners being loose so you can jostle them around to get all of the bolts in place. If you do that and still can't get them lined up, I'd go with slotting the holes on both rear hanger brackets to get them in. That's a heavy arrangement and you'll want both hangers in place correctly with the vibes the engine has.

BTW, everything looks really good.

Thanks Ancientdad. If I back the motor end of the pipes off, will I have to replace the gaskets (again)?
 
SUCCESS!!!!

I loosened the 6mm bolts up front till I could move them with my fingers, I then loosened the clamp for the header pipe, then the bolts behind the muffler (for the lower bracket, then the shock bolt--- all finger loose. It was still hard to get the bolt started, but once it did I tightened in this order: Front end (and used a rubber mallet on the header pipe to make sure that it moved and sat properly if that was needed (sorry girl), back of muffler bolts, big bottom bolt, shock bolt. then header clamp The unit is very solidly on there.

Now waiting to hear @ancientdad tell me that I should replace the crush gaskets so that I can do it all over :). (Please do tell me if you think that I should do that, as I want to try to fire her up this weekend and would rather it be done before (if you think it would be necessary).) I think that the header did move slightly at the clamp end, but that could have just been the vibration from the hammer...

PXL_20231018_003333926[1].jpg
 
Since I spend most of every day on VHT, at around 8 pm EDT I log off to watch TV with my wife so between 8 and 11 I'm not here.

No, you're fine with the exhaust gaskets, they can usually be re-used many times and they never got hot when clamped the first time. Glad it helped to loosen everything up, I suspected it would. Good job.
Thank you for being here and all of the assistance that you provide to the rest of us!

I'm waiting for a sunny day to try to get it started, take some good photos, which I will post here, and take the first ride. Hopefully I'm not waiting until spring.
 
I enjoy what we do here so it doesn't feel like a job or work at all. But I gotta spend some time with my wife to keep the happy life. ;)
Hopefully I'm not waiting until spring.
Amen to that. It's finally getting a little chilly here in west central Florida, it was 42° F here this morning. Hopefully you get a few more "Indian summer" days before the full winter hits so you can at least take it for a last ride before winter slumber.
 
Fun times.....

I put the battery in tonight to test the electrics. Bad news for me.

I turned the key on and tried the lights... headlight and signals.... nothing worked except that the orange turn signal pilot lamp when I turned the headlight on (but no headlight). After about 30 seconds, a slight humming/creaking noise started which I put down to the horn. It turns out that it was the starter motor, as on subsequent attempts it has become stronger and now a turn of the key instantaneously gets the starter into full gear (without pushing the button).

Its also worth noting that I do not have the spark plug connectors attached (the cables are hanging loose with no connectors) because I am waiting for new ones. I doubt that this is the issue, but obviously electrics are not my specialty. I'm suspect that this is a grounding issue and that it will be common enough that it is easily identifiable by those more skilled than I. Any advice on how to address this would be very welcome. :rolleyes:
 
Last edited:
Back
Top Bottom