A Bomber barn find

wentwest

Veteran Member
Joined
Feb 15, 2021
Total Posts
1,332
Total likes
891
Location
Oakland, CA, USA
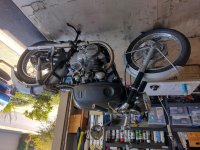
I'm late starting this thread, because I stumbled on a 67 CB450 in CL last year at the end of September, when the COVID stuff was still sort of new and no one knew what was happening. I knew that I needed a project and that, after years of picking up neglected bikes that needed some attention, fixing them up and then selling them it was time to take on a real project. Long story short, I bought this Bomber pretty much complete, not running, filthy from years in a dry, hot barn in inland California. No rust, but a world of spiders, grease and dirt.

IMG_20201004_200449594.jpg IMG_20201001_110509094.jpg

It has a K4 engine but a true Bomber frame. It came with boxes of spares, 8 extra carbs, 2 Mikuni slide carbs, and 2 partial Bomber engines. Neither partial engine had a head or a cam chain, but one was pretty complete otherwise and has a 3 mm overbore and oversize pistons, but only 1 set of rings. That engine has a starter, clutch, stator and alternator, etc. The photo is the bike before and after a lot of cleaning. With some work I got it to crank and eventually it started and ran well on the right cylinder but very poorly on the left, chuffing back through the carb. The compression is equal at about 175, the valves were not too far out of adjustment. I put in new plugs and swapped out the left coil for another one I had. No change. I swapped out the carb for another one that I rebuilt - no change. I changed the condensers, I cleaned and reset the points many times, I rebuilt the advancer mechanism. No change. At that point I decided to stop and take the engine out of the frame so I could examine it fully and so I could strip all the flat black paint on the frame and fenders and generally get it together.
 
After the dismantling began I took less photos, but here are a couple with the engine out. I had taken the forks off, repainted the fender, completely disassembled the forks and replaced the seals and drained out the fluid that was black and lumpy in one and gone in the other. Then I put everything together again after painting. The front brakes are old linings but everything has been cleaned and lubed and adjusted. At this point the rear wheel came off and then I stripped and repainted the back half of the frame, took the rear fork off and serviced the bushings, serviced the rear brakes, painted the rear fender and the taillight, etc.

IMG_20210515_140413625.jpg IMG_20210515_140430717.jpg

These photos were taken in May 2021. I'm retired, I'm working slowly on this thing because there's no rush and I want to take the time to do things right. Nothing like a pandemic lockdown to really stretch out time.
 
Next step was to dig into the engine a bit. I took off the valve covers again and this time I checked the cam chain timing. At first I just could not get it to synch; it was off some. Took out the tensioner and It was shot with the teeth worn down on the big sprocket. I had another, better one so I used that one and finally, after reading a bunch of info on VHT, I think I got it right. During that research I learned that it was possible that the torsion bar for the left side intake valve was fatigued from having sat for years with the valve open (who knows how long - the last owner had died and I was dealing with his family). I got a new torsion bar and put it in. No photos of that.

I rebuilt the starter motor and replaced the starter clutch springs, etc. The alternator seems OK. I cleaned up the neutral indicator switch. On the right side I took off the crankcase cover and cleaned the oil spinner. The clutch seems functional from what I can tell, the plates are thick enough and everything was clean in there. No stripped screws and someone had replaced all the Honda screws with socket heads.

IMG_20210624_150324551.jpg

What's been interesting is that almost everything I've taken apart was loose enough to unscrew with a simple ratchet, and the bolts that held the rear fork on were even looser than that. I hardly had to use the impact. Clearly someone had done a lot of work on the bike and it wasn't bad work. Ugly paint aside.

So the other day the engine went back in, and I've been messing with the wiring.

IMG_20210821_091832235.jpg
 
I’m not familiar with the 450 but if it’s anything like the 350, if you take the valve/breather cover off you may have compromised the head gasket.


Sent from my iPhone using Tapatalk
 
On the 450 there are two valve covers, one each for intake and exhaust. They are on the top of the head, far from the head gasket and each has its own 8 bolts. I can't see how I could have disturbed the head gasket.
 
Hey Bob, Great find. Look forward to following all your progress. Thanks for sharing and keep the photos coming.
 
That's a cool find and I'm looking forward to seeing subsequent progress. It's a shame that the bomber motors were not complete. Did you get an OEM handlebar with the collection of parts? It looks like the previous owner had a clubman bar on it??

You're probably aware, but valve adjustment on the 450 is a little tricky because the clearance can be achieved in two different positions, but only one is correct. This is discussed in the FSM. Thought I would throw that out there before this motor is fired up.
 
AD edit - Moved here from another thread


wentwest said:

I've been putting the wiring back together and discovered that there are lots of different wiring diagrams for the Bomber. Mine doesn't seem to have turn signals or a kill switch ever, and because the engine is a K4 (maybe) I have 2 coils and the Bomber only had 1. So it's a slow process.
 
Last edited:
wentwest said:

I've been putting the wiring back together and discovered that there are lots of different wiring diagrams for the Bomber. Mine doesn't seem to have turn signals or a kill switch ever, and because the engine is a K4 (maybe) I have 2 coils and the Bomber only had 1. So it's a slow process.

Bob, Are you telling us your bomber originally had a 360 degree (TypeII) engine, or just that one of the coils is missing?
Your K4 is a Type I engine (180 degree)......
 
I wasn't clear. The Bomber came to me with two coils. The wiring diagram I settled on that was the closest to my bike generally shows only one coil. Maybe it was for the police model? There's no info other than the CB450K0. Other diagrams have 2 coils and so do I, so for that reason I decided to kind of blend them in my head. The serial number on the engine definitely indicates a K4.

The other electrical thing that has me stumped is there is no sign of any sort of effort to ground the bars or the headlight bucket to the frame. Was there any? The bars are isolated by the rubber vibration dampers and the headlight bucket is pretty isolated by the way it's attached only to the mounting ears, which wrap around the forks. I'm thinking of running wire connections directly to the frame. Several of the electrical components seem to need better grounds.

On the wiring diagram that showed only 1 coil, it wasn't restricted to just the Police model. Unfortunately, back then there was a lot lost in translation and often you have to read between the lines, which is why those of us who were involved in the industry like to pass along some of the things we know that weren't necessarily widely published. The early 450 engine came in 2 versions as did many of the twins back then, a 360° crankshaft model that was sold in Japan as well as the 180° crankshaft version sold in many other places. The 360° version has both pistons traveling together and only uses 1 coil, which is the wiring diagram version you saw. Virtually all (if not all) the models sent to the US are 180° versions and those require 2 coils.

As to the grounds for the gauge lights, etc., before they began using a short ground connection wire between the bottom of one handlebar mount and the top bridge on the later 350s, the bikes prior used the control cables and steering head bearings to transfer ground to the bars and headlight area. You'd be wise to run a separate ground, if only to the green ground wiring found in the headlight case.
 
That's a cool find and I'm looking forward to seeing subsequent progress. It's a shame that the bomber motors were not complete. Did you get an OEM handlebar with the collection of parts? It looks like the previous owner had a clubman bar on it??

You're probably aware, but valve adjustment on the 450 is a little tricky because the clearance can be achieved in two different positions, but only one is correct. This is discussed in the FSM. Thought I would throw that out there before this motor is fired up.

I bought a new bar from 4into1 that seems to be close to photos I have of other, beautifully restored Bombers. Here's a photo that sort of shows them.

IMG_20210619_171737404.jpg

As far as the valve timing, I read the FSM and several threads here and tried my best not to screw it up. I can turn the crankshaft easily enough with a wrench that I know there's no interference between the valves and the pistons - and I did it wrong enough that I know how that feels. The magic was really paying attention to getting all the slack in the timing chain in the run from the crankshaft to the intake cam. Once I got that figured out things worked a lot better.
 
As far as the valve timing, I read the FSM and several threads here and tried my best not to screw it up. I can turn the crankshaft easily enough with a wrench that I know there's no interference between the valves and the pistons - and I did it wrong enough that I know how that feels. The magic was really paying attention to getting all the slack in the timing chain in the run from the crankshaft to the intake cam. Once I got that figured out things worked a lot better.

Just to be on the safe side, the marks on the valve adjusters should point away from the spark plug, as shown below.
PXL_20210823_230249484~2.jpg

The new handlebar looks great.
 
I'm not there yet. I've been tediously putting the electric system back together. Mechanical systems are obvious to my brain, but electric systems are very challenging. If I can't see it moving I have trouble following it. So I am putting in the time to carefully trace each circuit and trying to understand it as I go. When I know how something is supposed to work I can diagnose and maintain it easily.
 
Electrical is the boogey man for lots of people. Think of each wire as a garden hose, water flowing is the electricity. Switches are just on/off valves directing the water where to go. The hose can't have any leaks or blockages.
Also all circuits are a loop, power in and out of each device starting at the battery positive and ending at the battery negative.
 
That's the idea in my mind, but the problem is that any wiring diagram I have seems to be wrong on the colors, and there are places on this thing where there appears to be no ground. I know there is, but the wiring diagram shows a wire from things to ground and there isn't one, it's based on metal to metal contact and some of that seems awfully thready. The lights in the gauges are all powered by a dark green wire and that's the only wire around, but the cluster is isolated from the shell by a foam gasket, so how does that work? I finally gave up understanding and made a ground wire from the bracket stud on the back of the cluster to the frame.

The same thing is true for the horn and starter buttons that seem to rely on the idea that the bars themselves are grounded, but they really aren't. The mounts are cushioned by rubber insulators, so that's not a ground, and the only other thing is the bearing in the neck and the cables for the brakes and clutch and carbs. Seems like a poor set-up, so I grounded them too at Tom's suggestion. That kind of stuff is hard for me to solve.
 
I plunged back into the electrical system today and finally got the headlight to work, along with the horn and the brake light and the taillight. And there's power to the coils. So now I have to replace the points and the condensers and reset the timing. But first the ignition switch.

IMG_20210831_160129265.jpg

IMG_20210831_160140154.jpg

The bike came with a wiring harness that appears to be a K0, and it has a 6 wire connector. The only switches I have are 4 connector types, so I have to get to work making things function. And remember, some of the wiring is not the same as the diagrams I have, and some uses different color wires.
 
Hope this helps.......

450K0 wiring.png

As for the 6 wires that went to the original switch, directly connect the Yellow and Pink wires and tape them off......
Red to Red, Black to Black, White, and Green......This will turn on the bike's running lights whenever the key is on unless you connect a switch between the Black wire and (both) the Green and White wires to turn them off.....

Will need to know what switches you are actually using to "match" the "old" and "modern" color coding for you....Pics would help....
 
Last edited:
Will need to know what switches you are actually using to "match" the "old" and "modern" color coding for you....Pics would help....

Thanks a lot for the schematic. It looks very much like my bike, with the exception of my wire color issues, but those are probably because of mismatched parts or years of repairs. So far it's the best schematic I've seen.

The switch for the headlights seems to be correct, but perhaps it's not, or it's been rewired in the 50 years that the bike wasn't in my garage. There are four wires that go between the switch and the headlight housing. One of the four is for the horn button. In the switch housing the headlight contacts are lined up on a crescent shaped board, with the power going to the middle contact. On my switch that contact has a blue wire. The soldered connection there seems to be a factory job. On your chart the wiring shows that as a green wire. On my switch because the center contact is fed by the blue wire I had to connect the blue wire to the green in the headlight housing.That's the kind of thing that has had me spinning. I had to take the switch apart and see how it worked to realize what I had to do. When I finally identified the wires things worked.

Your chart shows the horn wire as light green. Mine is black. Works fine now.

Here's the switch. After spending an hour yesterday taking it apart, cleaning everything inside, diagramming the wiring, putting it together and and then hooking it up I don't want to take it apart to show the wiring.

headlight switch.jpgheadlight switch 2.jpg
 
I know little about the Bomber, but I do know that the wires are supposed to be run inside the handlebars so it's highly possible someone repaired it along the way. As for the horn, there should be black and light green involved and if the Bomber colors hold true to Honda's typical colors, the horn button wire color should be light green with black (switched power) present at the horn itself, horn blows when the light green is grounded at the handlebar by the switch.
 
I just copied the US model wiring diagram from the K0 owner's manual in our library and it looks to be the same as Steve posted for you above. The copy I made might be easier for you to use as it's a little darker and when opened in the library link it makes a full screen sized picture.
 
Thanks to you both. Now I'm sure the wiring to the headlight dimmer is not original. Whether the switch is I don't know. Certainly the bars are not as I never saw any original bars on this bike. At this point I'm going to have to continue reconstructing the electrical system using the diagrams I now have and a heavy load of patience. Somehow I feel like I'm making progress. My goal is to create a runner, not a restoration. It won't be all original, but it won't be heavily modified either.
 
At this point I'm going to have to continue reconstructing the electrical system using the diagrams I now have and a heavy load of patience. Somehow I feel like I'm making progress.
You have made progress, you have a working horn and lights! Carry on… patience will definitely help.


Tom - 1982 CM450E / Midwest USA
 
Just a follow up.

I did as 66Sprint suggested to connect my 4 wire ignition switch to the 6 wire switch on the K0, and it works. Finally a key switch that works. Someday soon I'll get the engine running.

It certainly pays to ask questions on VHT.
 
Interesting find. Looks like you have enough parts and skill to make a decent bike out of it. Just curious what the frame number is and the two parts k0 engine numbers are. Can tell a lot from them.
 
Interesting find. Looks like you have enough parts and skill to make a decent bike out of it. Just curious what the frame number is and the two parts k0 engine numbers are. Can tell a lot from them.

The frame is CB450-1025210
The engine is CB450E-4127991

Blocks: 1022162 and 1010430

My next few steps are more ordinary. I have to get the chain on, put the clutch release cover on, fault check the wiring at the coils, new points and condensers. Then I'll probably fill the crankcase, crank it over a few times with a wrench to set the points and then crank it with the electric starter to be sure that works right. There are no carbs on it yet, but have a surplus of them. It has new, non-resistor spark plugs. Assuming the whole thing doesn't self destruct, who knows, it might run. Wouldn't that be nice!
 
OK, update time. We've been out of town a while and today I dug back in to see what's what. The carbs are on, pretty much everything is together that is needed to run, oil in the sump, battery charged and at 12.85 volts. Still no air filters. In my collection of carbs I have chromed float bowls and carb bodies with chrome throttle levers and choke levers, (Keihin 14's) so I used them. After checking, rechecking, cranking with the starter with no fuel at all at bit, I squirted start fluid in both carbs and hit the button. Ignition! Both sides ran for a few seconds, there was lots of exhaust noise, and then it stopped, of course. Both pipes seemed warm. I did that a couple of times, then turned on the petcock. And waited a while for the fuel to fill the bowls. Then I tried again. Only the left side started. It started right up, but only the left side was running and that's the side that hardly ran before I replaced the intake torsion bar. This time the right did nothing but the left kept running, but slowly and quietly. I didn't rev it. It didn't stall but it was just putt, putt, putting along.

Turned it off, opened the gas cap and blew hard into the tank to convince the fuel to go through the loop from the petcock (all cleaned, new inner bits) and fill the bowl. The fuel lines are new. When I started it again both sides ran but the right took over, much louder and the idle was faster. The left side really only popped occasionally and the pipe stayed cool. If I left the choke on the right ran poorly and the left kicked up some, but nothing like it should. I tried enrichening the mix on the left but it had no effect. With the choke open the right would take the engine up to 2000 and the left exhaust would pop some.

So I'm scratching my head. The plugs are new non-resistor, the points are new, the condensers are new, the coils check out fine.

The compression has been around 170, both the same.

What next? And, no, I'm not in Australia, but I can't get the image right side up, and I'm tired

wentwest.jpg
 

Attachments

  • IMG_20210926_140702189_HDR.jpg
    IMG_20210926_140702189_HDR.jpg
    203.8 KB · Views: 22
Last edited by a moderator:
Picture orientation begins with your phone (if that's what you're using, like most of us now). How you hold your phone at the moment the picture is taken results in whether the forum software sees it as right-side up or upside down. If you haven't seen this link below yet, it explains more. I saved one of the pictures above, rotated it 180° and re-uploaded it for you. Windows 10 doesn't help as it apparently (in the ongoing "dumbing down of America" efforts) auto-corrects these things so you don't realize the orientation of the picture until the older forum software sees it.

https://www.vintagehondatwins.com/forums/showthread.php?507-Pics-post-upside-down
 
Big day today! After taking the petcock apart one more time, cleaning it out thoroughly, back on, the went through the left carb again, back on, started it and fiddled with the idle screws to get the 2 sides in step with each other, things ran better. I put more fuel in the tank so I could run it with the petcock "on" instead of "res", things ran better. So, one more check of the tires (OK) and the brakes (OK for now) it was time to suit up with all the gear and try to run it up and down my street. It's a private street so no registration needed. Put the seat on, mounted up, clutch in, into first, ease off the clutch and IT MOVED! So I stopped it with the brakes, readjusted them again, back on and motored slowly along in first and the speedo worked. Turned around at the end of the street and started in first, ran it up a bit, into second (torquey little thing) and even third. It was smoking nicely as decades of oil and stuff got hot for the first time. 3 laps of the block and it still was running and even idled well. I'm stoked.
 
Thanks. You're right, it made my weekend. I'm still cackling about it. I really love the stink when all the old filth that didn't get washed off starts to smoke. It means that life has come back to the machine after who knows how long. Being a part of getting these old Hondas going again after years of neglect is very satisfying.
 
I really love the stink when all the old filth that didn't get washed off starts to smoke. It means that life has come back to the machine after who knows how long. Being a part of getting these old Hondas going again after years of neglect is very satisfying.

My sentiments as well. Congratulations Bob, nice work! (y)
 
Thanks. You're right, it made my weekend. I'm still cackling about it. I really love the stink when all the old filth that didn't get washed off starts to smoke. It means that life has come back to the machine after who knows how long. Being a part of getting these old Hondas going again after years of neglect is very satisfying.

Yes it is Bob, and glad yours is now one of them, alive once again. Great to hear.
 
So it runs, but not right. The left side starts pretty well and idles sort of OK, with some visible exhaust and not much pressure coming out of the exhaust. The pipe and muffler are clear. The valves are set. The electric is ok (it's not charging but I keep the battery up with a trickle charge). Here's a video with the left side running and the right side has the spark plug cable disconnected. It has some white smoke in the exhaust and it's not a really humid day. The exhaust smells.

[video]https://photos.google.com/u/2/photo/AF1QipOgyCZ581I5BC4zXywo9sfXRd8AB1qEOMewmRGQ[/video]

The second video is of it running on both cylinders. What you can't see is that the pressure coming out of the pipes is much lower on the left than the right. I want to remind you that the compression has been checked several times and seems equal at +- 175.

[video]https://photos.google.com/u/2/photo/AF1QipNWXxchdj_REEBe28M4goPtlprny5xUzNdFXuaY[/video]

I'm convinced the ignition system is OK, I've checked the timing and it seems good, as do the point gaps, the spark advance seems to work fine because the right side runs well, I replaced the cam follower on the left exhaust and the old one was very worn. The carbs are clean but maybe not adjusted right or balanced right. The left spark plug gets quite black, fast. Here's a photo.

left spark plug after a few minutes.jpg

I'm thinking it's somehow a valve problem, but what? I need ideas.
 
The mufflers are clear.

There are no vacuum ports on the 450, so the mercury gauge thing I've owned for years won't help. Would this thing on Amazon work? https://www.amazon.com/UNI-CARB-SYN...id=1365114074&sr=8-11&keywords=carb+sync+tool

Or, could I sync them by taking out the spark plug on the right side, starting the engine and setting the idle on the left to, say 1000 rpm, then put the right plug in and take out the left and set the idle to 1000 running on just the right?

I can't get much listening to them because my hearing is poor and the hearing aids make everything sound the same - loud.
 
When start wrenching on an engine with a unknown history it is wise to start at the beginning, and that is to check the pump-function of the engine, so start with a compression test and a leak-down test and go from there. If the bike has compression and leakage is low proceed from there. This way you never have to look back. Personally I always strip the engine completely after the compression test, and start with cleaning the oil galleries which contain a lot of debris that will eventually destroy the engine. The information gathered with the compression test is useful to decide to replace pistons / valves / valve-jobs etc.
 
I'm still picking at the engine, but it's cold in my garage. However, I do have a question about the starter clutch. It slips. I replaced the rollers and springs, etc., with new Honda parts (from 4into1) and it still slips. The surface of the starting sprocket that the rollers run on is sort of rough and I'm thinking I should have a machine shop recut it so it's smooth. I don't have another one. Am I wrong? Should I just search for a replacement?
 
I'm still picking at the engine, but it's cold in my garage. However, I do have a question about the starter clutch. It slips. I replaced the rollers and springs, etc., with new Honda parts (from 4into1) and it still slips. The surface of the starting sprocket that the rollers run on is sort of rough and I'm thinking I should have a machine shop recut it so it's smooth. I don't have another one. Am I wrong? Should I just search for a replacement?
You can try polishing the surface with emery paper wrapped around it and gripped tight first. That may be all it takes but yes a machine shop could take a very light cut off for a smooth surface.
 
The OD of the sprocket's interface "shoulder" is somewhat critical, so machining the area down even slightly may be counterproductive....
"Shoe-shining" with emery is about as far as I would risk "machining" it...
The 450's and 500T are the engines I've had to replace the starter clutch sprockets on, so I'd suggest replace with new if possible/available.....
 
The mufflers are clear.

There are no vacuum ports on the 450, so the mercury gauge thing I've owned for years won't help. Would this thing on Amazon work? https://www.amazon.com/UNI-CARB-SYN...id=1365114074&sr=8-11&keywords=carb+sync+tool

Or, could I sync them by taking out the spark plug on the right side, starting the engine and setting the idle on the left to, say 1000 rpm, then put the right plug in and take out the left and set the idle to 1000 running on just the right?

I can't get much listening to them because my hearing is poor and the hearing aids make everything sound the same - loud.

Here's A trick I picked up way back when. It may be just be the ticket with your hearing. Take an old matchbook, the small ones with the flap(don't even know if these still exist), open it up and hold the flap against the outlet of the exhaust. Makes a very distinct sound that makes it easier to sync the carbs. Oh, maybe remove the matches.
 
I'm still picking at the engine, but it's cold in my garage. However, I do have a question about the starter clutch. It slips. I replaced the rollers and springs, etc., with new Honda parts (from 4into1) and it still slips. The surface of the starting sprocket that the rollers run on is sort of rough and I'm thinking I should have a machine shop recut it so it's smooth. I don't have another one.

If you end up needing a replacement, I may have one and, if so, you'd be welcome to it. I'm away from home at the moment and won't be able to check during the next two weeks.
 
If you end up needing a replacement, I may have one and, if so, you'd be welcome to it. I'm away from home at the moment and won't be able to check during the next two weeks.

It's good that you have one, I'm pretty sure I already passed on the one spare I had between the 2 spare engines
 
First I'll try the emery cloth suggestion. It's interesting that this engine is a K4 and I have 2 bottom ends from K0's that have starter sprockets that are slightly different and don't sit fully on the tapered shaft. If I still need a replacement I'll post here.

And it's such a pleasure to know there are people out there who are ready and willing to answer my questions. Thanks to everyone.
 
Back
Top Bottom